


Visualize Data in Your Flask App Using ChartJS
You can tell very powerful stories using data. Should you want to 'see' or understand deeply the data generated in your application, there are a handful of libraries that can help. One of them is ChartJS, the focus of this article. ChartJs is a free JavaScript library for creating charts in the browser (HTML-based charts). It is very easy to use, though a basic understanding of JavaScript is required.
What We Will Do
We will build a simple flask application for a class teacher to record the mean scores of all the subjects in a class throughout a 3-term year. Example data we will need may include the following:
- Subjects: Maths, English, Science, History, and Computer Science
- Mean Scores: 70, 80, 90, 100, 95
- Terms: 1, 2, 3
We will assume that the teacher has already calculated the mean scores of each subject, so we don't need to stress about them.
The completed application can be found in this GitHub repository.
Table of Contents
- Create a simple flask app
- Add web forms to the app
- Add data to the app
- Enable user login
- Improve user experience
- Display the mean scores of each subject per term
- ChartJs Overview
- Mean Score Chart
Create a simple flask app
I have already created a simple flask app for you. You can refer to it in this Github repository. If you are new to flask and would like to start with the basics, check out the starting-a-flask-server tutorial.
Add web forms to the app
Flask provides the wtf library for creating web forms. This library helps create forms that are used to collect data from a user, in our case, it will be the classroom teacher. To create a form, we will need to:
- Create a forms module to define all the forms we will need (login, register, and mean score)
- Create templates for each form (login.html, register.html)
- Create a views module to render our forms
In the terminal, install flask-wtf in your virtual environment:
(venv)$ pip3 install flask-wtf
Forms module
This module (forms.py) will contain all the forms we will need. We will use classes to define all the fields we want in the forms.
forms.py: Define login and register forms
from flask_wtf import FlaskForm
from wtforms import StringField, SubmitField, TextAreaField, PasswordField, BooleanField
from wtforms.validators import DataRequired, Length, Email, Regexp, EqualTo


class LoginForm(FlaskForm):
    email = StringField('Email', validators=[DataRequired(), Length(1, 64), Email()])
    password = PasswordField('Password', validators=[DataRequired()])
    remember_me = BooleanField('Keep me logged in')
    submit = SubmitField('Log In')


class RegistrationForm(FlaskForm):
    email = StringField('Email', validators=[DataRequired(), Length(1, 64), Email()])
    username = StringField('Username', validators=[
        DataRequired(), Length(1, 64),
        Regexp('^[A-Za-z][A-Za-z0-9_.]*$', 0,
               'Usernames must have only letters, numbers, dots or '
               'underscores')])
    password = PasswordField('Password', validators=[
        DataRequired(), EqualTo('password2', message='Passwords must match.')])
    password2 = PasswordField('Confirm password', validators=[DataRequired()])
    submit = SubmitField('Register')
Here, we want to capture a teacher's email, username, and password to protect their account. A few arguments are used to validate a teacher's credentials. For example:
DataRequredensures that the field is not empty.Lengthensures that the field is at least 1 character long and at most 64 characters long.Emailensures that the field has a valid email address.Regexpensures that the field only contains letters, numbers, dots, or underscores.EqualToensures that the password fields match.
Email() requires that we install email-validator, so remember to do so in the terminal (pip3 install email-validator).
For the web forms to work, we will need to configure our application such that we provide a SECRET_KEY to help protect our forms from CSRF attacks.
config.py: Configure the SECRET_KEY
import os


class Config:
    SECRET_KEY = os.environ.get('SECRET_KEY') or 'hard to guess string'
This variable will be sourced from the environment. In the event the variable does not exist in the environment, we will use a hard-coded string. This is a safe fall-back to ensure that our application does not crash.
Add data to the app
Just like web forms, we will also use classes to create a database model to store a user's data. flask-sqlalchemy, a flask-friendly wrapper to SQLAlchemy, will translate the classes, objects, and methods to tables and SQL. Intentionally, I will use the SQLite database since it does not require a server to run.
To install Flask-SQLAlchemy, run:
(venv)$ pip3 install flask-sqlalchemy
Every time we create a new model, we need to apply those changes to our database. The same goes for when we update the structure/schema of our database. This action is called migrating the database. Database migrations are easily handled by the flask-migrate package.
To install Flask-Migrate, run:
(venv)$ pip3 install flask-migrate
We need to further configure the application to accommodate the database. This is done in the config.py file.
config.py: Database configuration
import os

basedir = os.path.abspath(os.path.dirname(__file__))


class Config:
    SECRET_KEY = os.environ.get('SECRET_KEY') or 'hard to guess string'
    SQLALCHEMY_DATABASE_URI = os.environ.get('DATABASE_URL') or \
        'sqlite:///' + os.path.join(os.path.dirname(__file__), 'data.sqlite')
    SQLALCHEMY_TRACK_MODIFICATIONS = False
Once again, the database URL is sourced from the environment. Should the DATABASE_URL variable not exist, we default to using the file-based database called data.sqlite which will be located in the root directory of the application. SQLALCHEMY_TRACK_MODIFICATIONS is set to False to prevent SQLAlchemy from tracking changes to the database.
That is all for the configuration! We now should create instances of the database and the migrations in the app. This is normally done in __init__.py.
app/__init__.py: Initialize the database and migrations
from flask import Flask
from flask_bootstrap import Bootstrap
from config import Config
from flask_migrate import Migrate # < --- new update
from flask_sqlalchemy import SQLAlchemy


app = Flask(__name__)
app.config.from_object(Config)


bootstrap = Bootstrap(app)
db = SQLAlchemy(app) # < --- new update
migrate = Migrate(app, db) # < --- new update

from app import routes, models
We can now create a User table in models.py within app/ folder.
app/models.py: Create the User table
from app import db
from werkzeug.security import generate_password_hash, check_password_hash


class User(db.Model):
    id = db.Column(db.Integer, primary_key=True)
    username = db.Column(db.String(64), unique=True, index=True)
    email = db.Column(db.String(64), unique=True, index=True)
    password_hash = db.Column(db.String(128))

    def set_password(self, password):
        self.password_hash = generate_password_hash(password)

    def check_password(self, password):
        return check_password_hash(self.password_hash, password)
We have created three columns in our table. The columns will store every user's username, email, and password. The password_hash column will store the hashed version of the user's password. This is an additional security measure to secure users' data in the event the database is compromised.
This is a new structure. We need to apply these changes and create a brand new database table. To do so, we will run the commands below:
(venv)$ flask db init # creates migrations folder
(venv)$ flask db migrate -m "user table" # creates a new migration file
(venv)$ flask db upgrade # applies the changes
You should be able to see a new data.sqlite file in the root directory of the application.
Add a user to the database
To update the database with new data, our application will use the registration form to create a new user. To do this, let us add a few logic to the routes.py file.
app/routes.py: Register a new user
from app import db
from flask import url_for, flash, redirect, render_template
from app.models import User


@app.route('/register', methods=['GET', 'POST'])
def register():
    form = RegistrationForm()
    if form.validate_on_submit():
        user = User(email=form.email.data, username=form.username.data)
        user.set_password(form.password.data)
        db.session.add(user)
        db.session.commit()
        flash('Successfully registered! You can now log in.')
        return redirect(url_for('login'))
    return render_template('register.html', title='Register', form=form)
We store a user's information in a variable called user. Of interest, here is to note that we do not pass a user's password data into this variable. Instead, we hash the password using the helper function set_password() as seen in models.py. Thereafter, we add the user to the database.
Enable user login
After a user has registered, we redirect them to the login page. This is a good way to ensure that the user has successfully registered. To add this functionality, we will need to add some login logic to the login() view functions.
User login in Flask is easily handled by flask-login package. We need to first install it and then create an instance of it in the app.
(venv)$ pip3 install flask-login
app/__init__.py: Initialize the login manager
# ...
from flask_login import LoginManager

# ...
login = LoginManager()
Since our database has no clue about the user, we need to modify it slightly.
app/models.py: Modify the User table
# ...
from app import login
from flask_login import UserMixin


@login.user_loader
def load_user(id):
    return User.query.get(int(id))


class User(UserMixin, db.Model):
    # ...
We first ensure that a particular user is accessed using their id and returned during the login process. Flask-Login provides certain properties and methods to work with a database user. For example, the _isauthenticated and _isanonymous. To implement these properties, the UserMixin class from flask-login is used.
We can now update our login() view function to use the login_user() method from flask-login.
app/routes.py: Login a user
from flask_login import login_user


@app.route('/login', methods=['GET', 'POST'])
def login():
    if current_user.is_authenticated:
        return redirect(url_for('index'))
    form = LoginForm()
    if form.validate_on_submit():
        user = User.query.filter_by(email=form.email.data).first()
        if user is None or not user.check_password(form.password.data):
            flash('Invalid username or password')
            return redirect(url_for('login'))
        login_user(user, remember=form.remember_me.data)
        return redirect(url_for('index'))
    return render_template('login.html', title='Login', form=form)
To show this change, it would be nice and necessary to change the Login link in the navigation bar to Logout. This will give a user the chance to protect their account by logging out whenever they are done using it. We will implement this by first creating a new Logout view function.
app/routes.py: Logout a user
@app.route('/logout')
def logout():
    logout_user()
    return redirect(url_for('login'))
We will then update our base.html template to include a conditional statement to determine the state of the user.
app/templates/base.html: Log user out
<! -- previous code -- >

{% block navbar %}
        <div class="collapse navbar-collapse" id="bs-example-navbar-collapse-1">
            <ul class="nav navbar-nav navbar-right">
                {% if current_user.is_authenticated %}
                    <li><a href="{{ url_for('logout') }}">Logout</a></li>
                {% else %}
                    <li><a href=" {{ url_for('login') }} ">Login</a></li>
                {% endif %}
            </ul>
        </div>
{% endblock %}

<! -- previous code -- >
A quick reload will reveal the state of a user. If the user is logged in, then the link will change to logout. Upon logout, the user will be redirected to the login page.
Improve the user experience
Flash Message
To improve the user experience, we will add a flash message every time a user registers or logs into their account. This can be achieved by adding the following to the base.html file.
app/templates/base.html: Flash message
<! -- previous code -- >

{% block content %}
    <div class="container">
        {% with messages = get_flashed_messages() %}
            {% if messages %}
                {% for message in messages %}
                    <div class="alert alert-success">
                        {{ message }}
                    </div>
                {% endfor %}
            {% endif %}
        {% endwith %}

        {% block app_context %}{% endblock %}
    </div>
{% endblock %}

<! -- previous code -- >
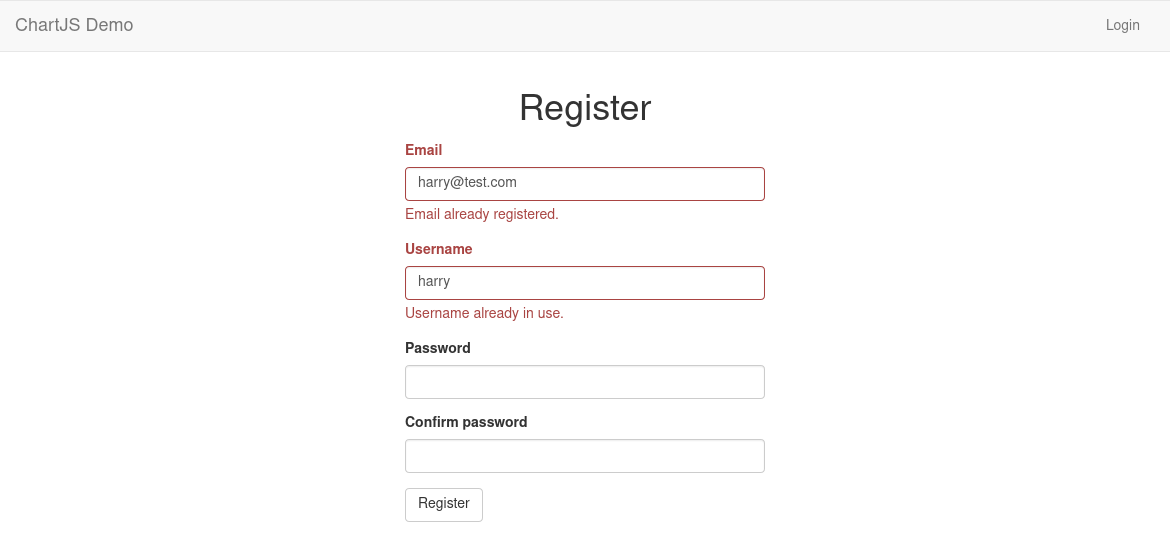
Duplicate registration
To further improve a user's experience during registration, we will alert them in case there is another user with the same credentials. This can be achieved by do the following:
app/forms.py: Improve User Experience During Registration
from wtforms.validators import ValidationError
from app.models import User


def RegistrationForm(FlaskForm):
    # ...

    def validate_email(self, field):
        if User.query.filter_by(email=field.data).first():
            raise ValidationError('Email already registered.')


    def validate_username(self, field):
        if User.query.filter_by(username=field.data).first():
            raise ValidationError('Username already in use.')
Every time a new user tries to use an already existing email address or username, we will raise a validation error and provide useful information as to why the registration process does not work.
Display the mean scores of each subject per term
This is the most crucial step in the data visualization process. To begin, we need to provide the classroom teacher with a form to record the mean score of each subject per term. The class below will define the form.
app/forms.py: Define Mean Score Per Term Form
class MeanScore(FlaskForm):
    term = IntegerField(
        'Term',
        validators=[DataRequired()],
        render_kw={"placeholder": 'e.g. "1"'})
    math = IntegerField(
        'Math',
        validators=[DataRequired()],
        render_kw={"placeholder": 'e.g. "66"'})
    english = IntegerField(
        'English',
        validators=[DataRequired()],
        render_kw={"placeholder": 'e.g. "66"'})
    science = IntegerField(
        'Science',
        validators=[DataRequired()],
        render_kw={"placeholder": 'e.g. "66"'})
    ict = IntegerField(
        'ICT',
        validators=[DataRequired()],
        render_kw={"placeholder": 'e.g. "66"'})
    history = IntegerField(
        'History',
        validators=[DataRequired()],
        render_kw={"placeholder": 'e.g. "66"'})
    submit = SubmitField('Submit')
We will show this form on the index page. So, let us update the index template to include this form.
app/templates/index.html: Display Mean Score Per Term Form
{% import 'bootstrap/wtf.html' as wtf %}
{% block app_context %}
<div class="row">
<div class="col-md-4">
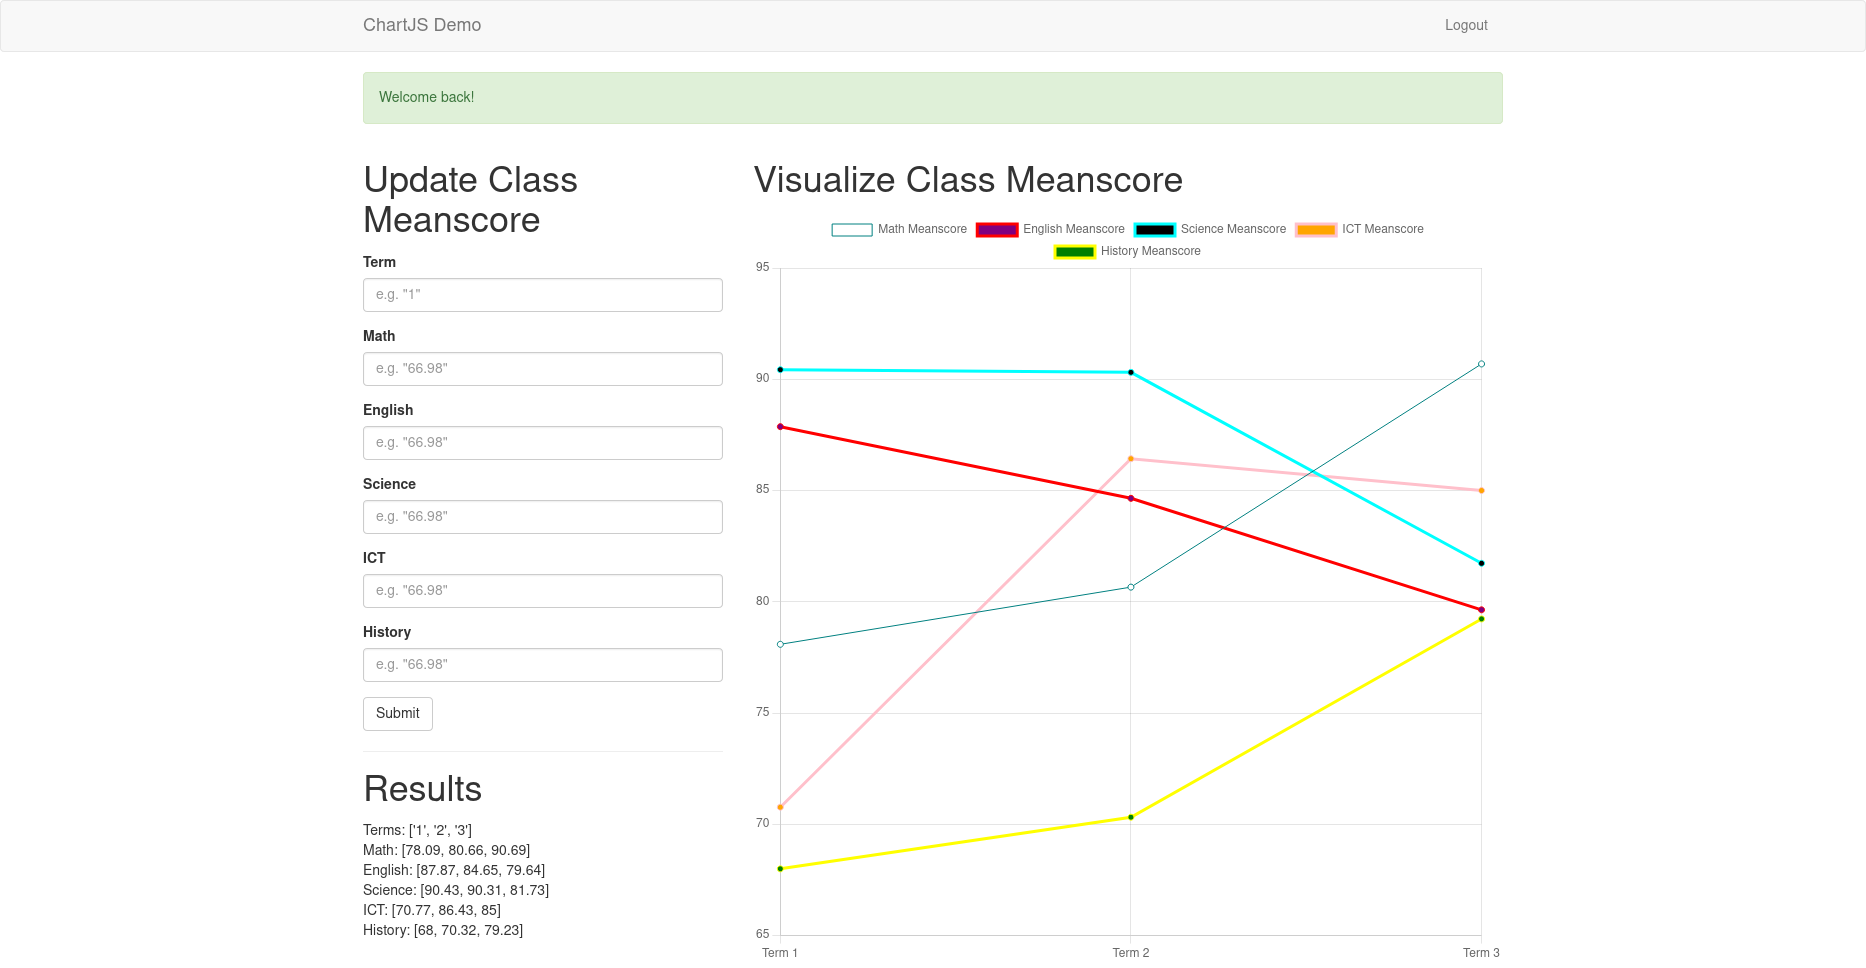
<h1>Update Class Meanscore</h1>
{{ wtf.quick_form(form) }}
</div>
<div class="col-md-8">
<h1>Visualize Class Meanscore</h1>
<canvas id="myChart" width="400" height="400"></canvas>
</div>
</div>
{% endblock %}
We need to update the index() view function to accommodate this form.
app/routes.py: Handling the mean score form
from app.forms import MeanScore


@app.route('/', methods=['GET', 'POST'])
def index():
    form = MeanScore()
    if form.validate_on_submit():
        # ...
        return redirect(url_for('index'))
    return render_template('index.html', form=form)
The form should be on display in the index template after refreshing the page. To store the data, we need to create a MeanScore model. This model will store the following data: term, math, english, science, ict, and history.
app/models.py: MeanScore Model
class User(UserMixin, db.Model):
    # ...
    meanscores = db.relationship('Meanscore', backref='author', lazy='dynamic')


class Meanscore(db.Model):
    id = db.Column(db.Integer, primary_key=True)
    term = db.Column(db.String(64))
    math = db.Column(db.Integer)
    english = db.Column(db.Integer)
    science = db.Column(db.Integer)
    ict = db.Column(db.Integer)
    history = db.Column(db.Integer)
    user_id = db.Column(db.Integer, db.ForeignKey('user.id'))
The User and the Meanscore tables are related by the _userid column. This means that each user will have a list of mean scores. To apply the changes we need to once again run the commands below:
(venv)$ flask db migrate -m 'mean score table'
(venv)$ flask db upgrade
Finally, we need to add a bit of logic to the form to ensure that the data is processed and stored in the new database.
app/routes.py: Meanscore Form Logic
# ...


@app.route('/', methods=['GET', 'POST'])
@login_required
def index():
    teacher = User.query.filter_by(email=current_user.email).first()
    form = MeanScore()
    if form.validate_on_submit():
        meanscore = Meanscore(
            term=form.term.data,
            math=form.math.data,
            english=form.english.data,
            science=form.science.data,
            ict=form.ict.data,
            history=form.history.data,
            author=current_user)
        db.session.add(meanscore)
        db.session.commit()
        flash('Your mean score has been recorded.')
        return redirect(url_for('index'))
    return render_template('index.html', form=form, teacher=teacher)

# ...
To display the results, we will need to update the index template.
app/templates/index.html: Display Mean Score Per Term
{% block app_context %}
<div class="row">
    <div class="col-md-4">
        <h1>Update Class Meanscore</h1>
        {{ wtf.quick_form(form) }}
        <hr>
        <h1>Results</h1>
        Terms: {{ terms }}<br>
        Math: {{  math }}<br>
        English: {{ english }}<br>
        Science: {{ science }}<br>
        ICT: {{ ict }}<br>
        History: {{ history }}
    </div>
</div>
{% endblock %}
Every time new data is entered, the output will be updated.
ChatJS Overview
A quick overview of ChartJS reveals that for us to use this library, we need to get the latest version. We will add the line below in our base template to get started.
app/templates/base.html: Add ChartJS
{% block scripts %}
    {{  super() }}
    <script src="https://cdn.jsdelivr.net/npm/chart.js"></script>
    {% block app_scripts %}{% endblock %}

{% endblock %}
ChartJS requires that we create a canvas element in our template. This element will be used to display the chart.
app/templates/index.html: Add Chart Canvas
<div class="row">
    <div class="col-md-4"><!-- form/results will go here --></div>
    <div class="col-md-8">
        <h1>Visualize Class Meanscore</h1>
        <canvas id="myChart" width="400" height="400"></canvas>
    </div>
</div>
Below is a simple script used to demonstrate how you can work with ChatJs:
<script>
    const ctx = document.getElementById('myChart').getContext('2d');
    const myChart = new Chart(ctx, {
        type: 'bar',
        data: {
            labels: ['Red', 'Blue', 'Yellow', 'Green', 'Purple', 'Orange'],
            datasets: [{
                label: '# of Votes',
                data: [12, 19, 3, 5, 2, 3],
                backgroundColor: [
                    'rgba(255, 99, 132, 0.2)',
                    'rgba(54, 162, 235, 0.2)',
                    'rgba(255, 206, 86, 0.2)',
                    'rgba(75, 192, 192, 0.2)',
                    'rgba(153, 102, 255, 0.2)',
                    'rgba(255, 159, 64, 0.2)'
                ],
                borderColor: [
                    'rgba(255, 99, 132, 1)',
                    'rgba(54, 162, 235, 1)',
                    'rgba(255, 206, 86, 1)',
                    'rgba(75, 192, 192, 1)',
                    'rgba(153, 102, 255, 1)',
                    'rgba(255, 159, 64, 1)'
                ],
                borderWidth: 1
            }]
        },
        options: {
            scales: {
                y: {
                    beginAtZero: true
                }
            }
        }
    });
</script>
We begin by creating a new Chart object and passing in the context of the canvas element and the type of chart we want to create. We then pass in the data we want to use for the chart. The data is passed in as an object with the following properties:
- labels - an array of strings containing the labels for each of the bars in the chart
- datasets - an array of objects containing the data for each of the bars in the chart
The datasets property is an array of objects with the following properties:
- label - a string containing the label for the set of data
- data - an array of numbers containing the data for the set of data
- backgroundColor - an array of strings containing the colors to use for the background of the bars in the chart
- borderColor - an array of strings containing the colors to use for the borders of the bars in the chart
- borderWidth - a number containing the width of the border for the bars in the chart
The options property is an object whose y-axis scale is configured to begin at zero. This is done by setting the beginAtZero property to true.
Mean Score Chart
The most important elements for our chart will be the label and the datasets. The label will be the lesson mean scores in any given term, and the datasets will be the actual mean scores. You can get the graph as a bar chart, a line chart, a pie chart, or a radar chart. We will stick with the basic line chart.
As you can see from the chart example above, the values needed for the chart are primarily sourced from a list (In JavaScript it is called an array). We need to figure out the logic to get the data from the database and display it in a simple list. These changes will be applied to the index() view function.
app/routes.py: List mean scores
@app.route('/', methods=['GET', 'POST'])
@login_required
def index():
    # ...

    term_meanscore = teacher.meanscores.all()
    terms = []
    math = []
    english = []
    science = []
    ict = []
    history = []
    for term in term_meanscore:
        terms.append(term.term)
        math.append(term.math)
        english.append(term.english)
        science.append(term.science)
        ict.append(term.ict)
        history.append(term.history)
    return render_template(
        'index.html',
        terms=terms,
        math=math,
        english=english,
        science=science,
        ict=ict,
        history=history)
Here, I have looped through the results stored in the database as filled by a particular teacher. The teacher.meanscores.all() method returns a list of all the mean scores for a particular teacher. The result is subsequently appended to relevant lists. These lists will then be used in the index template to display the results.
app/templates/index.html: Display Mean Score Per Term
{% block app_scripts %}
    <script>
        var ctx = document.getElementById('myChart').getContext('2d');
        var myChart = new Chart(ctx, {
            type: 'line',
            data: {
                labels: [
                    {% for term in terms %}
                        'Term {{ term }}',
                    {% endfor %}
                ],
                datasets: [{
                    label: 'Math',
                    data: [
                        {% for math_score in math %}
                            {{ math_score }},
                        {% endfor %}
                    ],
                    backgroundColor: ['white'],
                    borderColor: ['teal'],
                    borderWidth: 1
                }, {
                    label: 'English',
                    data: [
                        {% for english_score in english %}
                            {{ english_score }},
                        {% endfor %}
                    ],
                    backgroundColor: ['purple'],
                    borderColor: ['red'],
                }, {
                    label: 'Science',
                    data: [
                        {% for science_score in science %}
                            {{ science_score }},
                        {% endfor %}
                    ],
                    backgroundColor: ['black'],
                    borderColor: ['cyan'],
                }, {
                    label: 'ICT',
                    data: [
                        {% for ict_score in ict %}
                            {{ ict_score }},
                        {% endfor %}
                    ],
                    backgroundColor: ['orange'],
                    borderColor: ['pink'],
                }, {
                    label: 'History',
                    data: [
                        {% for history_score in history %}
                            {{ history_score }},
                        {% endfor %}
                    ],
                    backgroundColor: ['green'],
                    borderColor: ['yellow'],
                }]
            },
            options: {
                scales: {
                    yAxes: [{
                        ticks: {
                            beginAtZero: true
                        }
                    }]
                }
            }
        });
    </script>
{% endblock %}
Notice how I once again loop through individual mean score lists to retrieve the data we want. Intentionally, we use several dictionaries in our dataset list to display all the mean scores in one graph. Background color and border color are used to differentiate the different datasets.
That is all for this tutorial. We have covered the basics of chartjs.