


How To Deploy a Flask App on Docker Containers
Containers are built on a lightweight virtualization technology that allows an application, along with its dependencies and configuration to run in complete isolation, but without the need to use a full blown virtualization solution such as virtual machines, which need a lot more resources and can sometimes have a significant performance degradation in comparison to the host. A system configured as a container host can execute many containers, all of them sharing the host's kernel and direct access to the host's hardware. This is in contrast to virtual machines, which have to emulate a complete system, including CPU, disk, other hardware, kernel, etc.
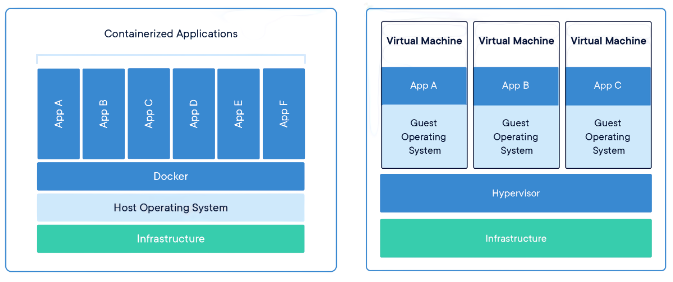
In spite of having to share the kernel, the level of isolation in a container is pretty high. A container has its own file system, and can be based on an operating system that is different than the one used by the container host. For example, you can run containers based on Ubuntu Linux on a Fedora host, or vice versa. While containers are a technology that is native to the Linux operating system, thanks to virtualization it is also possible to run Linux containers on Windows and Mac OS X hosts. This allows you to test your deployments on your development system, and also incorporate containers in your development workflow if you wish to do so.
While Docker isn't the only container platform, it is by far the most popular. There are two editions of Docker, a free community edition (CE) and a subscription based enterprise edition (EE). In this tutorial, Docker CE will be sufficient.
To work with Docker CE, you first have to install it on your system. There are installers for Windows, Mac OS X and several Linux distributions available at the Docker website. If you are working on a Microsoft Windows system, it is important to note that Docker CE requires Hyper-V. The installer will enable this for you if necessary, but keep in mind that enabling Hyper-V prevents other virtualization technologies such as VirtualBox from working.
Install Docker CE
Learn how to install docker here.
Build a Container Image
I am of the assumption that you already have a flask application built. I will show you how to build a container image from that flask application. For the purposes of demonstration, I will use my beautiful flask tables project.
The first step in creating a container for our app is to build an image for it. A container image is a template that is used to create a container. It contains a complete representation of the container file system, along with various settings pertaining to networking, start up options, etc. I will show you how to generate a container through a script.
The command that creates scripted container images is docker build. This command reads and executes build instructions from a file called Dockerfile, which I will need to create. The Dockerfile is basically an installer script of sorts that executes the installation steps to get the application deployed, plus some container specific settings.
Dockerfile: Script installer
FROM python:alpine

RUN adduser -D table # Without the -D option, you will encounter password unchanged error

WORKDIR /home/software_development/python/current_projects/beautiful_flask_tables

COPY requirements.txt requirements.txt

RUN python -m venv beautiful_flask_tables

RUN beautiful_flask_tables/bin/python -m pip install --upgrade pip

RUN \
    apk update && \
    apk add build-base && \ # Fixes installation issues due to greenlet
    apk add postgresql-dev gcc python3-dev musl-dev && \ # Dependencies for psycopg2
    beautiful_flask_tables/bin/pip3 install -r requirements.txt && \
    beautiful_flask_tables/bin/pip3 install gunicorn

COPY app app
COPY migrations migrations
COPY create_fake_users.py create_fake_users.py
COPY table.py config.py boot.sh ./
RUN chmod +x boot.sh

ENV FLASK_APP table.py

RUN chown -R table:table ./
USER table

EXPOSE 5000
ENTRYPOINT ["./boot.sh"]
Each line in the Dockerfile is a command. The FROM
command specifies the base container image on which the new image will be built.
The whole idea is that you start from an existing base container image, add or
change some things, and you end up with a derived image. Images are referenced by a
name and a tag, separated by a colon. The tag is used as
a versioning mechanism, allowing an image to provide more than one variant.
Above, the image used is python, the official Docker image for Python.
The tags for this image allow you to specifiy the interprter version and the base
operating system. The alpine tag is from Alpine Linux. You can be more
specific with the kind of tag you want to use. Say, 3.8-alpine tag
selects a Python 3.8 interpreter installed on Alpine Linux. The Alpine Linux
distribution is often used instead of the more popular ones such as Ubuntu because
of its small size. You can see what tags are available for the Python image in
the Python Image Reposistory.
The RUN command executes an arbitrary command in the context of the container, similar to you typing the command in a shell prompt. The adduser -D table command creates a new user named table. Most container images have root as the default user. It is never a good practice to run an application as root, so we need to create our own user.
The WORKDIR command sets a default directory where the application is going to be installed. When I created the table user above, a home directory path was created, so now I'm we are making that directory the default. The new default directory is going to apply to any remaining commands in the Dockerfile, and also later when the container is executed.
The COPY command transfers files from your machine the container file system. This command takes two or more arguments, the source and the destination files or directories. The source files must be relative to the directory where the Dockerfile is located. The destination can be an absolute path, or a path relative to the directory set in a previous WORKDIR command. Above, we are copying the requirements.txt file to the table user's home directory path in the container file system.
With requirements.txt in the container file system, we can create a virtual environment using RUN command. Above, I have created a virtual environment called beautiful_flask_tables in which I install all the requirements needed for our application. It is also possible to explictly install packages in your container. In our example, we are installing gunicorn which we are going to use as a web server. Altenatively, you can have gunicorn added to the requirements.txt file.
The COPY commands that follow install the application to the container, by copying the app package, the migrations repository with the database migrations and the top-level files table.py and config.py. Additionally, We are also copying a new file boot.sh (top-level file).
The RUN chmod command ensures that this boot.sh file is set as an executable file. If you are in a Unix based file system and your source file is already marked as executable, then the copied file will also have the executable bit set. I added an explicit set because on Windows it is harder to set executable bits. If you are working on Mac OS X or Linux you probably don't need this statement, but it does not hurt to have it anyway.
The ENV command sets an environment variable inside the container. We need to set FLASK_APP which is required to use the flask command.
The RUN chown command sets the owner of all the directories and files that were stored in /home/software_development/python/current_projects/beautiful_flask_tables as the new table user. Even though we created the this user near the top level of the Dockerfile, the default user for all the commands remain the root user. So, all the files need to be switched to the table user so that this user can work with them when the container is started.
The USER command in the next line makes the new table user the default for any subsequent instructions, and also for when the container is started.
The EXPOSE command configures the port that the container will be using for its server. This is necessary so that Docker can configure the network in the container appropriately. We have chosen the standard flask port 5000, but this can be any port.
The ENTRYPOINT command defines the default command that should be executed when the container is started. This is the command that will start the web server. To keep things well organized, we will now make a separate boot.sh script file:
boot.sh: Docker container start up script
#!/bin/sh
source beautiful_flask_tables/bin/activate
flask db upgrade
exec gunicorn -b :5000 --access-logfile - --error-logfile - table:app
Above, we activate the virtual environment, upgrade the database through the database migration framework, and finally run the server with gunicorn.
In a shell script, exec triggers the process running the script to be replaced with the command given, instead of starting it as a new process. This is important because Docker associates the life of the container to the first process that runs on it. In cases like this one where the start up process is not the main process of the container, we need to make sure that the main process takes the place of that first process to ensure that the container is not terminated by Docker.
In Docker, anything that container writes to stdout or stderr will be captured and stored in the logs for the container. For that reason, the --access-logfile and --error-logfile are both configured with a -, which sends the log to the standard output so that they are stored as logs by Docker.
With the Dockerfile created, now we can build a container image:
$ docker build -t table:latest . # Don't forget the . (dot)
The -t argument in docker build command sets the name and tag for the new image. The . indicates the base directory where the container is to be built. This is the directory where the Dockerfile is located. The build process is going to evaluate all the commands in the Dockerfile and create the image, which will be stored on our own machine.
To obtain a list of all the images that you have locally, run the docker images command:
$ docker images

# Output
REPOSITORY          TAG                 IMAGE ID            CREATED             SIZE
table               latest            39fa5cda1776        10 seconds ago        206MB
python              alpine            8744555ae7bb        6 days ago            42.3MB
The listing will include your image as well as the base image on which it was built. Any time you make changes to the application, you can update the container image by running the command again.
Start a Container
With the image already created, we can run the container version of the application using docker run command, which usually takes a large number of arguments.
$ docker run --name table -d -p 8000:5000 --rm table:latest

# Output
581ac718128eab9b58fe883ce114dba44f74bf2d937d8b5de45dec2f7567531e
The --name option provides a name for the new container. The -d option tells Docker to run the container in the background without which the container runs as a foregroung application, blocking your command prompt. The -p option maps container ports to the host ports. The first port is the port on the host computer, and the one on the right is the port inside the container. The above example exposes the 5000 port in the container on port 8000 in the host, so you will access the application on 8000, even though internally the container is using port 5000. The --rm option will delete the container once it is terminated. While this is not required, containers that finish or are interrupted (I mean successful or not) are usually not needed anymore, so they can be automatically deleted. The last argument is the name and tag of our container image. After you run the command above, you can access the application on http://localhost:8000.
To see what container is running, use docker ps:
$ docker ps

# Output
CONTAINER ID        IMAGE                  COMMAND             CREATED             STATUS              PORTS                    NAMES
08b68c8afe5f        table:latest         "./boot.sh"         23 seconds ago      Up 22 seconds       0.0.0.0:8000->5000/tcp     table
You can use a more useful variant such as docker ps -a instead of docker ps if you do not see any output. Note that the CONTAINER ID is shortened compared to what was generated by docker run command.
If you do not see any containers running, remember that initially we used the
--rmoption to delete the container once it was terminated. It is an option. You can remove it when running the container.Note that
alpinedoes not usebashfor its executable file. Instead, it usesshwhich is a shell. This is becausealpineis a minimal Linux distribution that does not have a bash shell. If you are using a Linux distribution that has a bash shell, you can usebashinstead ofsh. See this solution for more information.Every time you come across an error you are not sure about, always run the logs to see what is happening. In this case, you can use
docker logs -f <container_ID>(obviously having removed the--rmoption when building your image) to see the logs of the container.
If you want to stop a running container, use docker stop <CONTAINER ID> command:
$ sudo docker stop 08b68c8afe5f

# Output
08b68c8afe5f
Delete Images and Containers
To delete a container, use docker rm <CONTAINER ID>:
$ docker rm 08b68c8afe5f
Additionally, if you have several containers as seen in your docker ps -a list, and would like to delete all of them at once rather than having to rundocker rm <CONTAINER ID> for each one of them, run:
$ docker rm $(docker ps -a -a -f status=exited)
You can know the status of your container by checking the column STATUS when you run docker ps:
$ docker ps

# Output
CONTAINER ID        IMAGE               COMMAND             CREATED             STATUS              PORTS               NAMES
To delete an existing container image, check the image's REPOSITORY and IMAGE ID using docker images before running docker rmi command:
$ docker rmi <REPOSITORY> <IMAGE ID>
Multiple images can be deleted as follows:
$ docker rmi $(docker images -a -q)
Docker Cleaning Tools
As you work with Docker, it’s also easy to accumulate an excessive number of unused images, containers, and data volumes that clutter the output and consume disk space. Docker gives you all the tools you need to clean up your system from the command line.
Purge all Unused or Dangling Images, Containers, Volumes, and Networks
Images, containers and other volume data not successfully built or created to completion are defined as dangling. You can use a single command to lean up any resources — images, containers, volumes, and networks — that are dangling (not associated with a container):
$ docker system prune
To additionally remove any stopped containers and all unused images (not just dangling images), add the -a flag to the command:
$ docker system prune -a
Realistic Web Application
An application normally has a number of configurations that are sourced from environment variables. For example, the Flask secret key, database URL and email server options are all imported from environment variables.
We need to set these envrionment variables inside the container. The ENV command was used earlier in the Dockerfile to set environment variables, and it is handy for variables that are going to be static. For variables that depend on installation, however, it is not convinient to have them as part of the build process, because you want to have a container image that is portable. If you want to give your application to another person as container image, you want that person to be able to use it as is, and not have to build it with different variables.
So, build time environment variables can be useful, but there is also a need to have run-time environment variables that can be set via the docker run command, and for these variables, -e option can be used.
Setting email configuration in Docker container
$ docker run --name table -d -p 8000:5000 --rm -e SECRET_KEY=my-secret-key \
    -e MAIL_SERVER=smtp.gmail.com -e MAIL_PORT=587 -e MAIL_USE_TLS=true \
    -e MAIL_USERNAME=<your-gmail-username> -e MAIL_PASSWORD=<your-gmail-password> \
    table:latest
Using Third-Party "Containerized" Services
Assuming you have SQLite as your database of choise, what we know is that the application saves all its data on a file on disk on the local machine. What do you think is going to happen when the to the SQLite file when you stop and delete the container? The file is going to disappear!
The file system in a container is ephemeral, meaning that it goes away when the container goes away. You can write data to the file system, and the data is going to be there if the container needs to read it, but if for any reason you need to recycle your container and replace it with a new one any data that the application saved to disk is going to be lost forever.
A good design would be to make the container application stateless. If you have a container that has application code and no data, you can throw it away and replace it with a new one without any problem. This container becomes truly disposable, which is great in terms of simplifying the deployment of upgrades. But this means that the data must be put somewhere outside of the application container. This is where the Docker Registry comes into play.
The Registry is a stateless, highly scalable server side application that stores and lets you distribute Docker images. By putting images in a registry, you can store static and immutable application bits, including all of their dependencies, at a framework level. You then can version and deploy images in multiple environments and thus provide a consistent deployment unit.
The Docker Container Registry contains a large variety of container images, for example the python container image we have looked at already. Docker maintains images for many other languages, databases and other services in the Docker registry. Companies and regular users alike can publish our own container images.
Adding a MySQL Container
What you will do:
- Get
MySQLimage from the MySQL public registry - Update the Dockerfile to add a
MySQLclient package (pymysql) - Link server to application
MySQL has public container images available on the Docker registry. MySQL relies on environment variables that need to be passed to docker run. These configure passwords, database names etc. We will use the officially maintained image by mySQL team here.
Start MySQL server
$ docker run --name mysql -d -e MYSQL_ROOT_PASSWORD=yes -e MYSQL_DATABASE=table \
    -e MYSQL_USER=table -e MYSQL_PASSWORD=<database-password> mysql/mysql-server:latest

# Output
Unable to find image 'mysql/mysql-server:5.7' locally
5.7: Pulling from mysql/mysql-server
03e20c09154c: Pull complete
989c25a93b15: Pull complete
1fe2b817a6cb: Pull complete
0807146aa37b: Pull complete
Digest: sha256:96f7f199868eaaf9dd9c3cff47021831f5525047b41b0c6a8bf1187936a3e9d2
Status: Downloaded newer image for mysql/mysql-server:5.7
48d838a161eb84ba32f62a46448ecbe741786a9860fe39e58d4926a1ca33014c

# Use of \ allows for a rather long command to go to a new line. Do not include it in your command
On a Docker installed machine, you will get a fully installed MySQL server with a randomly generated root password, a brand new database called table, and a user with the same name that is configured with full permissions to access the database. Enter a proper password as value for the MySQL_PASSWORD environment variable.
mysqlinmysql/mysql-server:latestis the docker registry account used by MySQL.mysql-server:latestis the image from MySQL.
You should have the MySQL container running. Check:
$ docker ps

# Output
CONTAINER ID   IMAGE                       COMMAND                  CREATED          STATUS                    PORTS                                       NAMES
5c7baceab352   table:latest                "./boot.sh"              3 seconds ago    Up 2 seconds              0.0.0.0:8000->5000/tcp, :::8000->5000/tcp   table
1572ace01e37   mysql/mysql-server:latest   "/entrypoint.sh mysq…"   37 minutes ago   Up 37 minutes (healthy)   3306/tcp, 33060-33061/tcp                   mysql
With the MySQL server started, we need to add a MySQL client package. We will use pymysql. We will also need to add the cryptography package that MYSQL uses for authentication against the MySQL server.
Dockerfile: Add MySQL client
# previous commands
RUN \
    apk add libffi-dev && \ # this is required for the MySQL client
    beautiful_flask_tables/bin/pip3 install gunicorn pymysql cryptography
# previous commands
With this change to our Dockerfile (or the application itself), the container image needs to be rebuilt:
$ docker build -t table:latest .
Start the container
We will need to start our table again, this time linking it to the database container so that both can communicate through the network:
$ docker run --name table -d -p 8000:5000 --rm -e SECRET_KEY=my-secret-key \
    -e MAIL_SERVER=smtp.gmail.com -e MAIL_PORT=587 -e MAIL_USE_TLS=true \
    -e MAIL_USERNAME=<your-gmail-username> -e MAIL_PASSWORD=<your-gmail-password> \
    --link mysql:dbserver \
    -e DATABASE_URL=mysql+pymysql://table:<database-password>@dbserver/table \
    table:latest
The --link option tells Docker to make another container accessible to this one. The argument contains two names separated by a colon. The first part is the name or ID of the container to link. The second part defines the hostname that can be used in this container to refer to the linked one. dbserver if a generic name that represents the database server.
With the link to the two containers established, we can set the DATABASE_URL environment variable so that SQLAlchemy is directed to use the MySQL database in the other container. The database URL is going to use dbserver as the hostname, table as the database name and user, and the password that you selected when you started MySQL.
Sometimes the MySQL container takes a few seconds to be fully running and ready to accept database connects. If you start MySQL container and then start the application container immediately after, when the boot.sh script tries to run flask db upgrade it may fail due to the database not being ready to accept connects.
boot.sh: Retry database connection
#!/bin/sh
source beautiful_flask_tables/bin/activate
while true; do
    flask db upgrade
    if [[ "$?" == "0" ]]; then
        break
    fi
    echo Upgrade command failed, retrying in 5 secs...
    sleep 5
done
flask translate compile
exec gunicorn -b :5000 --access-logfile - --error-logfile - table:app
The loop checks the exit code of the flask db upgrade command, and if it is non-zero it assumes that something went wrong, so it waits five seconds and then retries.
Share Your Docker Application
The application is up and running on Docker, using two containers (where MySQL comes from a publicly available third-party image). We can make this application available to others by pushing it to the Docker registry from where anybody can obtain the image.
- Click here to create an account with Docker. Pick a username that you like.
- Run the command
sudo docker loginin your terminal. Provide your account username and password. - Rename your image to include your account (remember the MySQL image?) as seen below:
$ sudo docker tag table:latest <your docker registry account>/table:latest
- Publish you image to the Docker registry using the
docker pushcommand:$ sudo docker push <your docker registry account>/table:latest
Your image should be now publicly available. Feel free to document how to install and run it from the Docker registry. Check this MySQL example.
Continue ...
I hope you enjoyed this important lesson. There are more deployment methods you can use to get your application up and running. I recommend that you check out others such as:
Share
If you enjoyed this article, you can share it with another person.
TweetNewsletter Subcription
Level up your skills.
We take your privacy seriously. Read our privacy policy. Unsubscribe | Resubscribe.