


Test Your Locally Running App On Another Device
Obviously, if we want to test how our application looks like on other devices while we are
developing it is to check the developer tools in your browser. On Chrome, you can
also run ctrl + shift + i to open the developers tools.
Typically, when your application is running on localhost, it is protected by firewall, which makes it impossible to access from another device. I mean, if you try to paste the link http://localhost:5000 on another device, you will not have access to application that may be running on your laptop.
It is also possible to access your Flask application running on localhost from another device or location for the purposes of testing. Below, I will show you how to use pyngrok package to provision a temporary public URL for your application that works on your phone or from anywhere in the world.
Ngrok
In order to use this package, make sure that you go into your project directory and activate your virtual environment.
$ cd your_project_directory
$ workon your_virtual_env
I have used virtualenvwrapper to activate an existing virtual environment using the workon command. If you do not know what virtualenvwrapper is and how to use it, learn it here.
Install pyngrok into your virtual environment:
(your_virtualenv)$ pip3 install pyngrok
pyngrokis a Python wrapper forngrokthat manages its own binary and puts it on your path, making ngrok readily available from anywhere on the command line and via a convenient Python API.
Run ngrok --help in your virtual environment to confirm that it is installed and working:
(your_virtualenv)$ ngrok --help
How it Works
We will make use of two terminal windows for this, both with your virtual environment activated. If your are using VS Code, you can simpley split your terminal window to get two windows. If you are using your default Ubuntu terminal window, you may want to consider byobu, an open source text-based window manager and terminal multiplexer..
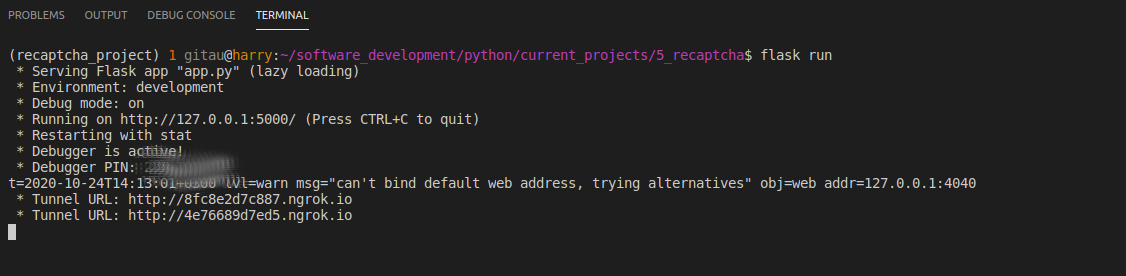
On your first terminal, start your application, either by running a Python script or you can run flask run command. The important thing is your application listens to requests at http://localhost:5000.
(your_virtualenv)$ flask run # start your application
On your second terminal, start ngrok:
(your_virtualenv)$ ngrok http 5000 # or any other port you have used

You can open your localhost in your browser by clicking on the link in your first terminal (as seen in the image above). On the second terminal window, look at the two lines that begin with the word Forwarding to know your ngrok URL. These two lines show the http:// and https:// versions of your URL. In my example above, I have http://23ebfb1baa7e.ngrok.io.
You will get a similar one, but the subdomain portion is going to be different each time you run ngrok. While the ngrok process is running (limited to a maximum of eight hours) any requests that are sent to this URL are immediately forwarded to your application.
Send the URL to your phone and open it in your mobile browser to see how cool ngrok is. You can also send the URL to a friend if you like, as it works from anywhere in the world.
How to Create a Ngrok Tunnel
By now, you must be excited about all the possibilities it opens. Below, I will show you an improved workflow that allows you to access Ngrok automatically every time you start your Flask application.
To open the tunnel add the script below anywhere in your application. For my case, I have added it to __init__.py file:
app/__init__.py: Create ngrok tunnel
def start_ngrok():
    from pyngrok import ngrok

    url = ngrok.connect(5000)
    print(' * Tunnel URL: ', url)
This script performs the same function as the ngrok http 5000 command. ngrok.connect() function returns the public URL that was assigned to the tunnel. start_ngrok() function prints this URL to the terminal, from where you can copy and paste it to a phone.
We will add a ngrok configuration to our app such that when it is enabled, we can call the start_ngrok() function to get a tunnel set up.
config.py: Create ngrok configuration
class Config:
    # previous code
    START_NGROK = os.environ.get('START_NGROK') is not None
Add the script below to your application instance to check if ngrok configuration is set:
app/__init__.py: Register your ngrok configuration
if app.config['START_NGROK']:
    start_ngrok()
Since we want this variable to be set to True, such that when the application starts it creates a tunnel for us, we will update our envrionment variables to include it:
.flaskenv: Set ngrok variable to True
START_NGROK=1
If you use the Flask reloader and enable the ngrok tunnel you will notice that two tunnels are started. This is because the reloader runs two processes: a parent process that monitors files for changes, and a child process that runs the actual server. The parent process kills and restarts the child process every time it detects changes to a source file.
It would be better if the tunnel could be created only in the parent process, which is the
process that has a longer life. That would mean that a reload event would preserve the tunnel URL,
since it is associated with the parent reloader process. So a nice improvement would be to make
sure the START_NGROK configuration variable is always False in the child process.
We will update our configration to accommodate these scenarios such that when the main Flask
process starts it will set up the tunnel. If the reloader is enabled, then a child process will
be launched with WERKZEUG_RUN_MAIN=true in the environment, so there will be no second tunnel
started. And every time the child process is recycled the tunnel set up in the parent process will
be unaffected, so the same tunnel URL will remain valid for as long as the reloader process is
running, up to a maximum of eight hours.
config.py: Working with Flask reloader
class Config:
    # previous code
    START_NGROK = os.environ.get('START_NGROK') is not None and \
        os.environ.get('WERKZEUG_RUN_MAIN') is not 'true'
Now, when you run flask run command, you will notice that our tunnel is set up, and we can access our ngrok URL. We can also access the localhost URL.
Share
If you enjoyed this article, you can share it with another person.
TweetNewsletter Subcription
Level up your skills.
We take your privacy seriously. Read our privacy policy. Unsubscribe | Resubscribe.