


Start A Flask Server
Before we can start a Flask server, we need to understand what Flask is. Flask is a micro-framework for the web. A framework is a collection of code (software) that can be used to build web applications. As a developer, you don't need to start from scratch (all the time) when you can make good use of tools designed to help you with your projects.
The 'micro' in Flask may be a bit misleading, but the good folks at Flask have taken their time to clarify this:
“Micro” does not mean that your whole web application has to fit into a single Python file (although it certainly can), nor does it mean that Flask is lacking in functionality. The “micro” in microframework means Flask aims to keep the core simple but extensible. Flask won’t make many decisions for you, such as what database to use. Those decisions that it does make, such as what templating engine to use, are easy to change. Everything else is up to you, so that Flask can be everything you need and nothing you don’t.
Create a Flask Application
We need to create an application before we can start a Flask server. The application is the main object that holds all the information about what we want to build. You can browse the completed project on the GitHub repository Start a flask server.
Project Structure
Principally, I will employ the concept of seperation of concerns when building our flask application. What this principle means is that we will categorize our application into modules. We will have several modules that will be responsible for different parts of our application. For example, we will have a module that will be responsible for the routes, and another module that will be responsible for the errors.
Let us create this application structure:
project_name
    | --- test.py
    | --- config.py
    | --- requirements.txt
    | --- .gitignore
    | --- .flaskenv
    | --- app/
            | --- __init__.py
            | --- routes.py
            | --- errors.py
            | --- templates/
                     | --- base.html
                     | --- index.html
            | --- static/
                    | --- css/
                            | --- main.css
                    | --- js/
                    | --- img/
You can use the commands mkdir and touch to create this project structure as seen below:
# Create the project directory
mkdir project_name

# Change to the project directory
cd project_name

# Create all the files in the top-level directory
touch requirements.txt config.py

# Create the app sub directory in the current directory
mkdir app

# Create the files in the app directory
touch app/__init__.py app/routes.py app/errors.py

# Create the templates and static sub-directories and their contents
The .gitignore file is used to ignore the files that we don't want to be tracked by git. Find out what Python files you won't need to be tracked by git by looking at this gitignore file on GitHub.
Create and Activate a Virtual Environment
During the development of this simple Flask application, we will need to install a few packages. To begin, we will create and activate a virtual environment. Virtual environments help isolate the needs of your application from that of your system. It also helps isolate one project's needs from another. Run the command below in your terminal to create a virtual environment:
$ mkvirtualenv flask_project # Create a virtual environment

# Output:

(flask_project) $
I am using the virtual environment flask_project to develop this application. The command mkvirtualenv is used to both create and activate a virtual environment for me. All the project's dependencies will be installed in this virtual environment.
If you are not aware of what the virtualenvwrapper is and would like to use it during your development, learn how to configure your machine and set it up here.
Install Dependencies
One package we will definitely need to install is Flask. We will do so using the pip package manager in our terminal:
(flask_project) $ pip3 install flask
Create Application Instance
Within our __init__.py file, we will create an instance of the Flask application. We will also import the Flask class from the flask module.
app/__init__.py: Create application instance
from flask import Flask

app = Flask(__name__)

from app import routes, errors
Create Routes
Routes direct us to a resource we may request. Each route is built using a view function. The view function is responsible for returning the response to the request. For now, let us simply return a string, the classic 'Hello, World'.
routes.py: Create home route
from app import app

@app.route('/')
@app.route('/index')
def index():
    return 'Hello, World!'
Create Entry Point for the Application
When we start our Flask server, we need to tell it what place to start from. This point will act as an entry point to our application.
test.py: Create entry point for the application
from app import app
Add Environment Variables
Flask expects certain environment variables to be set. These run time environment are needed by Flask to run. I created a file called .flaskenv which we will use to set these environment variables.
.flaskenv: Set environment variables
FLASK_APP=test.py
FLASK_ENV=development
FLASK_DEBUG=1
Run the Application
With the environment variables set, we can now run our application. In the terminal, we can run the following command:
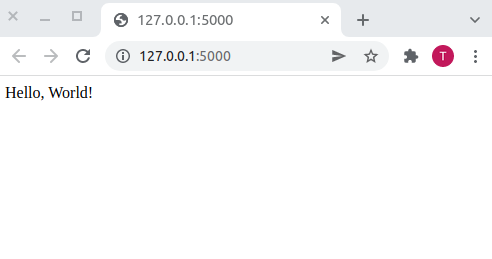
(flask_project) $ flask run
Navigate to the URL http://127.0.0.1:5000/ in your browser. You should see the following output:
You probably have also noted that in your terminal there is a soft warning.
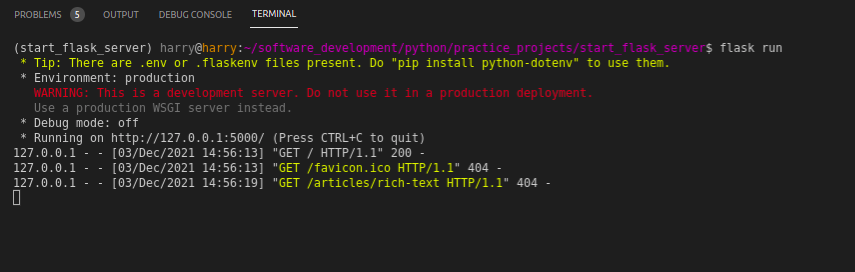
This is because when we started our Flask server, the environment variables we set were not read. To ensure that these runtime variable are available on startup, we will need another extension called python-dotenv. Let us install this extension:
(flask_project) $ pip3 install python-dotenv
Stop the Flask server by pressing Ctrl + C in your terminal. Then restart the server using flask run. All the environment variables should now be set.

Improve Application Design
Our application is looking so flat at the moment. We can improve its design by installing the flask-bootstrap package to help us create a beautiful and responsive web application.
(flask_project) $ pip3 install flask-bootstrap
Instantiate the bootstrap variable from the flask_bootstrap package.
app/__init.py__: Instantiate bootstrap package in application
from flask import Flask
from flask_bootstrap import Bootstrap # < ---- update

app = Flask(__name__)

boostrap = Bootstrap(app) # < ---- update

from app import routes, errors
Working With Templates
Templates are basicaly HTML files which we will use to display content. We will use the jinja2 templating engine to render our templates. At the moment, we have index.html and base.html templates. The base.html template is the parent template for all the other templates (currently we have only index.html). It will define all the base features of our application.
base.html: Parent template
{% extends 'bootstrap/base.html' %}

<!-- Link all style files here -->
{% block head %}
    {{  super() }}
    <link rel="stylesheet" type="text/css" href="{{ url_for('static', filename='css/main.css') }}">
{% endblock %}

<!-- The title of our application is defined here -->
{% block title %}
    {% if title %}
        {{ title }} - Flask Server
    {% else %}
        Welcome to Flask Server
    {% endif %}
{% endblock %}

<!-- This is the navbar -->
{% block navbar %}
    <nav class="navbar navbar-default">
        <div class="container">
            <div class="navbar-header">
                <button type="button" class="navbar-toggle collapsed" data-toggle="collapse" data-target="#bs-example-navbar-collapse-1" aria-expanded="false">
                    <span class="sr-only">Toggle navigation</span>
                    <span class="icon-bar"></span>
                    <span class="icon-bar"></span>
                    <span class="icon-bar"></span>
                </button>
                <a class="navbar-brand" href=" # ">Flask Server</a>
            </div>
            <div class="collapse navbar-collapse" id="bs-example-navbar-collapse-1">
                <ul class="nav navbar-nav navbar-right">
                    <li><a href=" # ">Documentation</a></li>
                </ul>
            </div>
        </div>
    </nav>
{% endblock %}

<!-- Contents of all our pages will go here -->
{% block content %}
    <div class="container">
        {% block app_context %}{% endblock %}
    </div>
{% endblock %}

<!-- All scripts will go here -->
{% block scripts %}
    {{  super() }}

{% endblock %}
Take your time to go through this template. There are several new things that I have used that you may not be familiar with. One addition that I would like to point out is in the title block. I have used a conditional statement to find out if the view function that will render index.html has a title variable. If it does, then we will use that title. If not, we will use the default title.
Template Inheritance
Our index.html template is a child of the base.html template. We can use the extends keyword to inherit the parent template.
index.html: Child template
{% extends 'base.html' %}

{% block app_context %}
    <div class="row">
        <div class="col-md-12">
            <h1>Hello, world!</h1>
        </div>
    </div>
{% endblock %}
Rendering Templates
Our view function index() will render the index.html template. We can use the render_template function to render a template.
routes.py: Render a template
from app import app
from flask import render_template


@app.route('/')
@app.route('/index')
def index():
    return render_template('index.html')
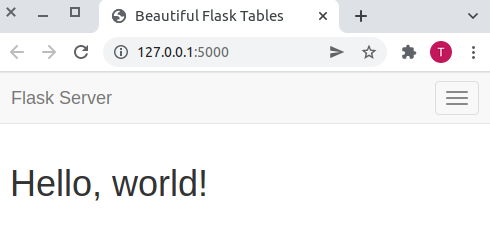
If you reload your Flask server, you should see the following output:
Error Handling
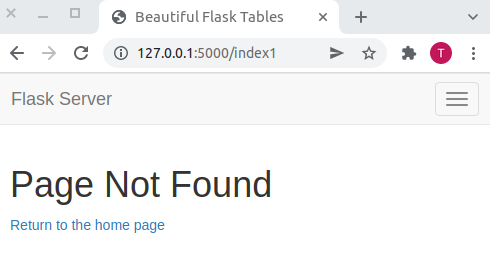
If you try to access the URL http://127.0.0.1:5000/index1, you will get a 404 Not Found error. This is because we have not created a view function for the URL /index1.
To handle this error, I will update our errors module
errors.py: Error Handling
from app import app, db
from flask import render_template


@app.errorhandler(404)
def not_found(error):
    return render_template('404.html'), 404
I have used the app.errorhandler decorator to register the error handlers. We need to render the 404 error template (you can add more). In the terminal, let us run the following command:
(flask_project) $ touch app/templates/404.html
This will create an empty 404.html template. We will populate it as follows:
404.html: 404 Not Found
{% extends 'base.html' %}

{% block app_context %}
    <div class="row">
        <div class="col-md-12">
            <h1>Page Not Found</h1>
            <p>
                <a href="/index">Return to the home page</a>
            </p>
        </div>
    </div>
{% endblock %}
You should have a nicer looking page with a redirect link to the home page.
Update Project Dependancies
Once you are done, we can update our requirements.txt file. This file contains all the dependencies that we have installed. Anyone who wished to install the application will need to install the same dependencies.
(flask_project) $ pip3 freeze > requirements.txt
Brief on the Flask Server
The flask run command is used to start the flask application in a development server. This server provides an interactive debugger and reloads when it notices changes in code. It is intended for local use only since it is not designed to be particularly efficient, stable or secure.
Prior to Flask 1.0 the FLASK_ENV environment variable was not supported and you needed to enable debug mode by exporting FLASK_DEBUG=1. This can still be used to control debug mode, but it is now preferred to set it as an evironment variable.
To stop your flask server, you can hit ctrl + C. However, when you hit ctrl + Z, you will notice a traceback when you try restarting your flask server. You will be informed that the address you are trying to connect to is already in use.
* Serving Flask app 'blog.py' (lazy loading)
* Environment: development
* Debug mode: on
Traceback (most recent call last):
# ...
OSError: [Errno 98] Address already in use
To fix it, you need to identify and stop the other program or use the command flask run --port 50001 to pick a different port.
Going Further
This is a good starting point as you learn flask. You can build on this project by adding more routes, and templates. You can even learn how to use web forms and a database with Flask. Things you can do:
- Learn how to work with Flask web forms
- Add a database to your Flask application
Share
If you enjoyed this article, you can share it with another person.
TweetNewsletter Subcription
Level up your skills.
We take your privacy seriously. Read our privacy policy. Unsubscribe | Resubscribe.