


Push Notifications Using Twilio Authy API in Flask
One of the most effective ways to reduce identity theft of online accounts is to enable two-factor authentication (2FA) on an account. It adds a layer of security to the authentication process by making it harder for attackers to gain access to a person's devices or online accounts because, even if the victim's password is hacked, a password alone is not enough to pass the authentication check. Below, you can choose what method you want to use to authenticate an account.
- Time-based two-factor authentication
- SMS two-factor authentication
- Push two-factor authentication (this article)
Traditionally, applications require a user to key in a numeric code on their phone or an authenticator app to log in. Unfortunately, as you can tell, this process requires the active participation of a user. To an extent, this seems tedious and a bit inconvenient, hence the need to simplify a secure login process.
To understand what a push notification is, let us first look at how it works. When a user tries to log into their account, an application's server will send a notification to the user's phone. All that a user needs to do is to tap on the dead simple notification message to either 'Accept' or 'Decline' the request.
The completed Twilio Authy project is available here on GitHub. To test the live project, click here.
Welcome to Twilio Authy Push Notification
Authy is a mobile application that allows users to either login to their accounts with or without having to key in a numeric code. It enables you to have a single mobile app for all your 2FA accounts and you can sync them across multiple devices, even on your desktop.
Requirements
- A smartphone
- Twilio Authy app
- Twilio Account
Things We Will Do
- Download and Install Authy
- Create a Twilio Authy App
- Create a simple flask app with password-based login
- Integrate push notifications with Authy
Download and Install Authy
I have chosen to use the Authy authenticator app for this demonstration. You will need to download the app from your applications' store:
- Authy on Google Play Store (Android)
- Authy on the Apple App Store (iPhone)
Create a Twilio Authy App
To create an Authy service, you first need to create an account on the Twilio website. It is free. Do so now here to continue. Once your account is created:
- Head over to the Twilio Console
- Click on Explore Products
- Under the Account Security category, find and pin the Twilio Authy product.
- On the pinned Authy product, click on Applications link.
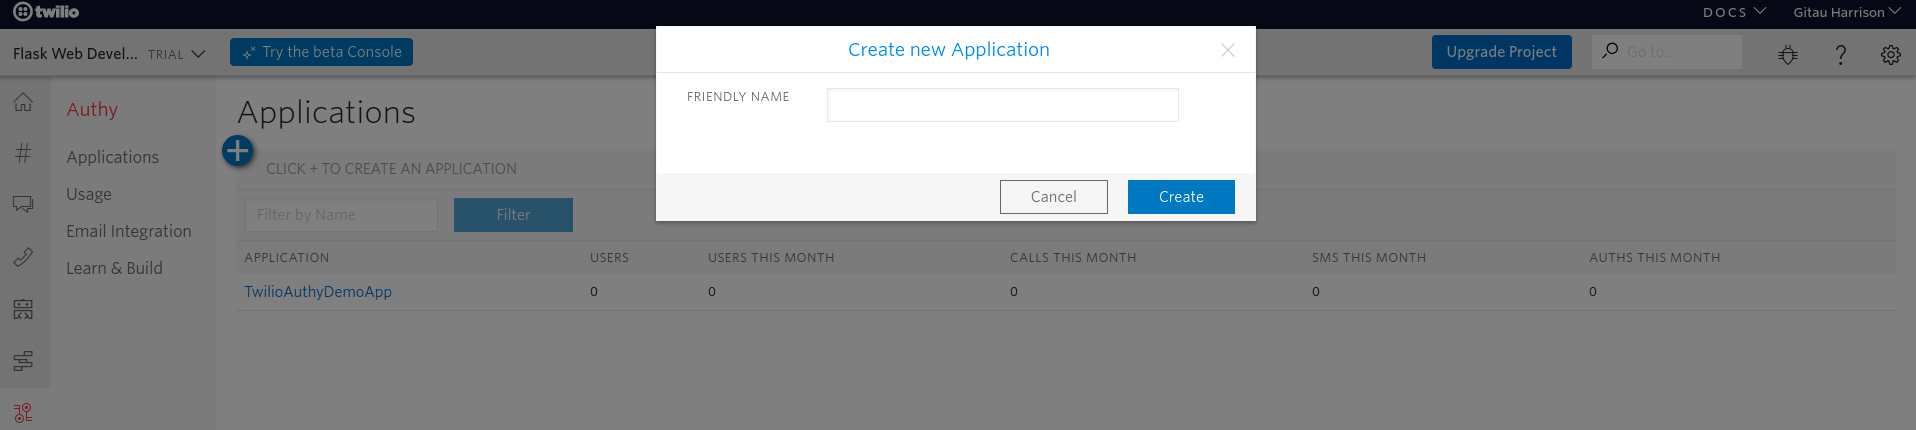
- Click on the blue + (plus) icon to create a new application.
- Provide a friendly name for your application.
Create a simple flask app with password-based login
I will not go into the details of creating a simple flask app with password-based login. The assumption here is that you already have a basic understanding of flask and how to create a flask app. If not, I recommend that you start here.
Your application should feature:
- A login page
- A registration page
- A home page
- A user profile page
- The ability to logout
- The profile page should have a placeholder link to enable/disable 2FA
Integrate push notifications with Authy
Overview
Push notifications work in a similar way to numeric codes. To enable two-factor authentication, a user needs to click on the "Enable" button on the profile page. They will then be redirected to another page where a QR code, specifically designed for push authentication with the proprietary Authy service, will be displayed. Using the Authy app on their smartphone, the user will then need to scan the QR code to complete the process.
The Authy service will poll the application regularly at intervals to find out if the QR code has been scanned. A bit of asynchronous Javascript logic will be added to enhance the polling process.
Subsequent attempts to log in will be made with the Authy service. Traditionally, you'd get a numeric code to fully authenticate the user. However, with Authy, you can simply tap on the notification message to either accept or decline the request.
As the application awaits the request, we can improve the user's experience by offering a spinner to indicate that the request is being processed
 .
.
Implementation
To enable push notifications using Twilio Authy, we will do the following:
- User clicks on the "Enable" button
- Generate JWT token
- Generate QR code
- Display QR code
- Poll for QR code scan
- Get user registrations status
- Send push authentication
- Verify push authentication
- Disable 2FA
You will need to download these three packages in your virtual environment to get started integrating push notifications on your Flask app with Authy:
(venv)$ pip3 install "authy>=2.2.5" pyjwt qrcode
The Twilio Authy package needs to be greater than or equal to version 2.2.5. We will also make use of the JSON Web Token package to create and verify tokens, as well as QR Codes.
Moving forward, we will need to create a module called authy.py within our app/ subfolder to handle all logic regarding the use of Authy.
User clicks on the "Enable" button
As soon as the "Enable/disable" link on the profile page is clicked, the user will be redirected to a page where there will be a link to enable or disable 2FA. You probably think this is unnecessary repetition, but it is useful to allow the user to consider whether or not they want to enable 2FA.
The view function handling this is straightforward:
app/routes.py: Enable 2FA
@app.route('/enable-2fa', methods=['GET', 'POST'])
@login_required
def enable_2fa():
    form = Enable2FAForm()
    if form.validate_on_submit():
        jwt = get_authy_registration_jwt(current_user.id)
        session['registration_jwt'] = jwt
        return render_template(
            'enable_2fa_qrcode.html', title='Enable 2FA QR Code')
    return render_template('enable_2fa.html', form=form, title='Enable 2FA')
Once the Enable button is clicked, a JWT token will be generated. This token will be stored in the session and will be used to generate the QR code.
Generate JWT token
Authy app expects QR Codes with the following URL:
authy://authy/qr?token={JWT}
The dynamic JWT token will have the following payload:
{
    'iss': '{ authy_app_name }',
    'iat': '{ issue date }',
    'exp': '{ expiration date }',
    'context': {
        'custom_user_id': '{ custom_user_id}',
        'authy_app_id': '{ authy_app_id }'
    }
}
iss: (issuer): must be the Authy application name you defined in the Twilio consoleiat(issued at) andexp(expiration) are integerscustomer_user_id: identifies the user of our application, typically the primary key assigned to a user in the databaseauthy_app_id: must be set to the identifier assigned by Authy to our application. To find this identifier, click on your Authy app name and find Settings.authy_app_id: is APPLICATION ID

To verify legitimate requests, you will sign to your application's JWT token with a secret key, the Authy API Production key. Below is how your application can generate the JWT token:
app/authy.py: Generate JWT token
import time
import jwt
from app import app


def get_authy_registration_jwt(user_id, expires_in=5*60):
    """
    Generate a JWT using the current user's id
    A custom expiration time can be specified
    """
    now = time.time()
    payload = {
        'iss': app.config['AUTHY_APP_NAME'],
        'iat': now,
        'exp': now + expires_in,
        'context': {
            'custom_user_id': str(user_id),
            'authy_app_id': app.config['AUTHY_APP_ID']
        }
    }
    return jwt.encode(
        payload, app.config['AUTHY_PRODUCTION_API_KEY'], algorithm='HS256')
As you can notice, I am using environment variables to access sensitive API keys. This is a good practice to avoid hardcoding sensitive information in your application. You will need to update the current config.py file in the app/ sub-folder to factor in Authy keys.
app/config.py: Configure Authy Keys
import os


class Config(obeject):
    # ...

    # Authy
    AUTHY_APP_NAME = os.environ.get('AUTHY_APP_NAME')
    AUTHY_APP_ID = os.environ.get('AUTHY_APP_ID')
    AUTHY_PRODUCTION_API_KEY = os.environ.get('AUTHY_PRODUCTION_API_KEY')
The values of the environment variables will be in the hidden .env file which SHOULD NOT be committed to your repository. Add it to your .gitignore file (located in the top-level directory) to keep it untracked by git!
.env: Actual values of environment variables
AUTHY_APP_NAME=
AUTHY_APP_ID=
AUTHY_PRODUCTION_API_KEY=
Enviroment variables within Flask can be accessed by the help of the python-dotenv package. It reads key-value pairs from a .env file and makes them available as environment variables. Remember to install this package into your virtual environment too. For more information about it, read more from its documentation.
Generate QR code
With JWT ready, we can generate the QR code for Authy.
app/authy.py: Generate QR code
from io import BytesIO
import qrcode
import qrcode.image.svg


def get_authy_qrcode(jwt):
    """
    Generate a QR code using the JWT
    Authy URL expected
    """
    qr = qrcode.make(
        f'authy://authy/qr?token={jwt}',
        image_factory=qrcode.image.svg.SvgImage)
    buffer = BytesIO()
    qr.save(buffer)
    return buffer.getvalue()
As mentioned earlier, Authy expects the QR Code to be generated using a specific URL, where the JWT is passed as an argument. The image format used is an SVG image, though you can use other formats too. The image data is written to a buffer and then returned as a byte string. An HTTP response is returned with the image data.
Display QR code
Once the user has clicked on the Enable 2FA button, the view function that will be invoked will generate a QR code image.
app/routes.py: Render QR code
from flask import abort, session


@app.route('/enable-2fa-qrcode')
@login_required
def enable_2fa_qrcode():
    jwt = session.get('registration_jwt')
    if not jwt:
        abort(400)
    del session['registration_jwt']
    return authy.get_authy_qrcode(jwt), 200, {
        'Content-Type': 'image/svg+xml',
        'Cache-Control': 'no-cache, no-store, must-revalidate',
        'Pragma': 'no-cache',
        'Expires': '0'}
This route serves extra headers that tell the browser to not do any caching. Why? To avoid any unauthorized access and use of the QR code.
Content-Type: sets the content type of the response toimage/svg+xmlCache-Control: sets the cache control headers tono-cache, no-store, must-revalidateno-cache: indicates that the response can be stored in caches, but the response must be validated with the origin server before each reuse, even when the cache is disconnected from the origin server. Note thatno-cachedoes not mean "don't cache".no-store: indicates that any caches of any kind (private or shared) should not store this response.must-revalidate: indicates that the response can be stored in caches and can be reused while fresh. If the response becomes stale, it must be validated with the origin server before reuse.
Pragma: Same asCache-Control: no-cache. Forces caches to submit the request to the origin server for validation before a cached copy is released.Expires: this header contains the date/time after which the response is considered expired.- Learn more about HTTP headers here.
You can use this image to display a QR code for the user to scan. For your reference, you need to create a new template called enable_2fa_qrcode.html in the app/templates/ folder.
app/templates/enable_2fa_qrcode.html: Enable QRCode on the 2FA template
{% extends 'base.html' %}

{% block app_content %}
        <div class="row">
            <div class="col-md-12 text-center">
                <h1>Register</h1>
                <p>Scan the QR Code below using your Authy App</p>
            </div>
        </div>
        <div class="row">
            <div class="col-md-6">
                 <h3>IOS Devices</h3>
                 <ul>
                    <li>Open the Authy iOS app</li>
                    <li>
                        Tap the Red + sign at the bottom of the screen for Add Account
                    </li>
                    <li>Tap Scan QR Code</li>
                 </ul>
            </div>
            <div class="col-md-6">
                <h3>Android Devices</h3>
                <ul>
                   <li>Open the Authy iOS app</li>
                   <li>
                        Tap the … (menu) icon in the upper right corner,
                        and then select Add Account
                    </li>
                   <li>Tap Scan QR Code</li>
                </ul>
            </div>
        </div>
        <div class="row">
            <div class="col-md-12">
                <div>
                    <img src="{{ url_for('enable_2fa_qrcode') }}" alt="QR Code">
                </div>
            </div>
        </div>
{% endblock %}

{% block qrcode_script %}{% endblock %}
Poll for QR code scan
The application will now wait for the user to scan the QR code. There are two ways to do this:
- Polling
- Webhooks
Polling is less efficient, but it is the easiest to implement. Additionally, it does not require the setup of a domain and an SSL certificate. To implement polling, we will need to create a script that will run every minute.
app/templates/enable_2fa.html: Polling for scan status
<!-- Previous code remains -->

{% block qrcode_script %}
    <script>
        function check_registration() {
            $.ajax( " {{ url_for('enable_2fa_polling') }} ").done(function(data) {
                if (data == 'pending') {
                    setTimeout(check_registration, 1000);
                }
                else {
                    window.location = " {{ url_for('user', username=current_user.username) }} "
                }
            });
        }
        setTimeout(check_registration, 1000);
    </script>
{% endblock %}
check_registration() function sends a request to the enable_2fa_polling view function. I have scheduled the function to be called every second after the page loads. If a user has not scanned the QR Code yet, the response data will be pending, hence the function will be called again. This will go on until the response changes, at which point the user will be redirected to their profile page.
app/routes.py: Polling for scan status
@app.route('/enable-2fa-polling')
@login_required
def enable_2fa_polling():
    registration = authy.get_registration_status(current_user.id)
    if registration['status'] == 'compeleted':
        current_user.authy_id = registration['authy_id']
        db.session.commit()
        flash('2FA has been enabled!')
    elif registration['status'] != 'pending':
        flash('Something went wrong! Please try again')
    return jsonify(registration['status'])
Once a user is successfully scanned, the response data will be completed. The user will be redirected to their profile page. At this point, we would want the link on the profile page to change from Enable 2FA to Disable 2FA.
app/templates/user.html: Disable the 2FA link
{% extends 'base.html' %}

{% block app_content %}
        <div class="row">
            <div class="col-md-12 text-center">
                <!-- Two-factor authentication -->
                {% if not user.two_factor_enabled() %}
                    <p>
                        <a href="{{ url_for('enable_2fa') }}">Enable 2FA</a>
                    </p>
                {% else %}
                    <p>
                        <a href="{{ url_for('disable_2fa') }}">Disable 2FA</a>
                    </p>
                {% endif %}
            </div>
        </div>
{% endblock %}
Get user registrations status
So, how do you check for the registration status of a user?
app/authy.py: Get registration status
from authy.api import AuthyApiClient


def get_registration_status(user_id):
    """
    Use an authy object to get the registration status of a user
    A user is identified by their id
    Successful returns a dict with the status and the authy id
    Otherwise, the status remains pending
    """
    authy_api = AuthyApiClient(app.config['AUTHY_PRODUCTION_API_KEY'])
    resp = authy_api.users.registration_status(user_id)
    if not resp.ok():
        return {'status': 'pending'}
    return resp.content['registration']
First, we obtain the Authy API client by instantiating the AuthyApiClient class. Then, we call the users.registration_status method, passing the user ID as an argument. This is the same identifier passed when generating a JWT encoded into the QR Code. Authy recognizes this user by their ID when mapping the ID to the Authy user.
When the user scans the QR Code, the response will be a JSON object:
{'status': 'compeleted', 'authy_id': 123456789}
Otherwise, an unscanned response would look like this:
{'status': 'pending'}
Any other status value besides pending and completed indicates that an error has occurred, so the application should cancel the registration request.
The authy_id is an integer found in the database once a user has successfully enabled 2FA. Ensure that you have an authy_id column in your database to store this data.
app/models.py: Add authy_id column to User
class User(db.Model):
    # ...
    authy_id = db.Column(db.Integer, index=True, unique=true)

    def two_factor_enabled(self):
        return self.authy_id is not None
If you do not have this column yet, add it, and remember to run your migrations so that the changes apply. The two_factor_enabled helper method checks whether the authy_id attribute exists or not.
Send push authentication
To begin, you need to check if the user has enabled 2FA on their account. If they have, you can send a push notification to the user.
app/authy.py: Send push notification
def send_push_authentication(user):
    """
    Identify the user using their unique authy_id
    Send a push authentication request to the user
    using the one_touch_request() method
    """
    authy_api = AuthyApiClient(app.config['AUTHY_PRODUCTION_API_KEY'])
    resp = authy_api.one_touch.send_request(
        user.authy_id,
        message='Please scan this QR code to enable 2FA',
        details={
            'username': user.username,
            'IP Address': request.remote_addr,
            },
            seconds_to_expire=120)
    if not resp.ok():
        return None
    return resp.get_uuid()
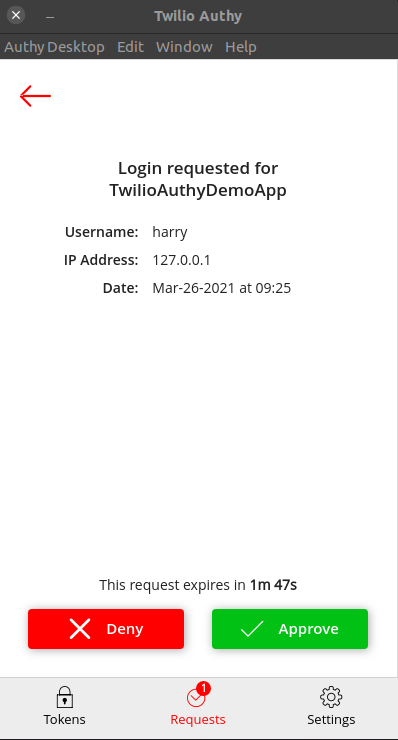
Using a user's unique authy_id, Authy will initiate a push notification using the one_touch.send_request method. The message parameter is the text that will be displayed in the push notification. The details parameter is a dictionary with details that will be shown in the Authy app to help the user identify logins that are illegitimate. The seconds_to_expire parameter is the number of seconds that the push notification will be valid. Find out what other parameters can be used from the documentation.
Verify push authentication
The application will wait for the user to accept or deny a request. Polling from the backend can be used here too. A check_2fa function can be used to check the status of the request.
app/routes.py: Check 2FA status
@app.route('/check-2fa')
def check_2fa():
    username = session['username']
    user = User.query.filter_by(username=username).first()
    session['authy_push_uuid'] = authy.send_push_authentication(user)
    return render_template('check_2fa.html', next=request.args.get('next'))
As the user awaits authentication, their username will be obtained in a flask session. The database will be queried to retrieve the first instance of that user's username. This user will then be used as an argument in the authy.send_push_authentication method to send the push notification. The response is a UUID that is stored in the session.
The check_2fa.html template will contain a spinner to indicate that the request is being processed.
app/templates/check_2fa.html: Check 2FA status
{% extends 'base.html' %}

{% block app_content %}
        <div class="row">
            <div class="col-md-12 text-center">
                <h1>Check 2FA</h1>
                <p>
                    <img src="{{ url_for('static', filename='img/spinner.gif') }}" alt="spinner" />
                </p>
            </div>
        </div>
{% endblock %}

{% block qrcode_scripts %}
    <script>
        function check_push() {
            $.ajax(' {{ url_for('check_2fa_poll') }} ').done(function(data){
                if (data == 'pending') {
                    setTimeout(check_push, 1000);
                }
                else if (data == 'approved') {
                    window.location = {{ 'next' }};
                }
                else {
                    window.location = " {{ url_for('login', next=next) }} ";
                }
            });
        }
        setTimeout(check_push, 1000);
    </script>
{% endblock %}
The check_2fa_poll function will be called every second. It will make an AJAX request to the backend to check the status of the push notification. If the status is pending, the function will be called again. If the status is approved, the user will be redirected to the next page. If the status is denied, the user will be redirected to the login page.
app/routes.py: Check 2FA status
@app.route('/check-push-poll')
def check_2fa_poll():
    push_status = authy.check_push_authentication_status(
        session['authy_push_uuid'])
    if push_status == 'approved':
        username = session['username']
        del session['username']
        del session['authy_push_uuid']
        user = User.query.filter_by(username=username).first()
        remember = request.args.get('remember', '0') == '1'
        login_user(user, remember=remember)
    elif push_status != 'pending':
        flash('An error has occurred. Please try again')
    return jsonify(push_status)
The check_push_authentication_status method will be used to check the status of the push notification. The authy_push_uuid will be used to identify the push notification.
app/authy.py: Check 2FA status
def check_push_authentication_status(uuid):
    authy_api = AuthyApiClient(app.config['AUTHY_PRODUCTION_API_KEY'])
    resp = authy_api.one_touch.get_approval_status(uuid)
    if not resp.ok():
        return 'error'
    return resp.content['approval_status']['status']
UUID is used to identify the push notification. The get_approval_status method will be used to check the status of the push notification. The response will be a string indicating the status of the push notification ('approved', 'pending' or 'error'). If the user does not handle this request before the timeout set in the push authentication request, then the status will change to 'expired'.
Disable 2FA
In the event a user wants to disable 2FA, they can use the disable_2fa function.
app/routes.py: Disable 2FA
@app.route('/disable-2fa', methods=['GET', 'POST'])
def disable_2fa():
    for = Disable2FAForm()
    if form.validate_on_submit():
        if not authy.delete_user(current_user.authy_id):
            flash('An error has occurred. Please try again.')
        else:
            current_user.authy_id = None
            db.session.commit()
            flash('Two-factor authentication is now disabled.')
        return redirect(url_for('user', username=current_user.username))
    return render_template('disable_2fa.html', form=form)
The delete_user method will be used to disable 2FA. The authy_id will be used to identify the user whose authy_id will be set to None.
app/authy.py: Disable 2FA
def delete_user(authy_id):
    """Unregister a user from Authy push notifications.
    :param authy_id: the Authy ID for the user.
    :returns True if successful or False otherwise.
    """
    authy_api = AuthyApiClient(current_app.config['AUTHY_PRODUCTION_API_KEY'])
    resp = authy_api.users.delete(authy_id)
    return resp.ok()
Conclusion
That is all there is to it. You can build on this idea to help strengthen your application's security.
Share
If you enjoyed this article, you can share it with another person.
TweetNewsletter Subcription
Level up your skills.
We take your privacy seriously. Read our privacy policy. Unsubscribe | Resubscribe.