


Implement Search Feature In Your Flask App Using Elasticsearch
Elasticsearch may mean different things to different people, depending on their level of familiarity with the technology. At its core, Elasticsearch is largely a distributed open-source search and analytics engine for all types of data built on Apache Lucene and developed in Java, using NoSQL, meaning it stores data in an unstructured way and that we cannot use SQL to query it. It is at the heart of the ELK Stack (Elasticsearch, Kibana, and Logtash) such that it has become synonymous with the name of the stack itself.
The following are other sections in the Elasticsearch series. You can click on any of the links to learn more:
- Install Elasticsearch in Ubuntu 20.04 In Localhost
- Install And Configure ElasticSearch In A Live Linux Server
- Implement Search Functionality In Your Flask App (this article)
As you learned in the installation guide, support for full-text search is not standardized like relational databases are. Also, the fact that SQLAlchemy does not natively support the search functionality, we have to contend with the fact that we need to manually do this ourselves.
Table of Contents
- Overview
- Build A Simple Flask App
- Understanding Elasticsearch
- Configure Elasticsearch
- Generic Implementation Of Search Functionality
- Combining The Search Functionality With SQLAlchemy
- Define The Search Form
- Access The Search Form Before Each Request
- Display The Search Form
- Render The Search Form
Overview
From the Testing section in the Localhost installation guide, you saw how to index a document and get corresponding JSON data back. However, you may be curious to understand how everything works. The Elasticsearch documentation does a good job of trying to explain how indexing and parsing work. Let us cover some basic concepts of how it organizes data and its backend components.
Documents
They are the basic unit of JSON data that can be indexed in Elasticsearch. If you have interacted with rows in relational databases, a document is more or less like a row object. Each document has a unique ID and a given data type.
body={'test': 'this is the first test'}
Indices
An index is used to classify documents that have the same characteristics. It is what you would typically use to query against Elasticsearch to retrieve logically-related data. Say you have a blog, you can have an index for Articles, another for Comments et cetera. Each index has a name.
index='test_index'
Inverted Index
Elasticsearch uses a data structure called an inverted index that supports very fast full-text searches. An inverted index lists every unique word that appears in any document and identifies all of the documents each word occurs in. Let us look at this example to best understand what it is.
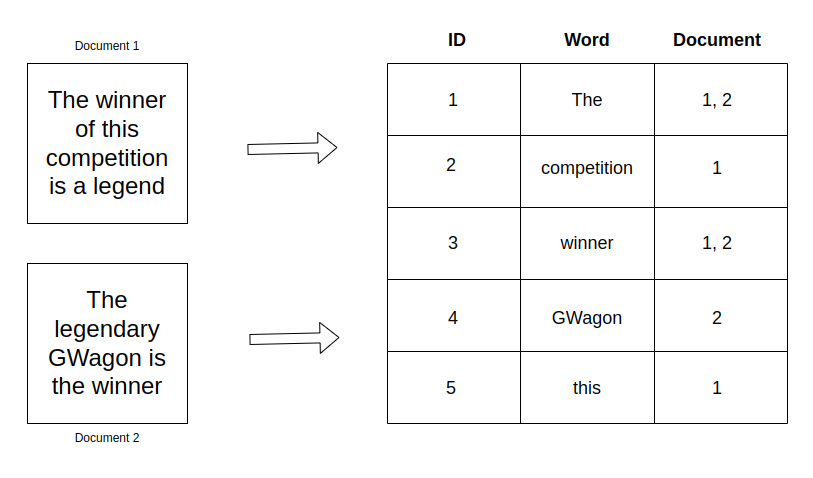
The inverted index does not really store items directly, but it instead splits each document up into individual search terms and then maps each term to the documents they occur in. By using inverted indices, Elasticsearch can quickly find the best matches for full-text searches from even large data sets.
When performing full-text searches, we are querying an inverted index and not the JSON documents that we defined when indexing the documents. A cluster can have at least one inverted index. That’s because there will be an inverted index for each full-text field per index. So if you have an index containing documents that contain five full-text fields, you will have five inverted indices.
Cluster
A cluster is a group of one or more node instances that are connected. The effectiveness of Elasticsearch is in the distribution of tasks to each node in the cluster.
Nodes
A node is a single server that participates in the indexing and search capabilities of a cluster.
- Master node: Responsible for cluster-wide operations such as creating and deleting an index and adding or removing a node
- Data node: Stores data and executes data-related operations such as search and aggregation
- Client node: Forwards cluster requests to master and data nodes
Shards
It is possible to subdivide an index into multiple pieces called shards. Each shard is a full-functional and independent index that can be hosted on any node. By distributing documents across many shards and distributing those shards across multiple nodes, Elasticsearch can protect against hardware failures and increase query capacities as nodes are added to a cluster.
Build A Simple Flask App
We are going to search data generated by users in an app. We, therefore, need to store these user data in a database against which we shall query. This section presumes you are already familiar with working with databases as we will not go into details of how to set up the application. You can refer to this completed project on GitHub.

The key things that your application will need to have are:
- A model or models used to store user data (the
Postmodel has been used in the sample project) - A form that allows users to post something
- A page that displays all the data users posted in the app
Your navigation bar does not necessarily need to have a search form as seen in the image above. In a subsequent section below, we will learn how to add one such that it will be available across all web pages of the app.
Understanding Elasticsearch
In the localhost installation guide, you learned how to install and configure Elasticsearch. We will need the Python client library while managing it, so make sure you install it in your virtual environment too:
(venv)$ pip3 install elasticsearch && pip3 freeze > requirements.txt
The first thing we need to do is to connect to Elasticsearch:
(venv)$ flask shell


>>> from elasticsearch import Elasticsearch
>>> es = Elasticsearch('https://localhost:9200')

# Document 1
>>> es.index(index='test', id=1, body={'text': 'testing elasticsearch connection'})

# Document 2
>>> es.index(index='test', id=2, body={'text': 'this is another test'})
Above, we have written two documents with the index test each with a field called text. Let us try to search for the word test as seen in the body of each document.
>>> es.search(index='test', body={'query': {'match': {'text': 'test'}}})
The response from the es.search() call is a Python dictionary whose results are:
{
    'took': 16,
    'timed_out': False,
    '_shards': {
        'total': 1,
        'successful': 1,
        'skipped': 0,
        'failed': 0
        },
    'hits': {
        'total': {
            'value': 1,
            'relation': 'eq'
            },
        'max_score': 0.6548753,
        'hits': [
                {
                    '_index': 'test',
                    '_type': '_doc',
                    '_id': '2',
                    '_score': 0.6548753,
                    '_source': {'text': 'this is another test'}
                }
            ]
        }
    }
The results query returned one document with a non-perfect score. A perfect score is 1. The returned document is the one that contains our search words. Typically, if there is more than one document, the one with the highest score is the one that contains almost the exact words searched for. Those that partially contain the words would be returned but with a lower score. To delete an index, you can run:
>>> es.indices.delete('test')
Configure Elasticsearch
Like with other configurations, the connection URL for Elasticsearch is going to be sourced from an environment variable.
config.py: Configure Elasticsearch
class Config(object):
    # ...

    ELASTICSEARCH_URL = os.environ.get('ELASTICSEARCH_URL') or None
If this variable is not defined, we are going to set it to None and use it as a signal to disconnect Elasticsearch. In certain situations, say during unit testing, we may not necessarily need Elasticsearch to run, and therefore, disabling it may come in handy. To instantiate this variable, we will need to update the .env file as follows:
.env: Elasticsearch URL
ELASTICSEARCH_URL=http:localhost:9200
The challenge with working with Elasticsearch is that it is not wrapped by a Flask extension, and cannot be initialized in a global scope as many other extensions. The only way to access this variable is through app.config which becomes available once a Flask context is created.
app/__init__.py: Access configurations
# ...
from elasticsearch import Elasticsearch


app = Flask(__name__)
app.config.from_object(Config)

# Access value from the config module
app.elasticsearch = Elasticsearch([app.config['ELASTICSEARCH_URL']]) \
    if app.config['ELASTICSEARCH_URL'] else None

# ...
If you are using blueprints and a factory function, Elasticsearch configurations will only be accessible once create_app() function has been invoked.
app/__init__.py: Elasticsearch with a factory function
# ...
from elasticsearch import Elasticsearch
# ...

def create_app(config_class=Config):
    app = Flask(__name__)
    app.config.from_object(config_class)

    app.elasticsearch = Elasticsearch([app.config['ELASTICSEARCH_URL']]) \
        if app.config['app.config['ELASTICSEARCH_URL']'] else None
Generic Implementation Of Search Functionality
The assumption here is that we are not going to limit ourselves to one model when searching. The search functionality is going to be open in the sense that any model can be used in the search query. Also, it is best not to limit ourselves to only Elasticsearch for this functionality. There are a handful of powerful other search engines that we can use. Our implementation is going to be open to a possible switch to another search engine.
The first attempt to get this rolling is to identify what model and what fields in this model we would like to index. How can this be done? Well, we can define an attribute called __searchable__ which lists all the fields we would need to be included in the index.
app/modes.py: Identify model and fields to be indexed
# ...


class Post(db.Model):
    __searchable__ = ['body']
    # ...
Next, we can define all indexing, deletion, and querying of a model in a search module following the principle of separation of concerns.
app/search.py: Implement search functionality
from app import app

'''
If using the factory function, you can import the current_app from Flask as:

from flask import current_app

Then replace every instance of `app.` with `curent_app.`
'''

def add_to_index(index, model):
    # Check if elasticsearch is configured; if not return nothing
    if not app.elasticsearch:
        return
    payload = {}
    # Add the fields to be searched to a payload after looping through
    # The selected fields of the model
    for field in model.__searchable__:
        payload[field] = getattr(model, field)
    app.elasticsearch.index(index=index, id=model.id, body=payload)
To ensure that the search functionality runs even when Elasticsearch has not been configured, we begin by checking if there are any configurations set, without which we return nothing. This is only a matter of convenience. If the configurations are set, then we loop through the fields listed in __searchable__ and pass those as payloads to a document's body whose ID is that of the model (uniquely convenient) and an index we can appropriately choose for ourselves (you will see this later).
In the context above, all data in the body field of the Post model will be added as a document that can be searched. Refer to the section Understanding Elasticsearch to see how documents can be added to an index before a search query. Using the same ID for SQLAlchemy and Elasticsearch is super convenient when running searches since we can link the two databases.
app/search.py: Delete an index
# ...

def remove_from_index(index, model):
    if not app.elasticsearch:
        return
    app.elasticsearch.delete(index=index, id=model.id)
The elasticsearch.delete() function is to be used to delete a document based on its ID, which is conveniently similar in both databases.
app/search.py: Query function
# ...

def query_index(index, query, page, per_page):
    if not app.elasticsearch:
        return [], 0
    search = app.elasticsearch.search(
        index=index,
        body={'query': {'multi_match': {'query': query, 'fields': ['*']}},
              'from': (page - 1) * per_page,
              'size': per_page})
    ids = [int(hit['_id']) for hit in search['hits']['hits']]
    return ids, search['hits']['total']['value']
The query_index function takes an index name together with the query to search for along with pagination controls. Unlike before where you saw the use of match, above, we are using multi-match which can search across multiple fields. The use of * in the key fields basically tells Elasticsearch to look in all fields.
Unfortunately, Elasticsearch does not provide a nice pagination control as is the case with SQLAlchemy. The implementation implements a custom logic to add pagination. The return statement returns two items, (1) A list of IDs from the search results and (2) the total number of results. Refer to the search results of the Understanding Elasticsearch section to learn more.
Let us test our work on a Flask shell:
(venv)$ flask shell

>>> from app.search import add_to_index, remove_from_index, query_index
>>> for post in Post.query.all():
        add_to_index('posts', post)
>>> query_index('posts', 'test one three the', 1, 20)
([5, 1, 6, 9, 10, 2, 3, 7, 8], 9)
>>> query_index('posts', 'test one three the', 1, 5)
([5, 1, 6, 9, 10], 9)
>>> query_index('posts', 'test one three the', 2, 5)
([2, 3, 7, 8], 9)
>>> query_index('posts', 'test one three the', 3, 5)
([], 9)
Our query returned a total of 9 results. When we asked for page 1 with 20 items, we got all 9 items. The subsequent examples have been used to show pagination the way we know from SQLAlchemy. After experimenting, we can delete the posts index as follows:
>>> app.elasticsearch.indices.delete('posts')
Combining The Search Functionality With SQLAlchemy
What we saw above is fantastic, but it is less than ideal. The search results should return the actual model(s) instead of IDs. With models, we can pass them to the templates for rendering. So, we need to find a way to replace the IDs with the actual models. Another obvious problem from our example above is that we have to explicitly issue an indexing call so that posts can be added or removed. A more convenient way would be for the application to automatically trigger such calls as soon as there is a change made to the SQLAlchemy database.
SearchableMixin Class
We are going to utilize a mixin class to solve the two-mentioned challenges of our prior example. A mixin class provides method implementation for reuse by multiple related child classes but is not considered a base class itself. The SearchableMixin class is going to act as a link between SQLAlchemy and Elasticsearch databases to automatically manage the associated full-text search index.
app/models.py: SearchableMixin class
# ...
from app.search import add_to_index, remove_from_index, query_index


class SearchableMixin(object):
    @classmethod
    def search(cls, expression, page, per_page):
        ids, total = query_index(cls.__tablename__, expression, page, per_page):
        if total == 0:
            return cls.query.filter_by(id=0), 0
        when = {}
        for i in range(len(ids)):
            when[ids[i]] = i
        return cls.query.filter(cls.id.in_(ids)).order_by(
            db.case(when, value=cls.id)), total
The search() function uses a class method to associate it with a given class rather than a particular instance. Instead of using self as is normally the case with a class, notice how I use the cls to make it clear that this method receives a class and not an instance as its first argument. Once it is attached to a model, say the Post model, the search method will be invoked as Post.search() without needing an actual instance of the class Post.
To begin, you will notice that the cls.__tablename__ is passed to query_index as the index name. This is going to be a convention such that the names assigned by SQLAlchemy to a model shall be used as the index name. The returned query is a series of positional elements (rather than a list) and their total number. We have used case from SQLAlchemy to retrieve the list of objects by their IDs in the order they were given. This is so because Elasticsearch returns a sorted query from more to less relevant.
The CASE construct in SQL is a conditional object that acts somewhat analogously to an “if/then” construct in other languages. It returns an instance of
Case.case()in its usual form is passed a series of “when” constructs, that is, a list of conditions and results as tuples:
from sqlalchemy import case

stmt = select(users_table).\
        where(
            case(
                (users_table.c.name == 'wendy', 'W'),
                (users_table.c.name == 'jack', 'J'),
                else_='E'
            )
        )
We loop through the list of IDs to retrieve their positions, which is what we pass to the when dictionary. Before Flask-SQLAlchemy V3.0.2, the case() method took a list rather than a dictionary. Instead of returning a series of positional elements, we'd get a list of objects by their IDs.
class SearchableMixin(object):
    @classmethod
    def search(cls, expression, page, per_page):
        # ...
        when = []
        for i in range(len(ids)):
            when.append((ids[i], i))
        # ...
The latest version of Flask-sqlalchemy will return the error sqlalchemy.exc.ArgumentError: The "whens" argument to case(), when referring to a sequence of items, is now passed as a series of positional elements, rather than as a list. if a list is used.
To trigger changes from the SQLAlchemy database such as before and after a commit is made, we can define class methods for each.
app/models.py: Before and after commit
class SearchableMixin(object):
    # ...

    @classmethod
    def before_commit(cls, session):
        session._changes = {
            'add': list(session.new),
            'update': list(session.dirty),
            'delete': list(session.deleted)
        }

    @classmethod
    def after_commit(cls, session):
        for obj in session._changes['add']:
            if isinstance(obj, SearchableMixin):
                add_to_index(obj.__tablename__, obj)
        for obj in session._changes['update']:
            if isinstance(obj, SearchableMixin):
                add_to_index(obj.__tablename__, obj)
        for obj in session._changes['delete']:
            if isinstance(obj, SearchableMixin):
                remove_from_index(obj.__tablename__, obj)
        session._changes = None
Just before a session is committed, the before_commit() handler will allow us to check what object has been added, modified or deleted through session.new, session.dirty and session.delete respectively. These objects are not going to be available anymore after a commit is made. session._changes dictionary allows us to save the objects and have them survive a commit since we shall be using them to update the Elasticsearch index.
As soon as a session has been successfully committed, this is the proper time to make changes on the Elasticsearch side of things using after_commit(). We begin by iterating over what has been added, modified or deleted and make corresponding calls to the indexing functions in the search module for objects with SearchableMixin.
We can include a simple reindex() helper method that can allow us to refresh an index with all the data on the relational side. You may experience instances where you have to manually update the Elasticsearch index to ensure the latest changes are applied.
app/models.py: Reindexing
class SearchabelMixin(object):
    # ...

    @classmethod
    def reindex(cls):
        for obj in cls.query:
            add_to_index(cls.__tablename__, obj)
Given that reindex is a class method, you can run Model.reindex() to update the Elasticsearch index. Finally, to ensure that SQLAlchemy listens to database change events, we can call the function db.event.listen() from SQLAlchemy. This function serves to call before_commit and after_commit methods before and after each commit respectively.
app/models.py: Listen to database changes
class SearchableMixin(object):
    # ...

db.event.listen(db.session, 'before_commit', SearchableMixin.before_commit)
db.event.listen(db.session, 'after_commit', SearchableMixin.after_commit)
To ensure that SearchableMixin is fully incorporated into a model, we can pass it as a class argument to the select model as follows:
app/models.py: Integrate SearchableMixin into a model
class Post(SearchableMixin, db.Model):
    # ...
With this minor change to the Post model, we can maintain a full text-search for posts. Let us begin by initializing all the index from the posts currently in the database:
>>> Post.reindex()
And to search, we can do:
>>> query, total = Post.search('test the Japan', 1, 20)
>>> total
7
>>> query.all()
[Post: test comment, Post: Another one test for you, Post: Why the diss, Post: Japan the great country, Post: I am the greatest, Post: Two of the tests were not done well, Post: There has got to be the best way around it]
Define The Search Form
Everything we have done so far has been through the terminal. To complete this feature, we now need to provide a more user-friendly form that will allow users to search for posts in the application. Common across web browsers, search results use the q argument in the URL. For example, to search for gitauharrison on the browser, the search URL pointing to the results would look like https://www.google.com/search?q=gitauharrison. Let us begin by defining such a form:
app/forms.py: Search form
from flask import request

# ...

class SearchForm(FlaskForm):
    q = StringField(
        'Search',
        validators=[DataRequired()],
        render_kw={'placeholder': 'Search ...'})

    def __init__(self, *args, **kwargs):
        if 'formdata' not in kwargs:
            kwargs['formdata'] = request.args
        if 'meta' not in kwargs:
            kwargs['meta'] = {'csrf': False}
        super(SearchForm, self).__init__(*args, **kwargs)
A deviation from how you may be working with forms, a search form typically sends a GET request rather than a POST request. We have a constructor function called __init__() which provides the formdata and the meta arguments. If you are not aware, formdata is where Flask gets its form submissions. A POST request would use request.form while a GET request uses request.args.
By default, all forms have CSRF protection enabled. However, for clickable search links to work, this feature needs to be disabled hence why we are setting meta to {'csrf': False}. This tells Flask-wtf to bypass all csrf validation for this form.
Curious that this form lacks a submit button? Well, since it is a text field, a simple press of the Enter key on the keyboard will submit a user's input. That is why we do not necessarily need a submit button.
Access The Search Form Before Each Request
In this application, we are going to put the search form in the navigation bar, meaning it will be located in the base.html file and appear across all other templates. To avoid possible duplication of code where we have to instantiate the SearchForm object in each route and pass it to relevant templates, we can use the before_request handler.
app/routes.py: Instantiating the search form before each request
from flask import g
from app.forms import SearchForm


@app.before_request
def before_request():
    g.search_form = SearchForm()
Flask provides the g object. It is a variable that acts as storage. Data stored in this variable can persist through the life of a request. What will happen is that when a call to this handler ends and Flask invokes the view function responsible for rendering the search form, the g object will remain unchanged and still have the form attached to it.
Note that the g variable is specific to each request. If your application is serving multiple requests to clients (browsers), you can rely on this object to provide private storage for each request. You do not have to worry about one client's data being similar to data requested by another client.
Display The Search Form
This form is going to be in the reusable navigation bar.
app/templates/base.html: Display the search form
<nav class="navbar navbar-default">
    <div class="container">
        <div class="navbar-header">
            <button type="button" class="navbar-toggle collapsed" data-toggle="collapse" data-target="#bs-example-navbar-collapse-1" aria-expanded="false">
                <span class="sr-only">Toggle navigation</span>
                <span class="icon-bar"></span>
                <span class="icon-bar"></span>
                <span class="icon-bar"></span>
            </button>
            <a class="navbar-brand" href=" {{ url_for('index') }} ">Add Search Feature</a>
        </div>
        <div class="collapse navbar-collapse" id="bs-example-navbar-collapse-1">
            <ul class="nav navbar-nav navbar-right">

                <!-- Search form -->
                {% if g.search_form %}
                    <form class="navbar-form navbar-left" action="{{ url_for('search') }}" method="get">
                        <div class="form-group">
                            {{ g.search_form.q(size=20, class_='form-control') }}
                        </div>
                    </form>
                {% endif %}
                <!-- End of the search form -->

            </ul>
        </div>
    </div>
</nav>
The display of the form is conveniently limited to only when the g.search_form has been defined. This prevents pages such as the error pages from having this. Notice that the request method is GET and that the view function to handle this request is specifically search. Typically, we would leave this blank so that the default URL handles this.
Render The Search Form
To complete the last functionality, we now need to define the search() view function that will handle search form submissions.
app/search.py: Search view function
@app.route('/search')
def search():
    if not g.search_form.validate():
        return redirect(url_for('index'))
    page = request.args.get('page', 1, type=int)
    posts, total = Post.search(
        g.search_form.q.data, page, app.config['POSTS_PER_PAGE'])
    next_url = url_for('search', q=g.search_form.q.data, page=page + 1) \
        if total > page * app.config['POSTS_PER_PAGE'] else None
    prev_url = url_for('search', q=g.search_form.q.data, page=page - 1) \
        if page > 1 else None
    return render_template(
        'search.html',
        title='Search',
        total=total,
        posts=posts,
        next_url=next_url,
        prev_url=prev_url)
The form.validate() has been used to primarily validate field values without checking how the data was submitted. Remember, our search form lacks the submit button. The function form.validate_on_submit() cannot be used here because it is ideal for POST requests where it validates field data upon submission.
Pagination is cleverly handled using the number of pages available depending on the outcome of the search results. Remember, Elasticsearch does not have inbuilt pagination as SQLAlchemy does. The search.html template will then look like this:
app/templates/search.html: Display search results
{% extends 'base.html' %}
{% block app_context %}
<div class="row">
<div class="col-md-12">
<h1 class="text-center">{{ title }} ({{ total }})</h1>
<div class="row">
<div class="col-lg-12">
<!-- User posts -->
<table class="table table-hover">
{% for post in posts %}
<tr>
<td width="70px"><img src="{{ post.author.avatar(35) }}" /></td>
<td><strong>{{ post.author.username }}</strong> said {{ moment(post.timestamp).fromNow() }}: <br> {{ post.body }}</td>
</tr>
{% endfor %}
</table>
<!-- End of listing user posts -->
<!-- Pagination -->
<nav aria-label="...">
<ul class="pager">
<li class="previous{% if not prev_url %} disabled{% endif %}">
<a href="{{ prev_url or '#' }}">
<span aria-hidden="true">←</span> Previous results
</a>
</li>
<li class="next{% if not next_url %} disabled{% endif %}">
<a href="{{ next_url or '#' }}">
Next results <span aria-hidden="true">→</span>
</a>
</li>
</ul>
</nav>
<!-- End of pagination -->
</div>
</div>
</div>
</div>
{% endblock %}
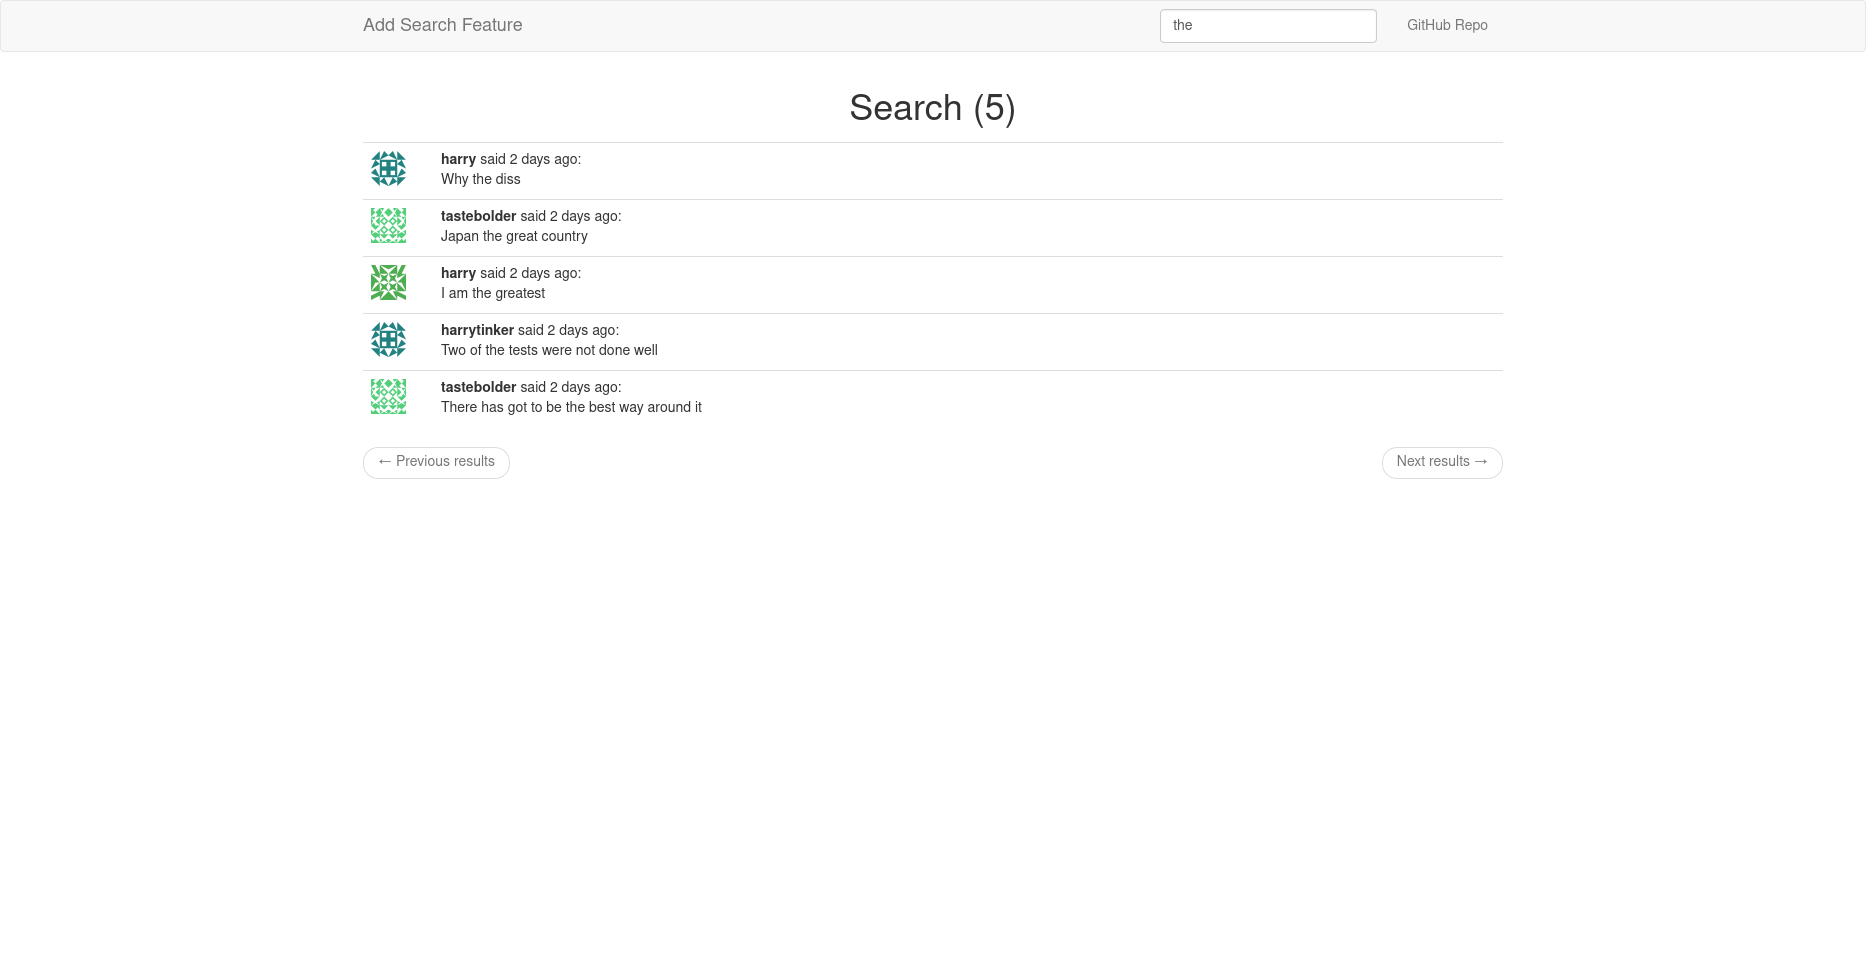
You should see this:
Share
If you enjoyed this article, you can share it with another person.
TweetNewsletter Subcription
Level up your skills.
We take your privacy seriously. Read our privacy policy. Unsubscribe | Resubscribe.