


API Testing Using Postman
Given the scope of our simple chat application, we have built all the endpoints we wanted to have for both a web client specifically and for any other client using APIs. During the development of our API, we have been testing each endpoint on our terminal to ensure that it works as intended. One tool that can help us test our endpoint is Postman. Postman simplifies each step of the API lifecycle and streamlines collaboration so you can create better APIs—faster.
For your reference, these are the topics in our discussion:
- Overview
- API Blueprint
- Resource Representation
- Error Handling
- Unique Resource Identifiers
- API Authentication
- API-friendly Error Messages
- API Testing Using Postman (this article)
Table Of Content
This article is broken down into the following subsections:
- Getting Started With Postman
- Create A Collection
- Working With Variables
- Testing Endpoints
- API Documentation
Getting Started With Postman
Postman offers both the web client and the desktop app. You can choose to use either or both. If you would like to use the desktop app, you can download a version suitable for your operating system. As of this writing, there are desktop apps for Windows, Mac, and Linux. I am using Ubuntu, so I will download one for Linux.
Postman requires us to sign up for free. Follow the prompts to get started. You will eventually be redirected to your default personal workspace.
Postman workspaces enable you to organize and work together on API projects with your team. Within each workspace, you can share APIs, collections, environments and other Postman elements. You can create more workspaces for your personal use and to work with teammates.
Create A Collection
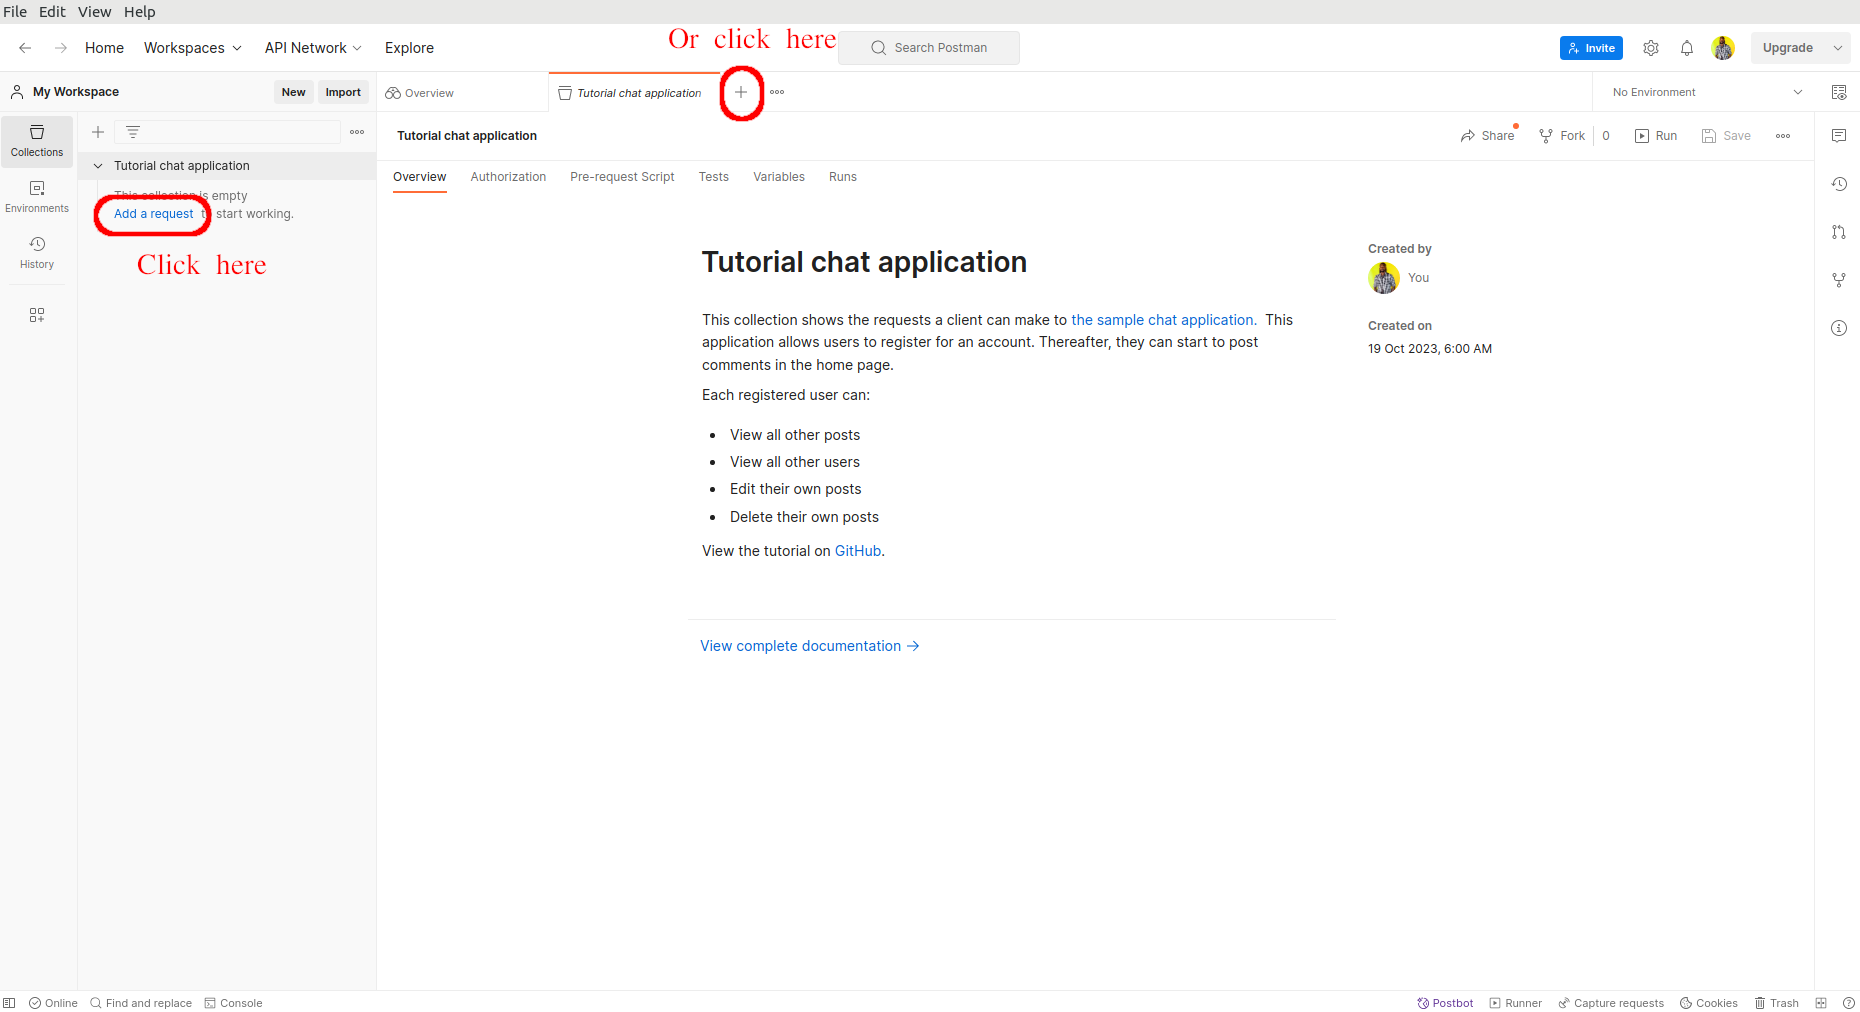
The essence of using a collection is to group related Postman requests to keep our workspace organized. We are going to test the endpoints of our chat application. It, therefore, makes sense to group all the requests we will be testing into a collection. All requests made in Postman will typically show up under your History tab on the left sidebar of your application. While that is okay for a small number of endpoints, things can quickly get out of hand and become disorganized when we rely on the History of where we have been.
First, let us begin by creating a collection.
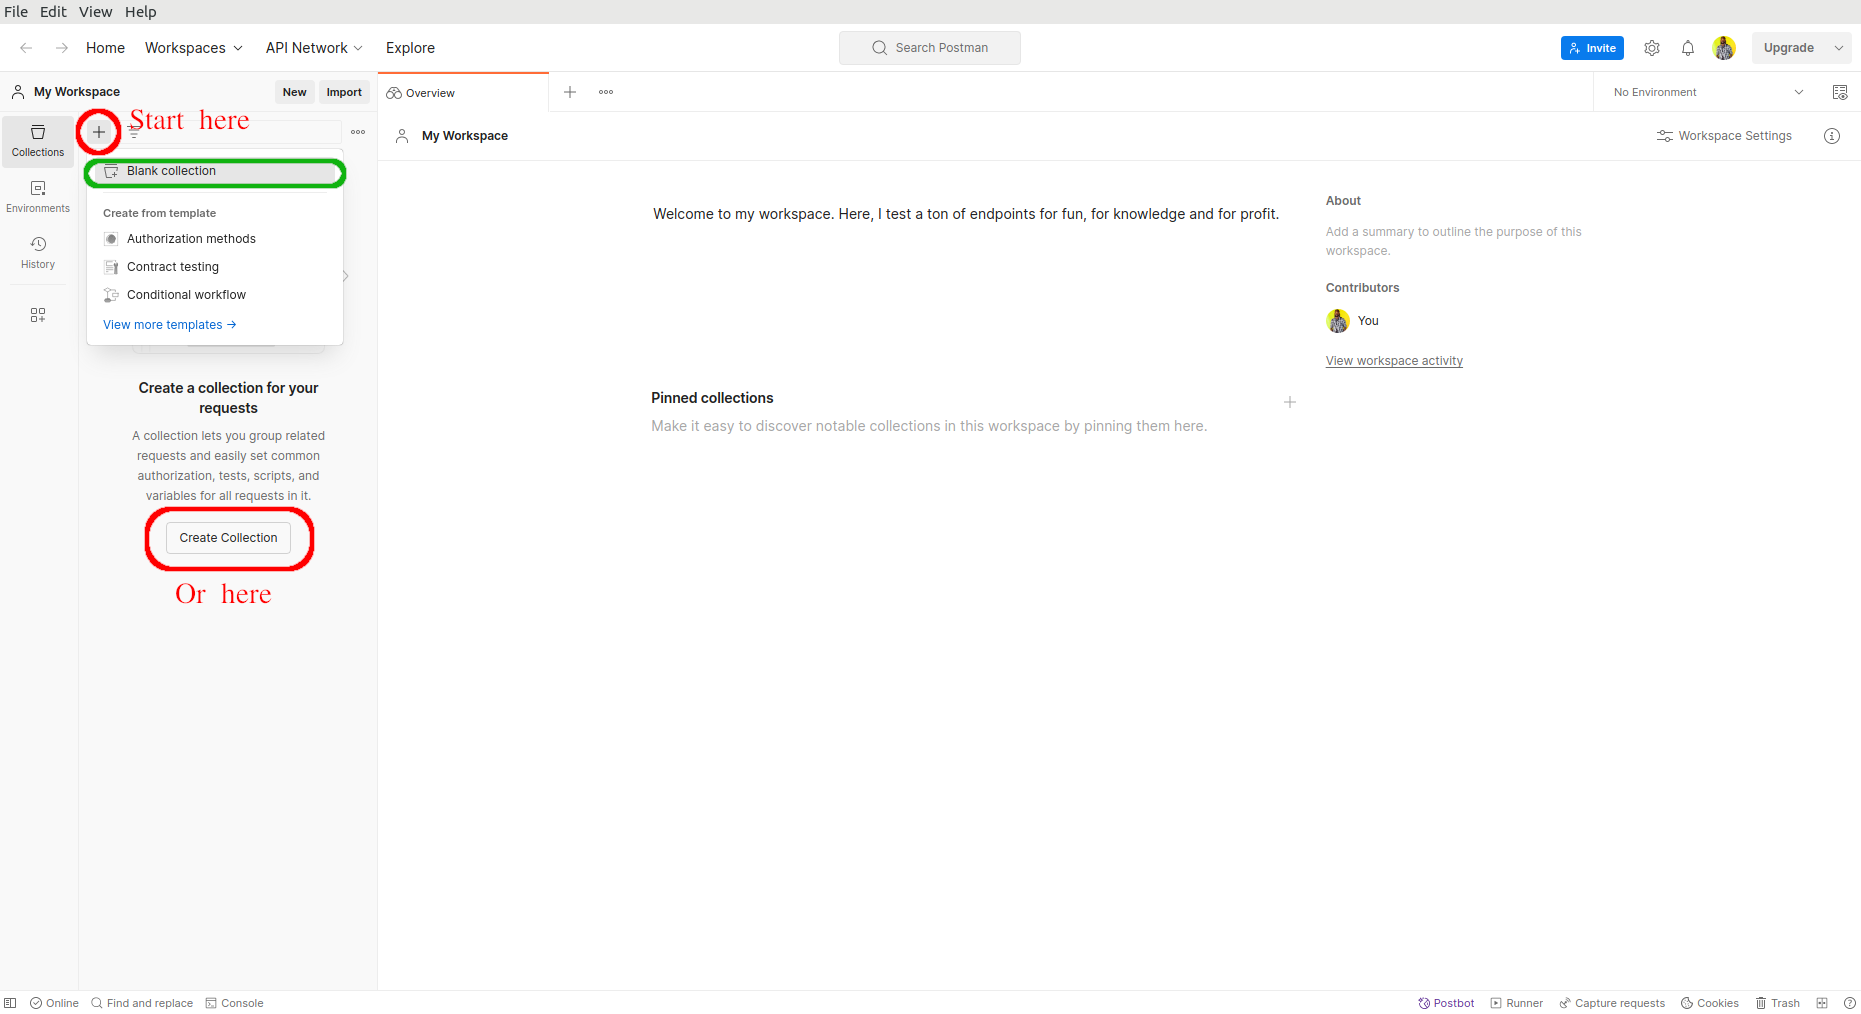
Give the collection a relevant name then press "Enter".

Working With Variables
Variables enable us to store and reuse values in Postman. By storing a value in a variable, we can reference it throughout our collections, environments, and requests, thereby helping us work more efficiently. They are a key-value pair where each variable name represents its key.
For example, we know that our base URL is http://localhost:5000/api. Instead of having to type this in each request every time we are testing an endpoint, we can create a variable such as base_url and assign it the value http://localhost:5000/api. We can then reference it using {{base_url}}. Should the base URL change in the course of our development, we only need to go to one place, that is the variable { { base_url}}, and update our value and it will be applied across all collections and requests using it.
Variable Scopes
Postman has different scopes, ranging from the broadest to the narrowest. Scopes allow us to tailor our processing to a variety of tasks ranging from development, testing, and collaboration.
- Global variables: they are accessible throughout a workspace.
- Collection variables: they are available throughout the requests in a collection and are independent of environments (they do not change based on environment).
- Environment variables: they can be used in local development or testing or production, allowing you to specify role-based access level.
There are also data variables and local variables. If a variable with the same name is declared in two different scopes, the value stored in the variable with the narrowest scope will be used. For example, if there is a global variable named username and a local variable named username, the local value will be used when the request runs.
Initial And Current Values
An initial value is a value sent in the element where the variable is defined. This value is synced to Postman servers and is shared with a team when the element is shared (useful during collaboration).
Current value is used when sending a request. These are local values that are not synced to Postman's servers. If changed, the current value won't persist in the original shared collection etc.
Variable Types
- Default type is shown as plain text and does not have extra properties
- Secret type makes the initial and current values for all workspace members and is typically used to prevent the unintentional disclosure of sensitive data, including API secrets, passwords, tokens, and keys.
Create Variables
Let us begin by creating our collection's variables.
Our first variable will be base_url.
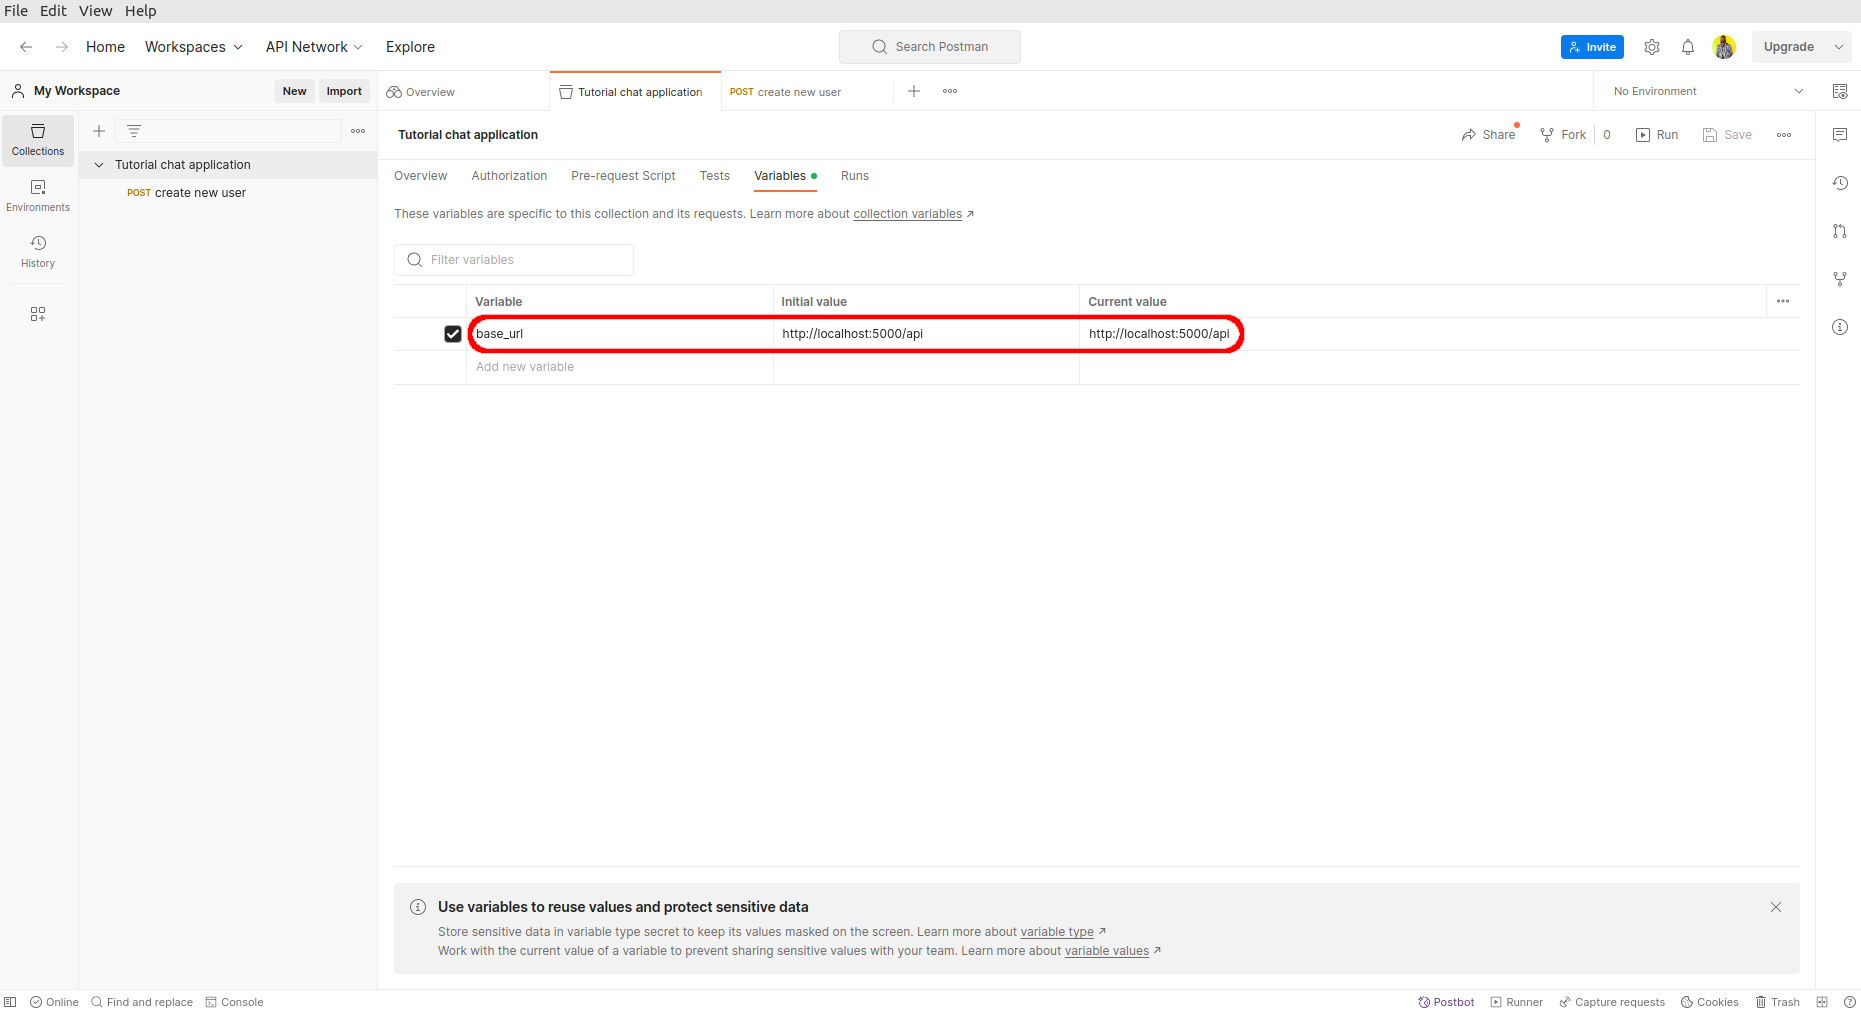
Remember to save your changes by pressing "Ctrl + S". This variable, and others we will create, shall all be collection variables.
Testing Endpoints
Now, we can start testing our endpoints. To begin, we need to add a request.
Create A New User Request
The first request we are going to make is one that creates a new user. We have a view function called api.create_user() of the endpoint /users that makes POST requests specifically designed to allow for the creation of new users. This is the only endpoint that can be accessed anonymously. As we noted here, we need a user's username, email, and password as arguments to make a successful request and return a 201 Created response. An about_me argument is optional.
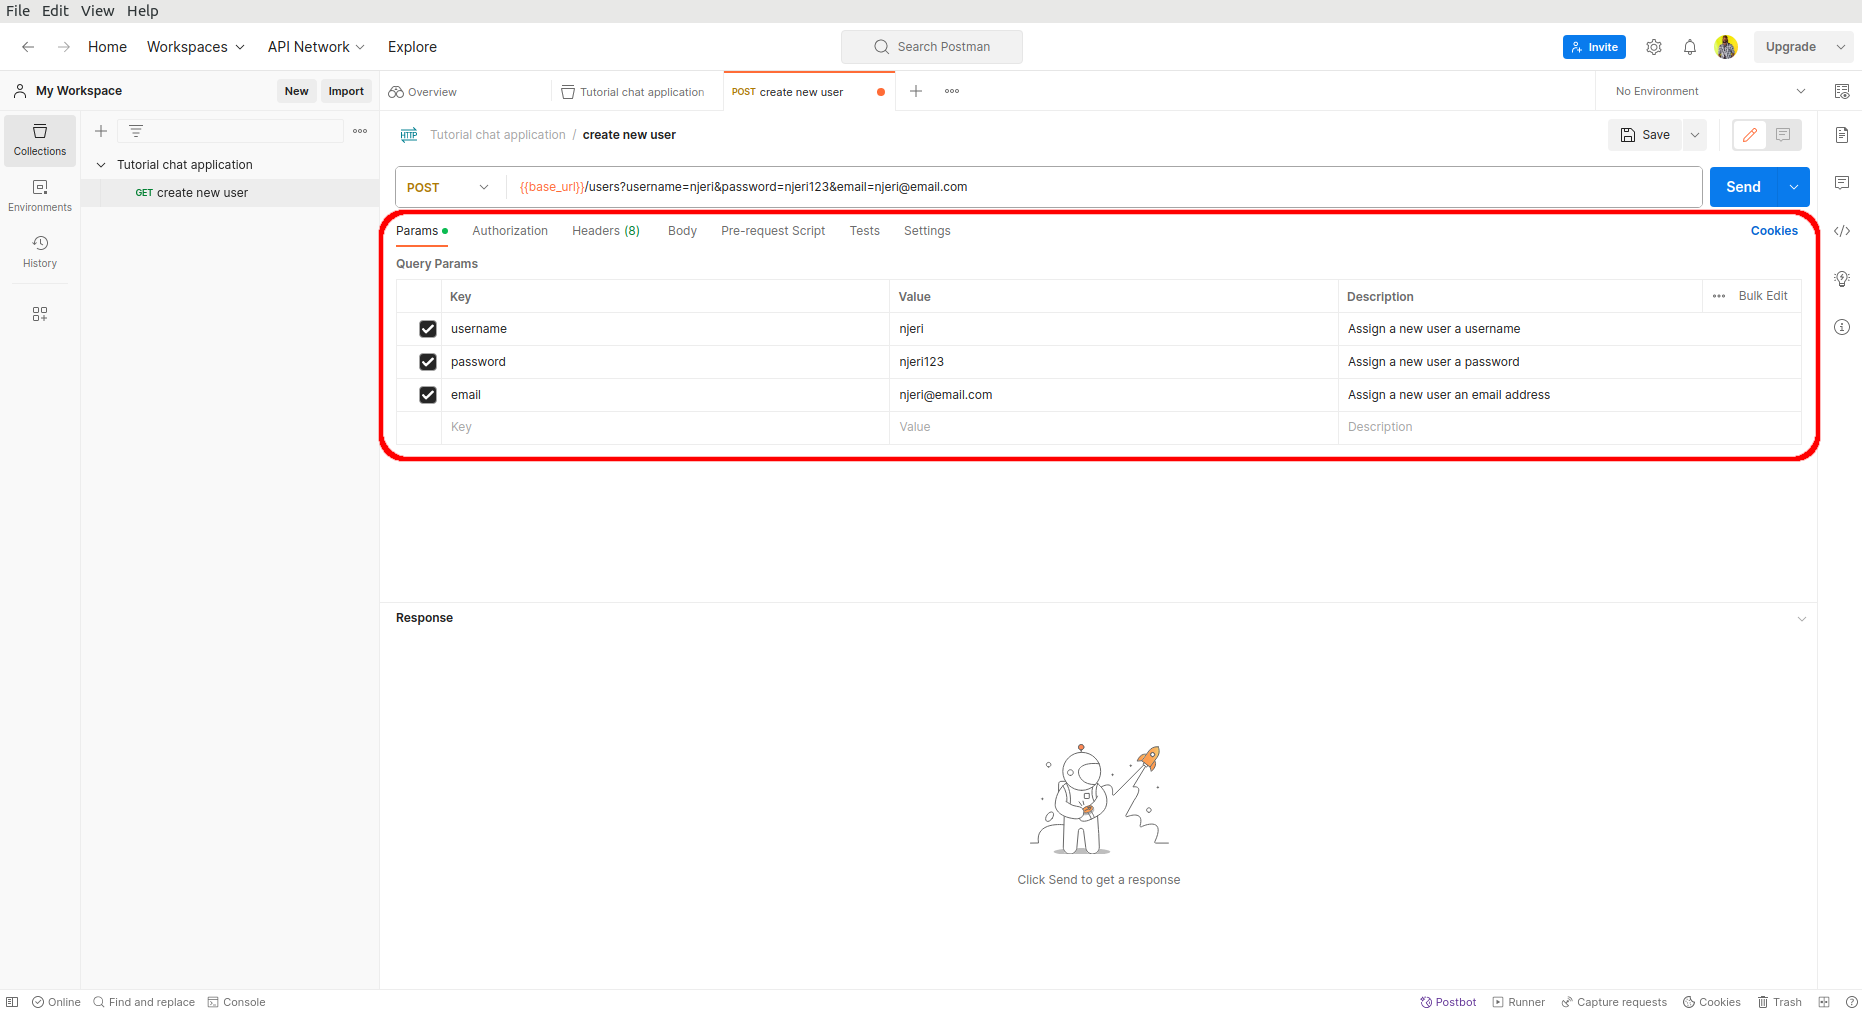
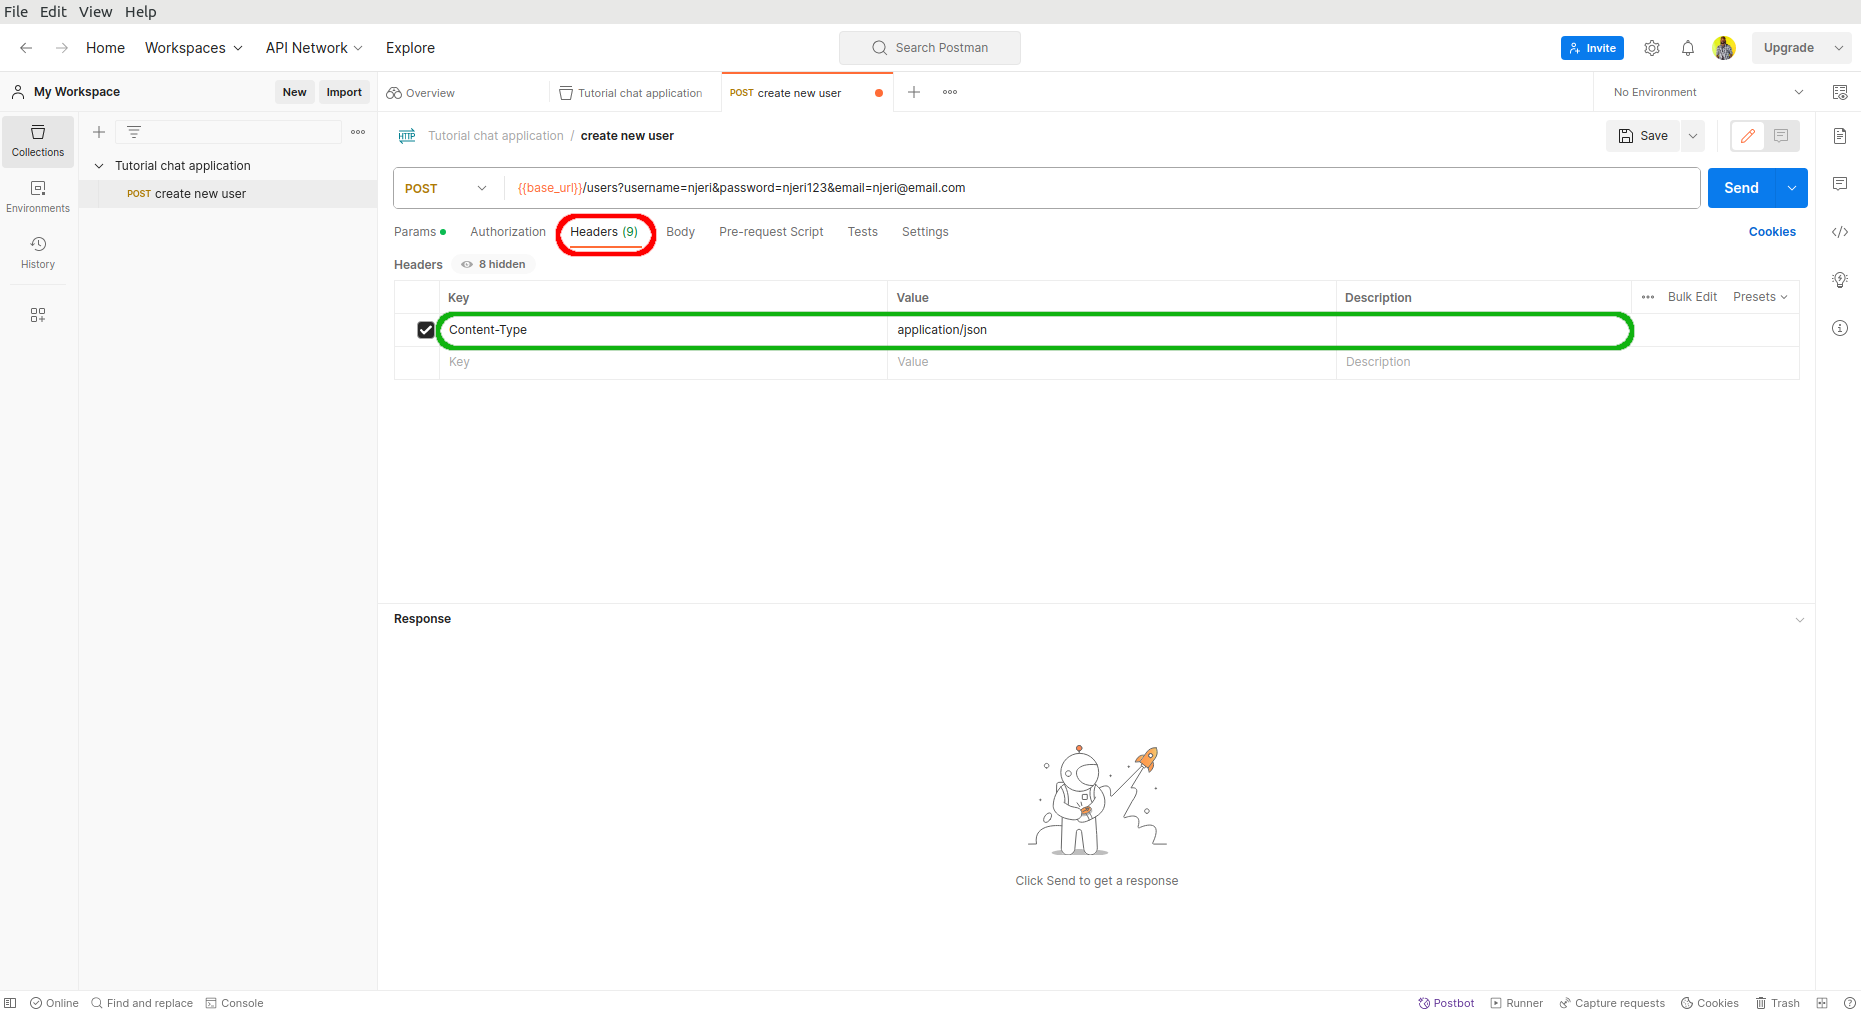
I selected the POST method from the dropdown menu, manually keyed in the base URL variable as {{base_url}}, and added the request parameters as seen in the table above. Before we can test the endpoint, we will need to specify in our header that the type of content we want is JSON.
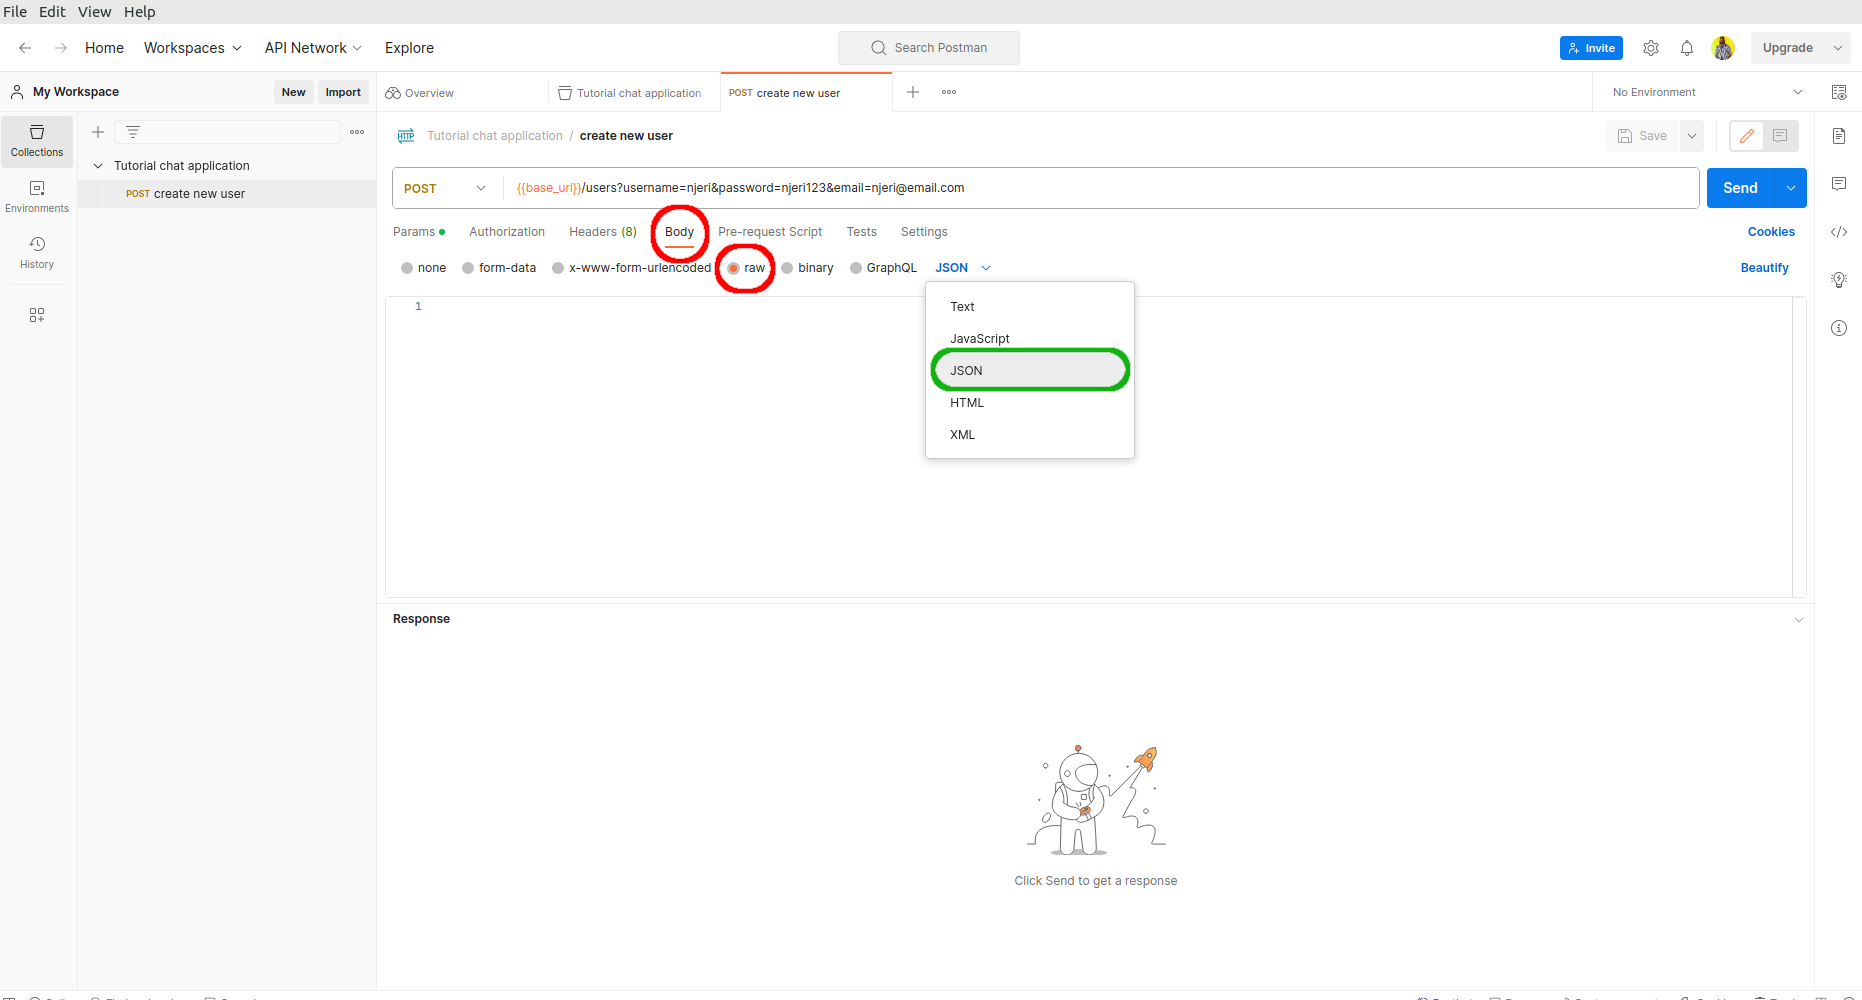
Then, click on the "Body" tab and check the "raw" radio button. On the dropdown menu that appears on the far right, select "JSON".
Finally, let's update the body of the JSON with the key-value pairs of our collection variables.
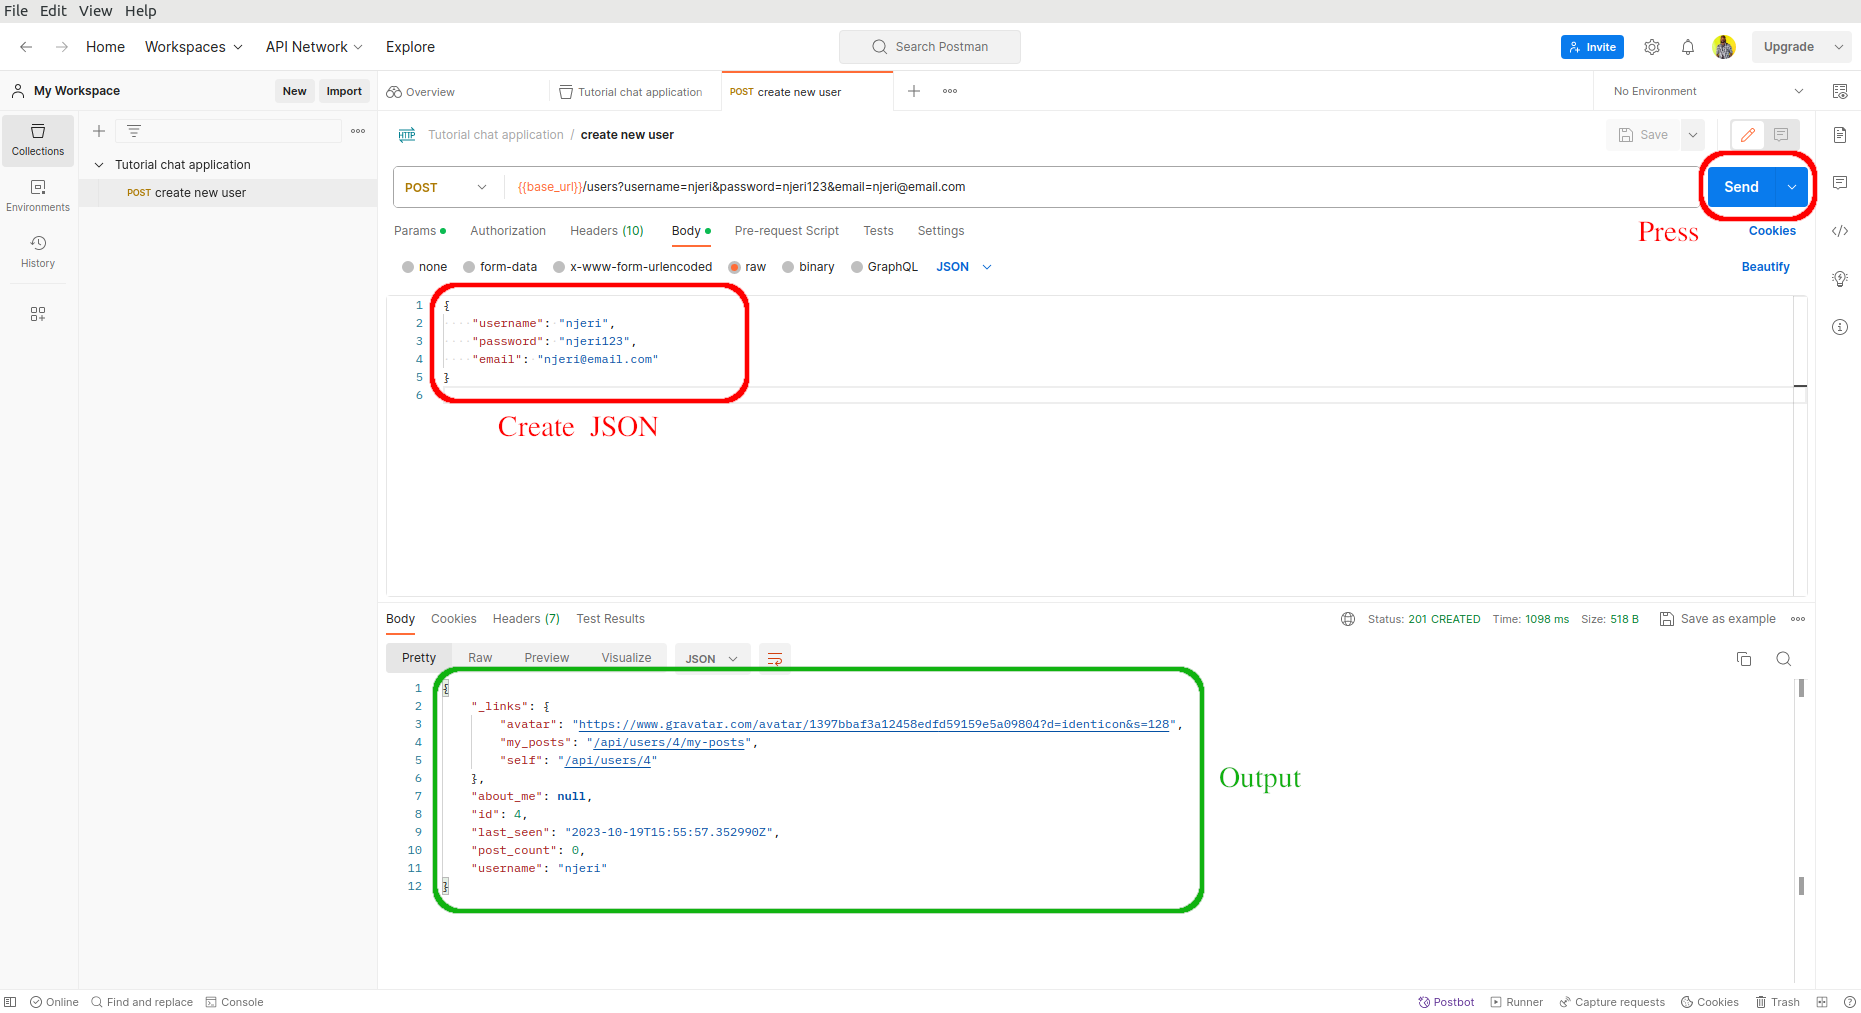
You will notice that a new entity will be created for you. Postman provides us with a pretty printed output of the 201 Created response.
Generating Tokens
If you recall in our earlier lesson on api authentication, we added token authentication to almost all our endpoints to protect against unauthorized access. The first step after our new user njeri has been created is to generate an expirable token for her. This token will be used to authenticate and authorize her to perform certain actions.
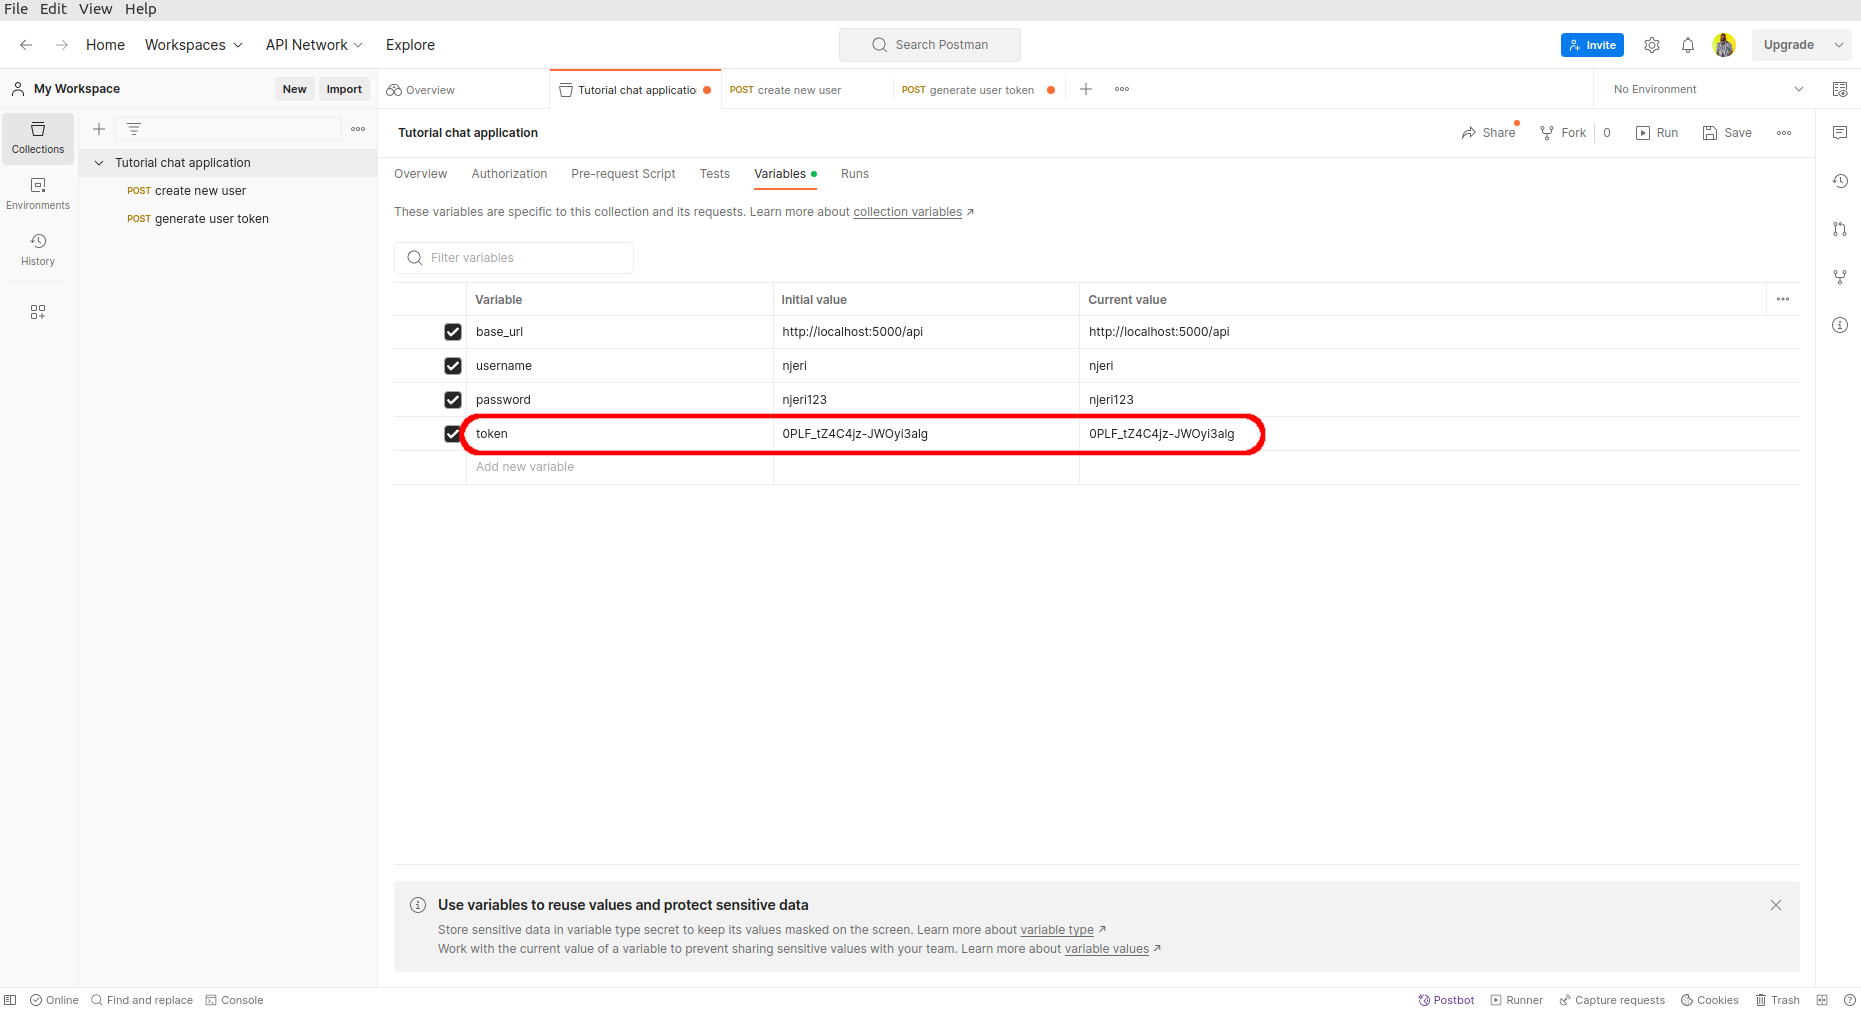
Because we are going to interact with the user njeri a lot, we can decide to create some variables used to identify her. For example, two variables that we are going to use often after each token has expired are username and password.
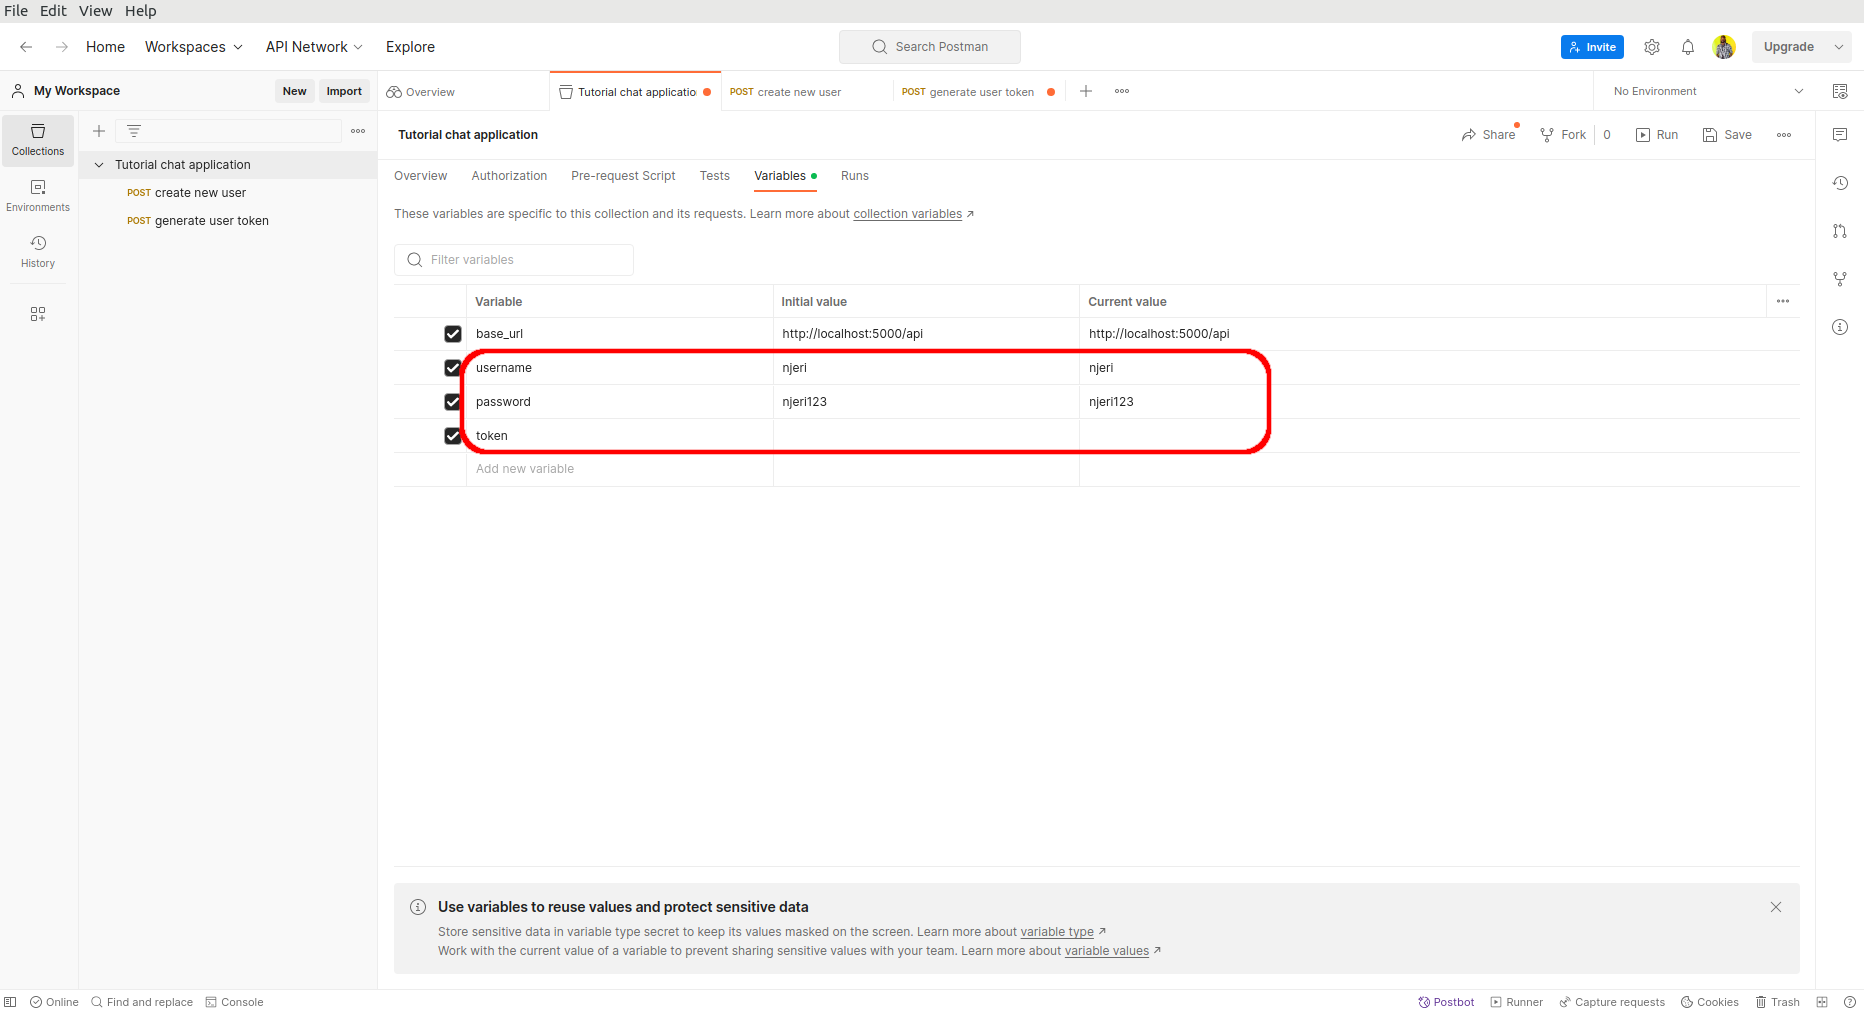
I have also added the token variable because we will need to use it whenever we want to access all other endpoints as the user njeri. At this point, it is empty, but we will be updating it shortly (Remember to save your work).
The mechanism we chose to generate a token was basic authentication (BA). This mechanism requires that we provide a user's username and password as a key-value pair in a POST request. The POST request used to generate a token is api/tokens. On the terminal, while using the HTTPie package, we previously ran the following command:
(venv)$ http --auth muthoni:muthoni123 http://localhost:5000/api/tokens
The request will be sent with the header Authorization: Basic <username:password>. In Postman, this can be achieved by selecting the Authorization type as "Basic Auth", and then supplying a user's username and password in the POST request.
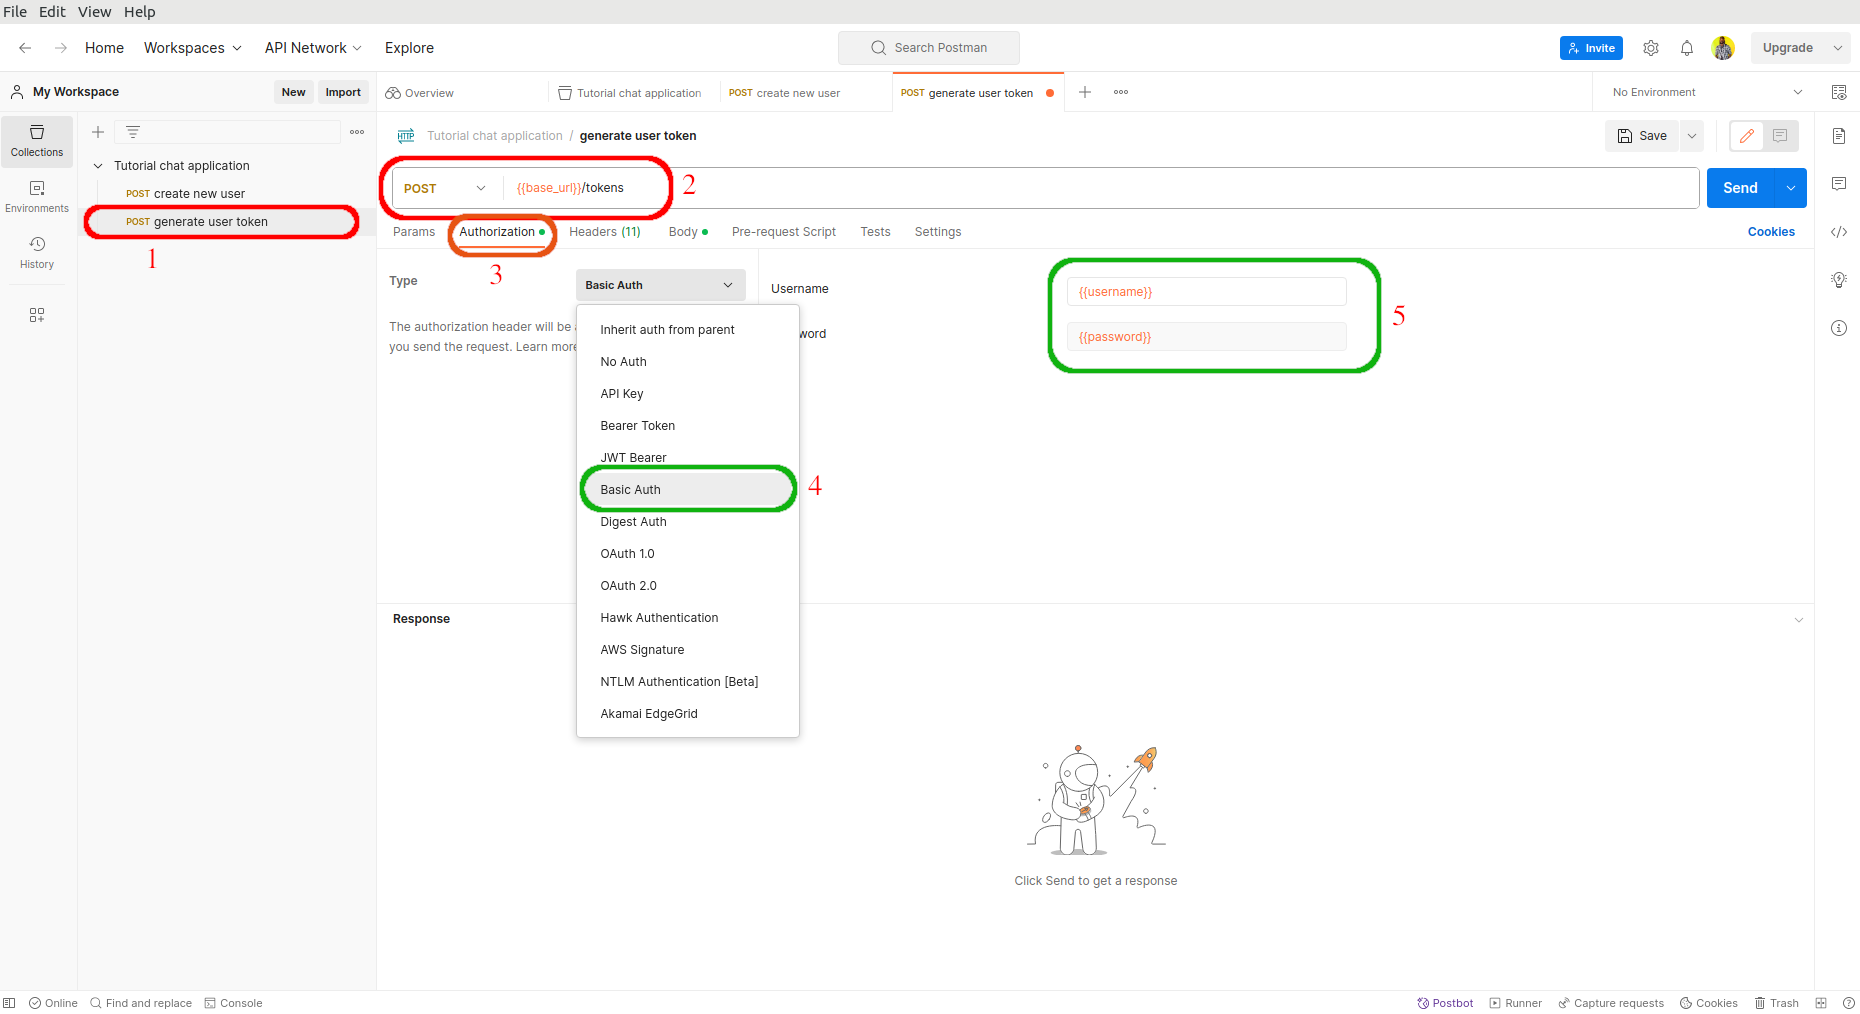
Once done, press "Send" to generate her token.
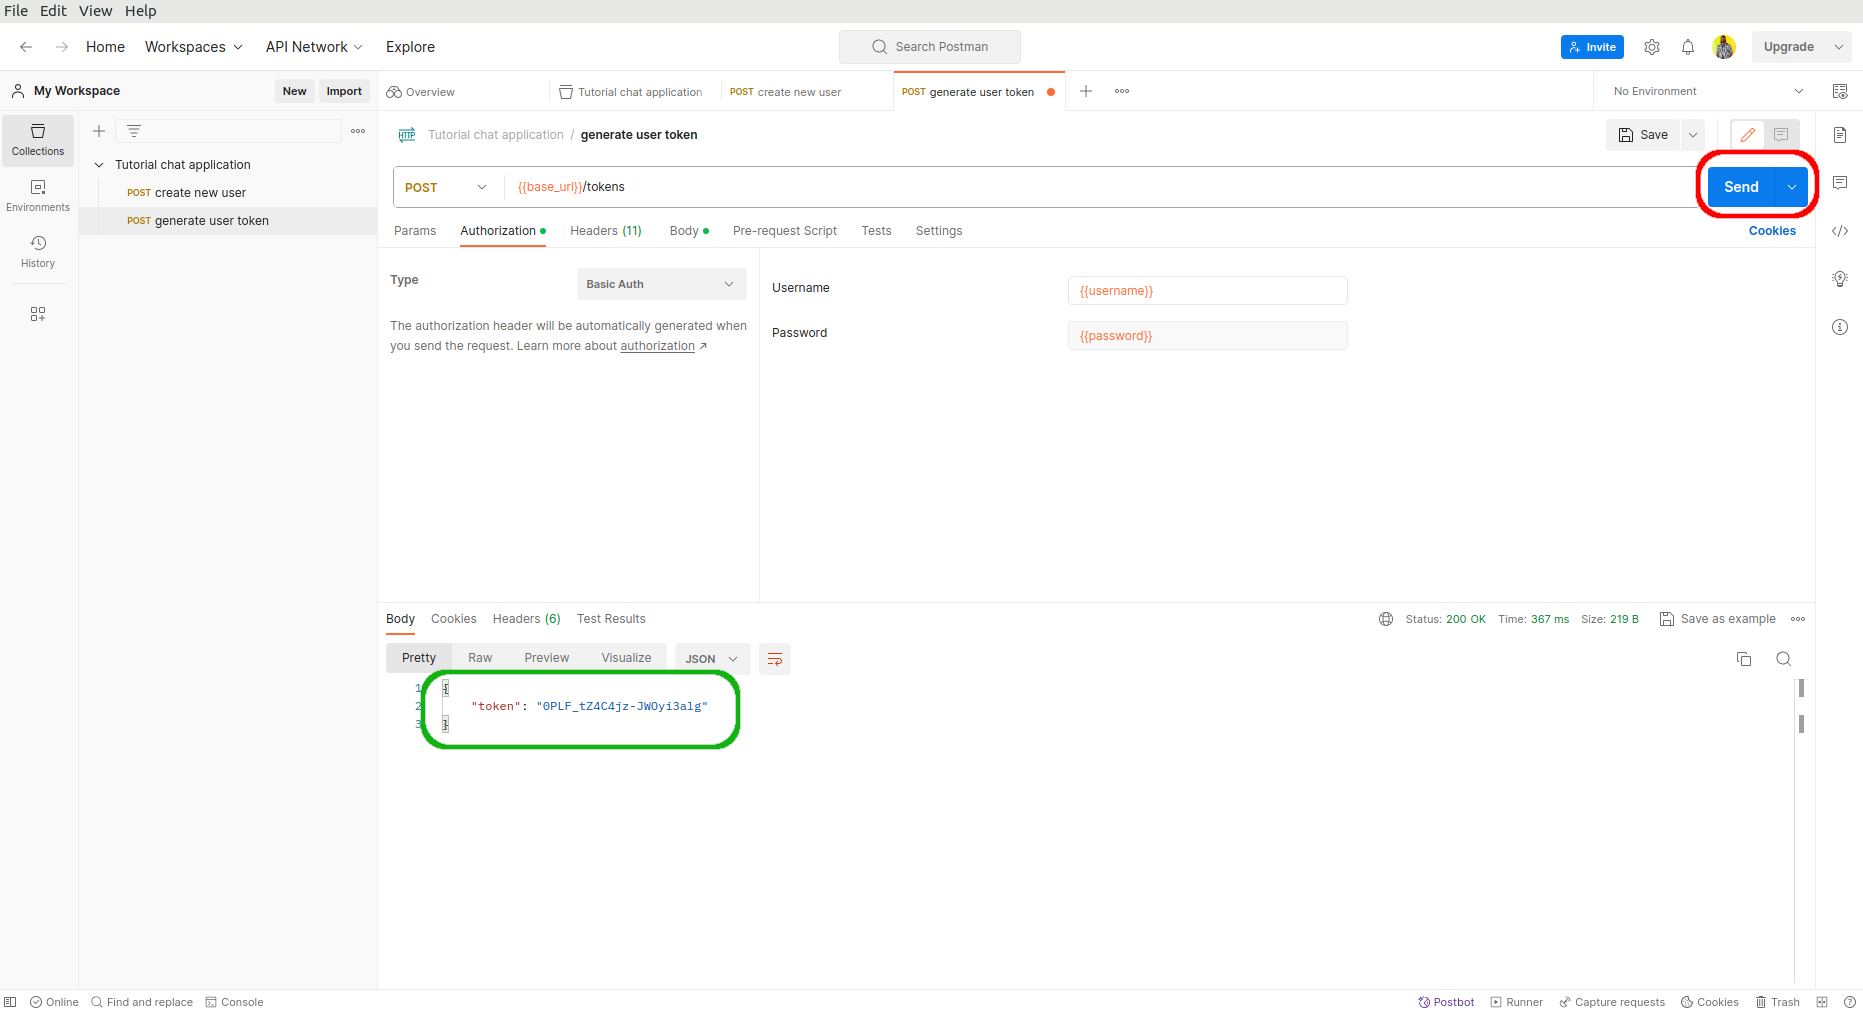
With the token in place, we need to update our token variable by giving it the key seen in the response.
Access Protected Endpoints
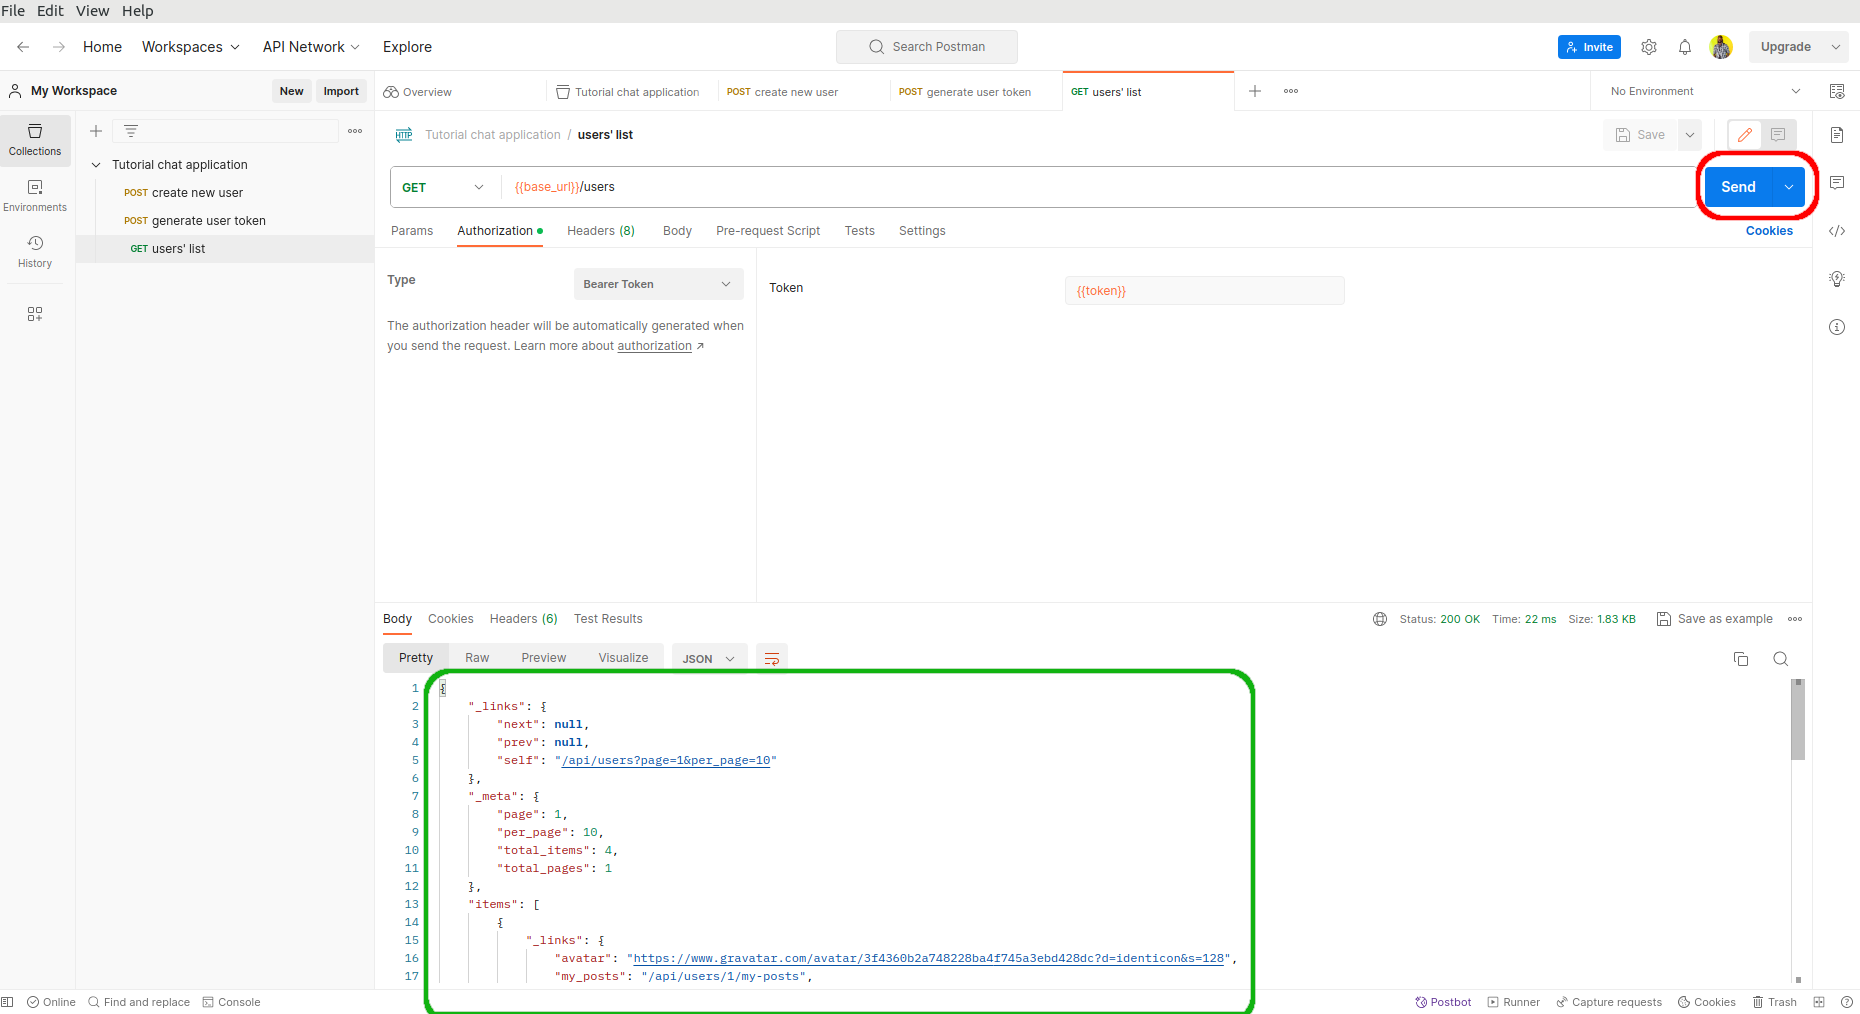
The first endpoint we would like to test is that used to retrieve the list of all users in the backend. The endpoint api/users expects a user's token to view this list. Let us use njeri's token to view the list of all users in the application.
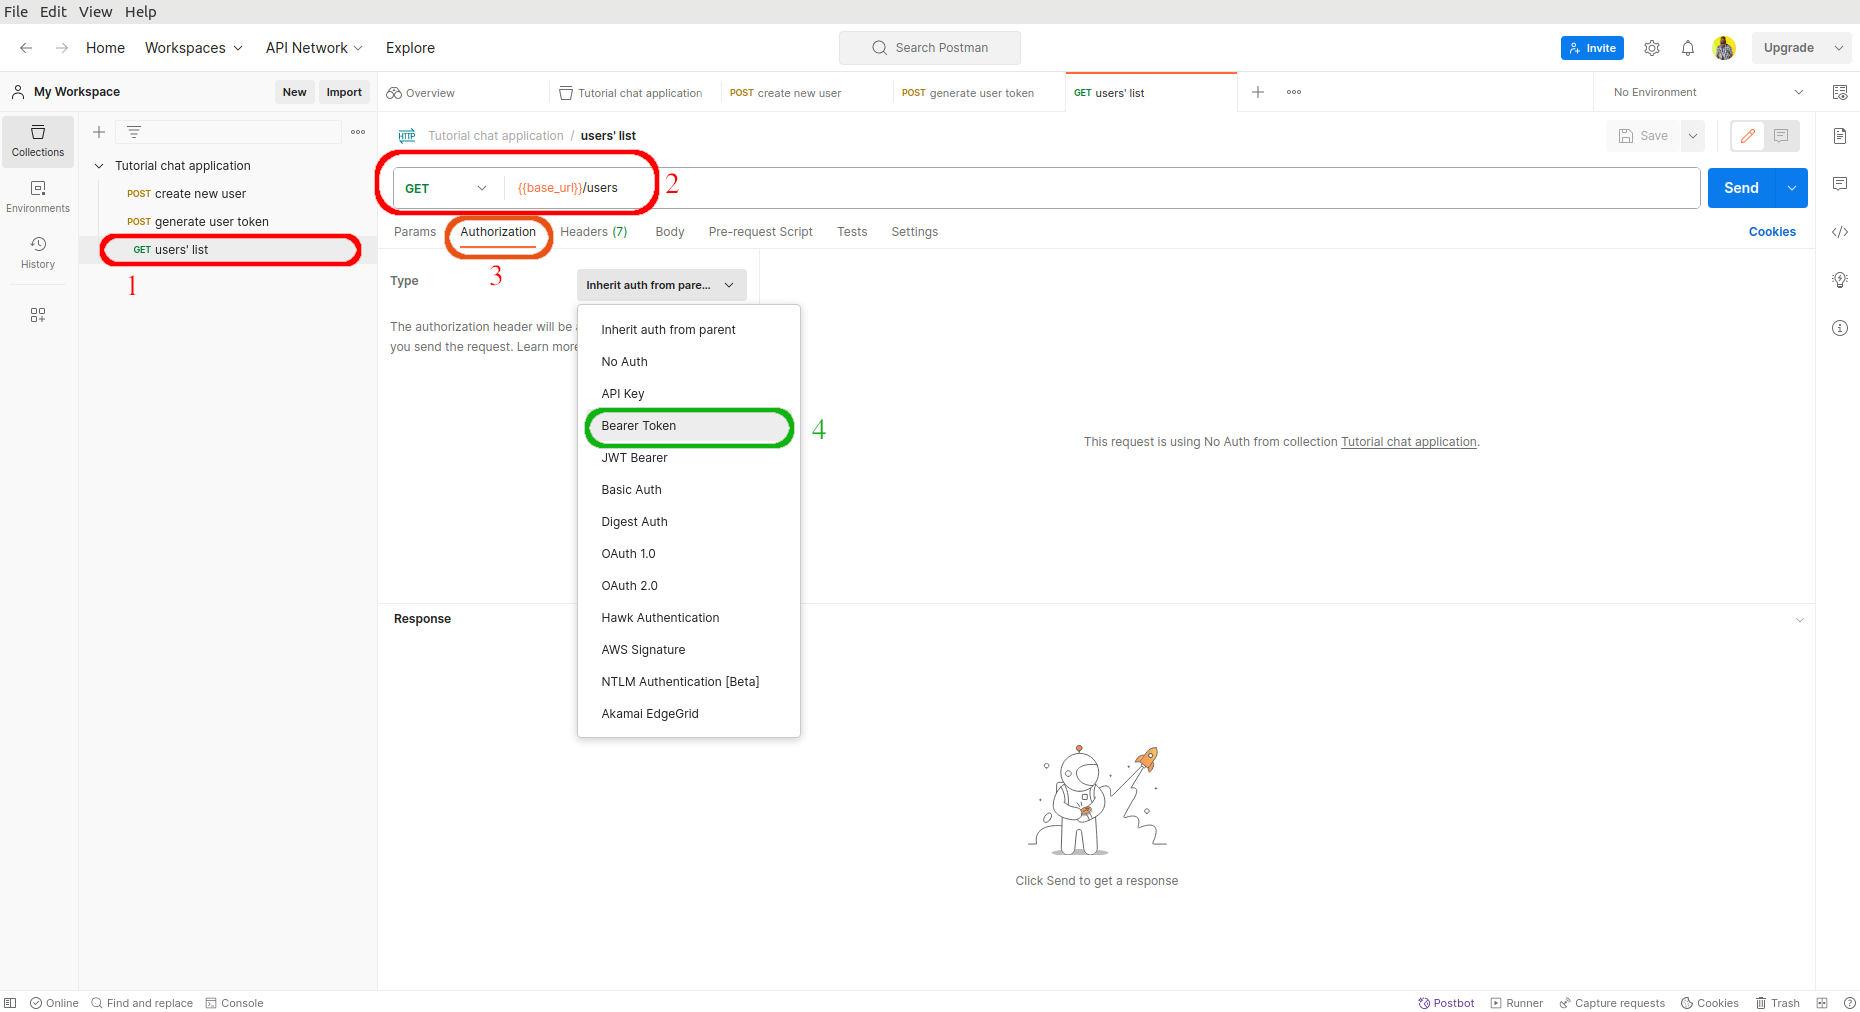
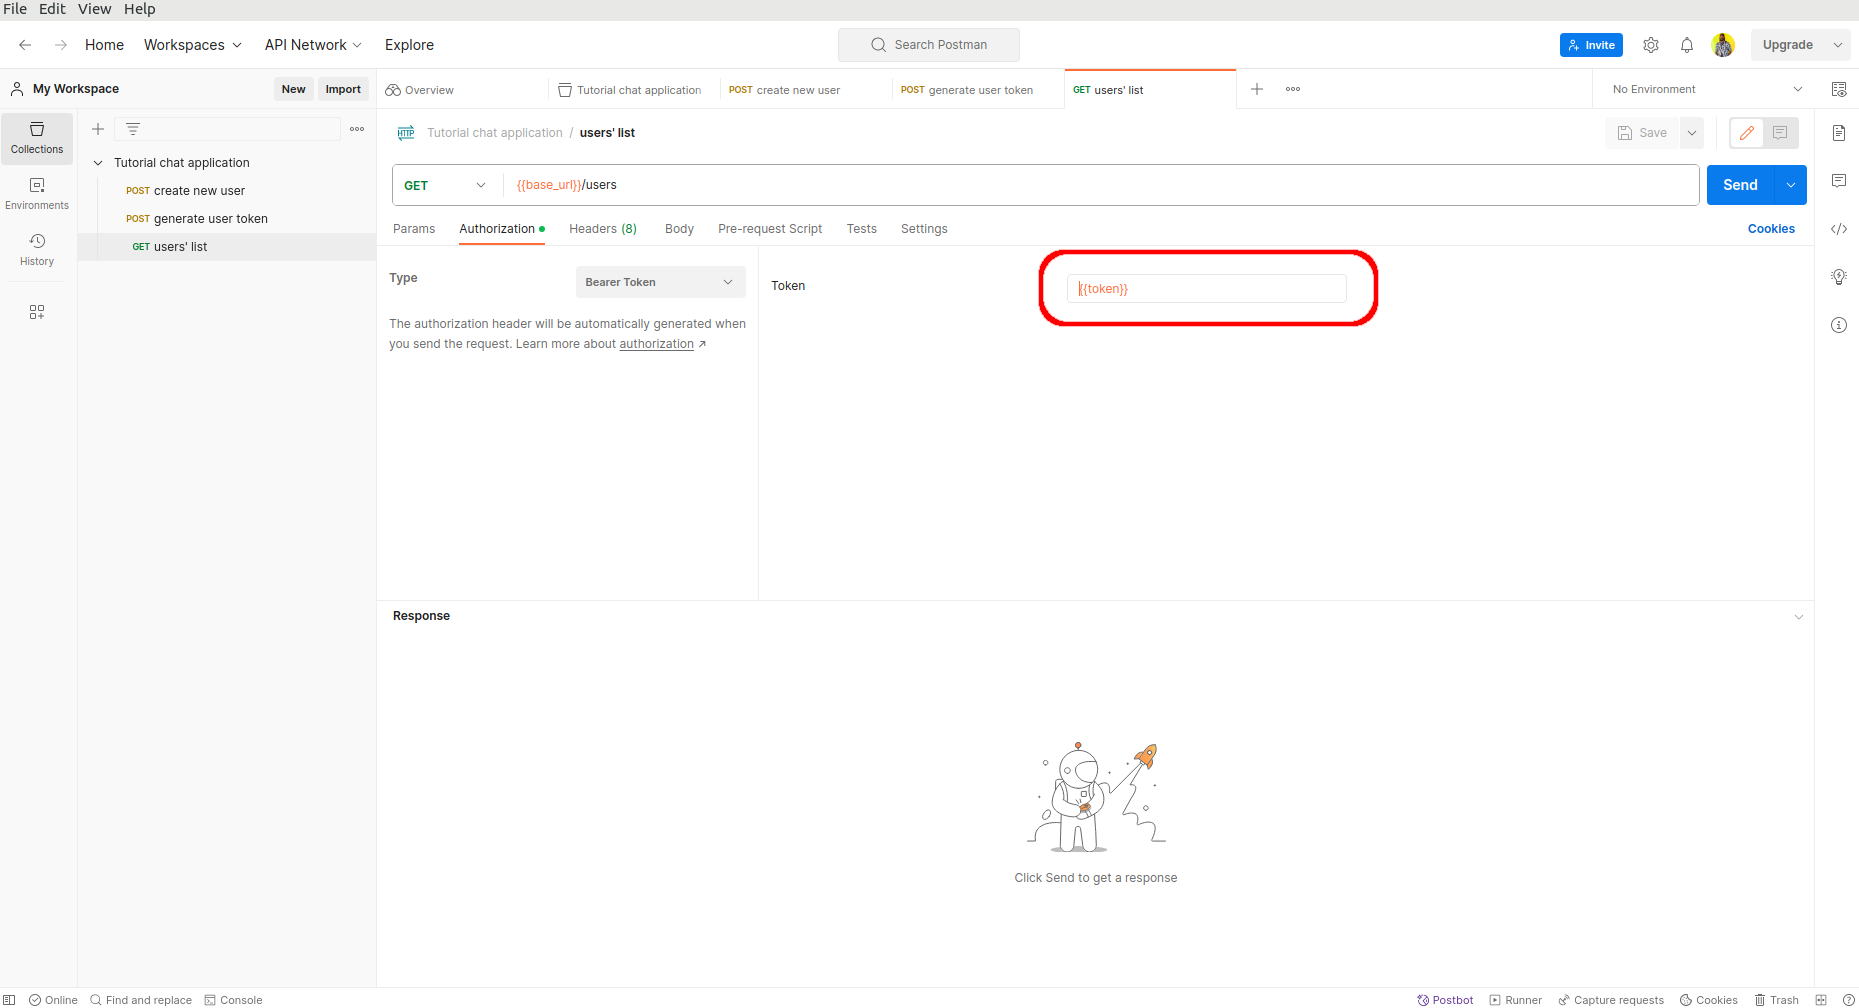
All endpoints are protected using the token-based mechanism, which requires that the authorization header be Authorization: Bearer <token>. Ensure you select the type of authorization as "Bearer Token". Then update the value of the token using the token collection variable we created earlier.
Press "Send" to generate a list of all users in the backend (should the token be expired, remember to generate another one and update your variable accordingly).
At this stage, I hope you now get the idea of how you can test your application's endpoints using Postman. I am not going to show you how to test the remaining endpoints. It is left to the reader to complete the testing of the remaining endpoints.
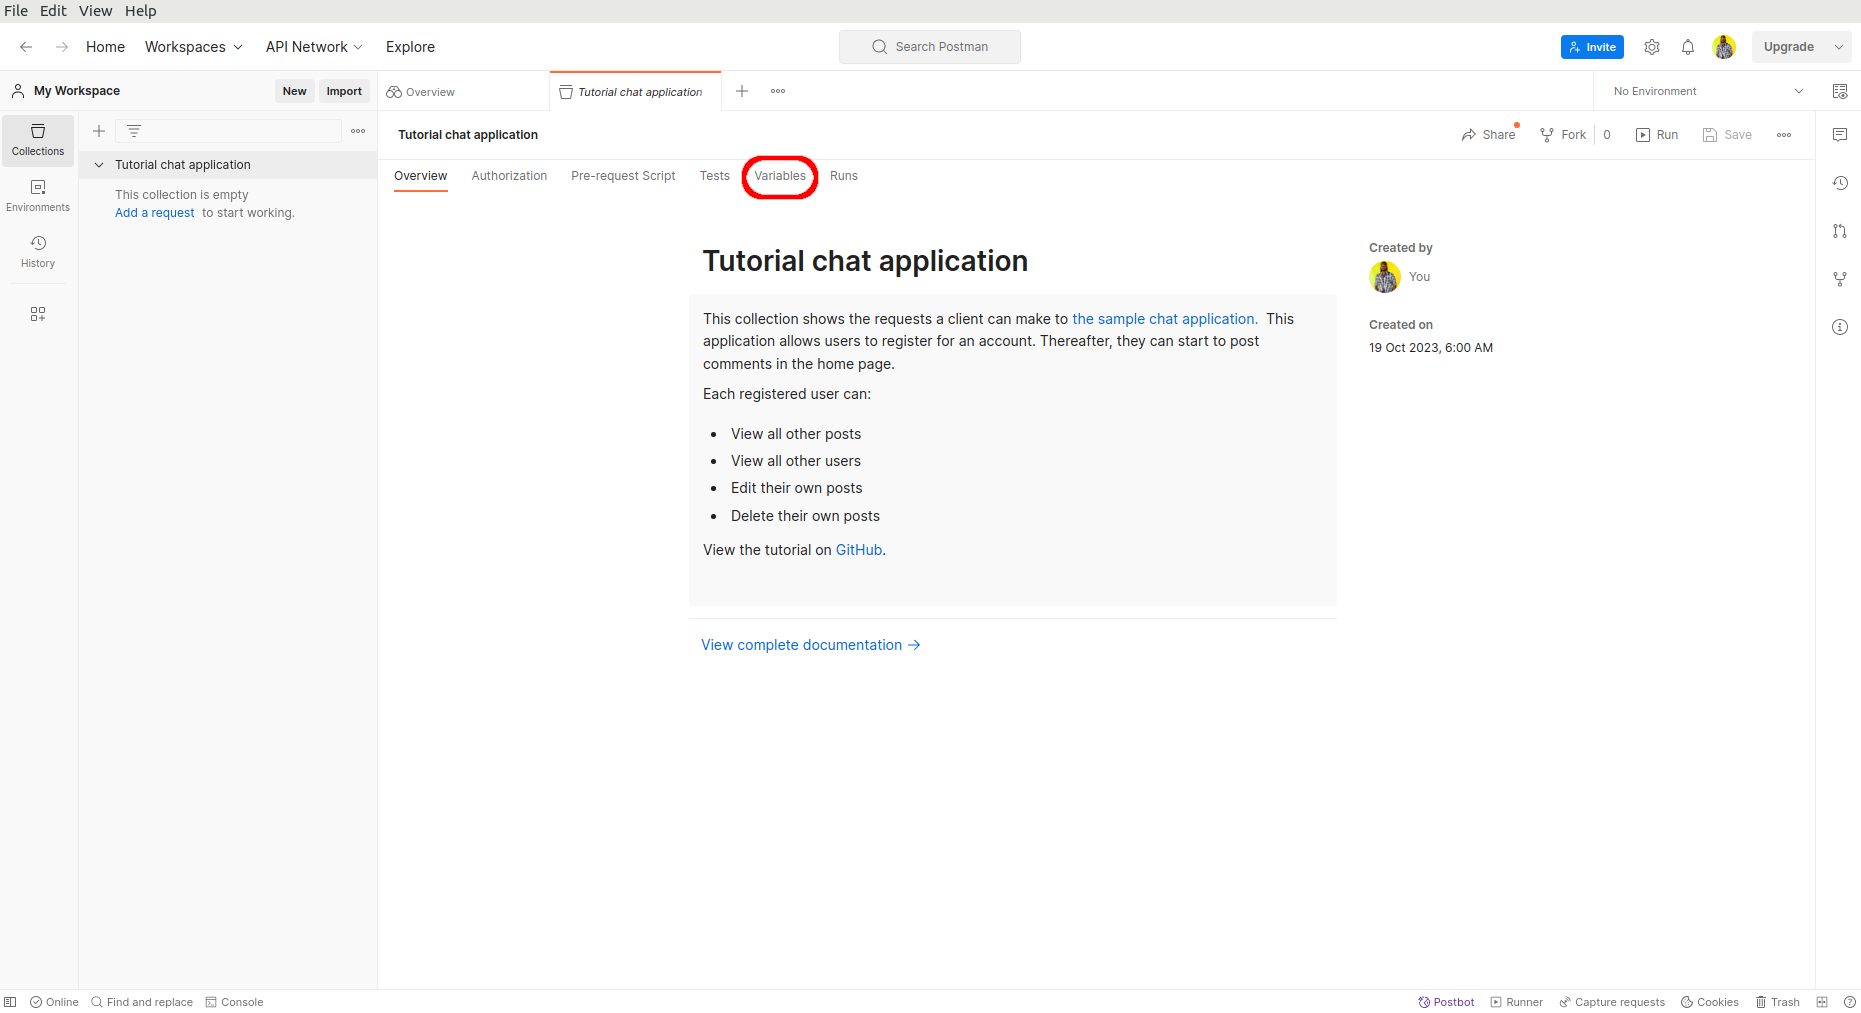
API Documentation
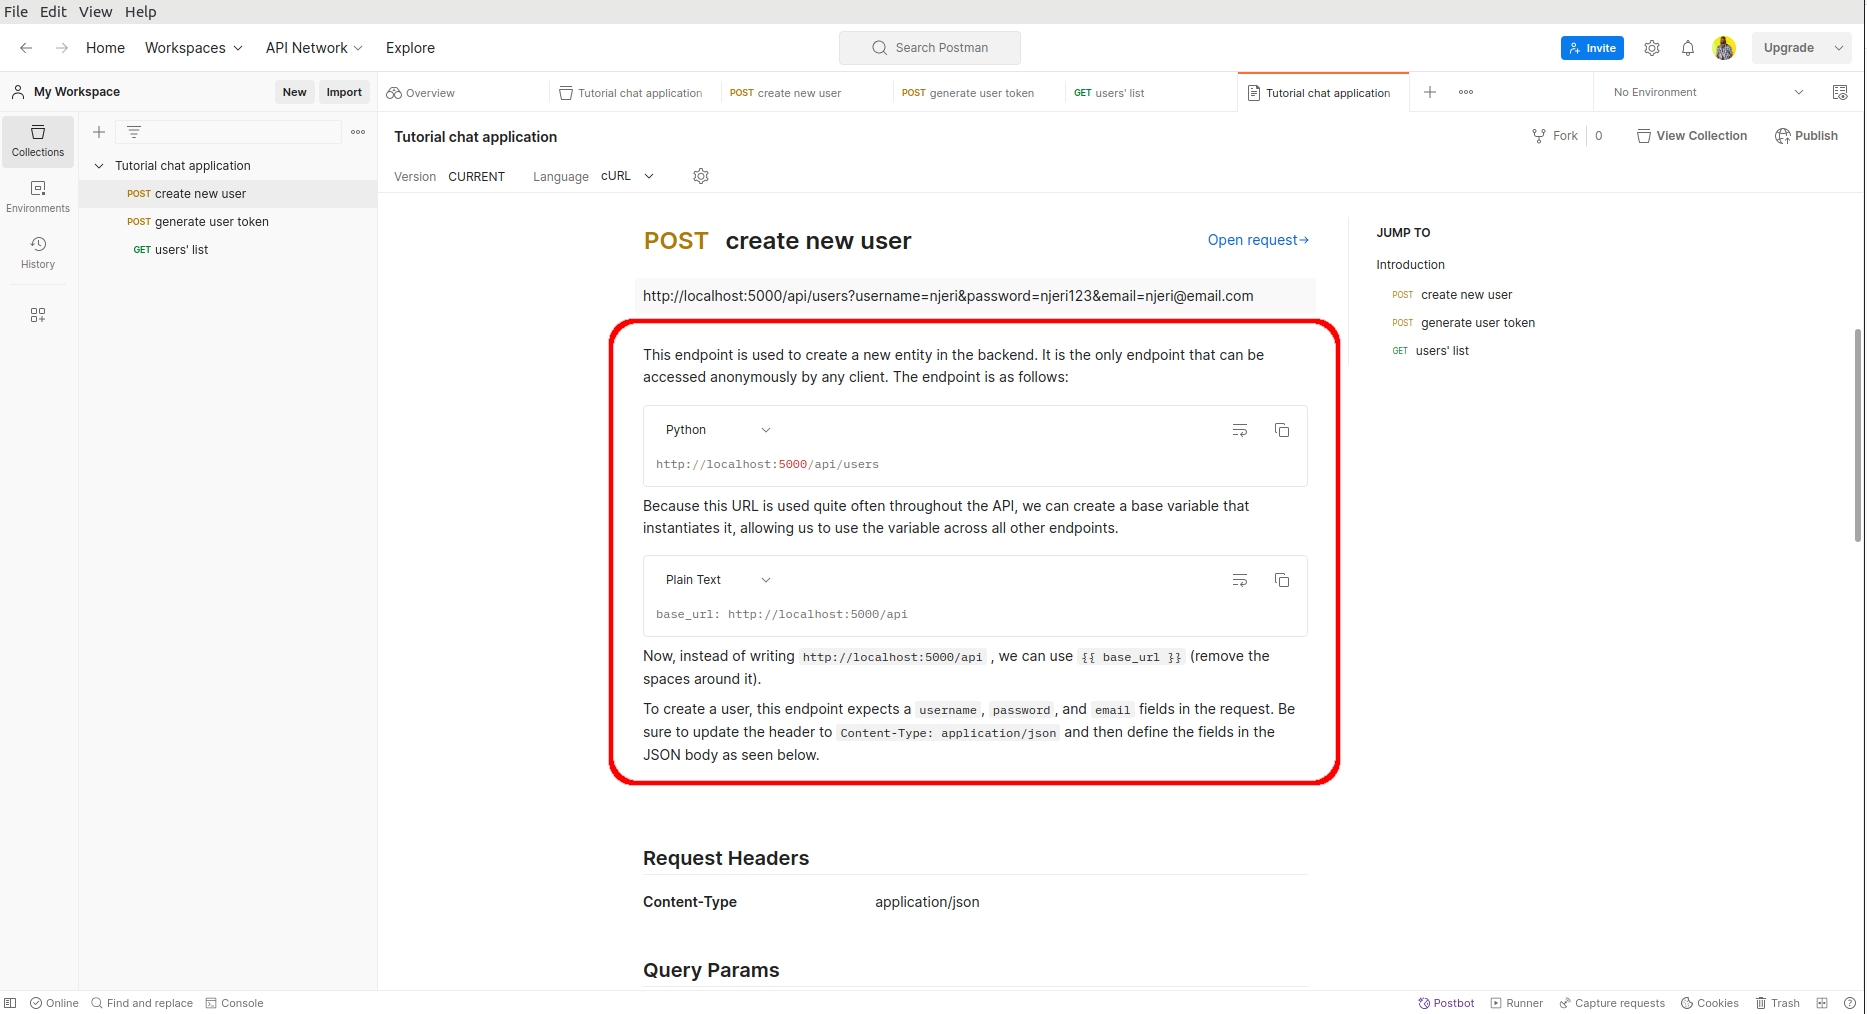
Postman automatically generates basic documentation for any collection you create. The documentation includes details about all of the requests in your collection, along with sample code in various client languages. Learn how to write comprehensive API documentation here.
Add Description To A Collection
To enhance our documentation, we can describe our collection. Postman's description editor uses the markdown syntax to write content, but you can use the WYSIWYG editor too.
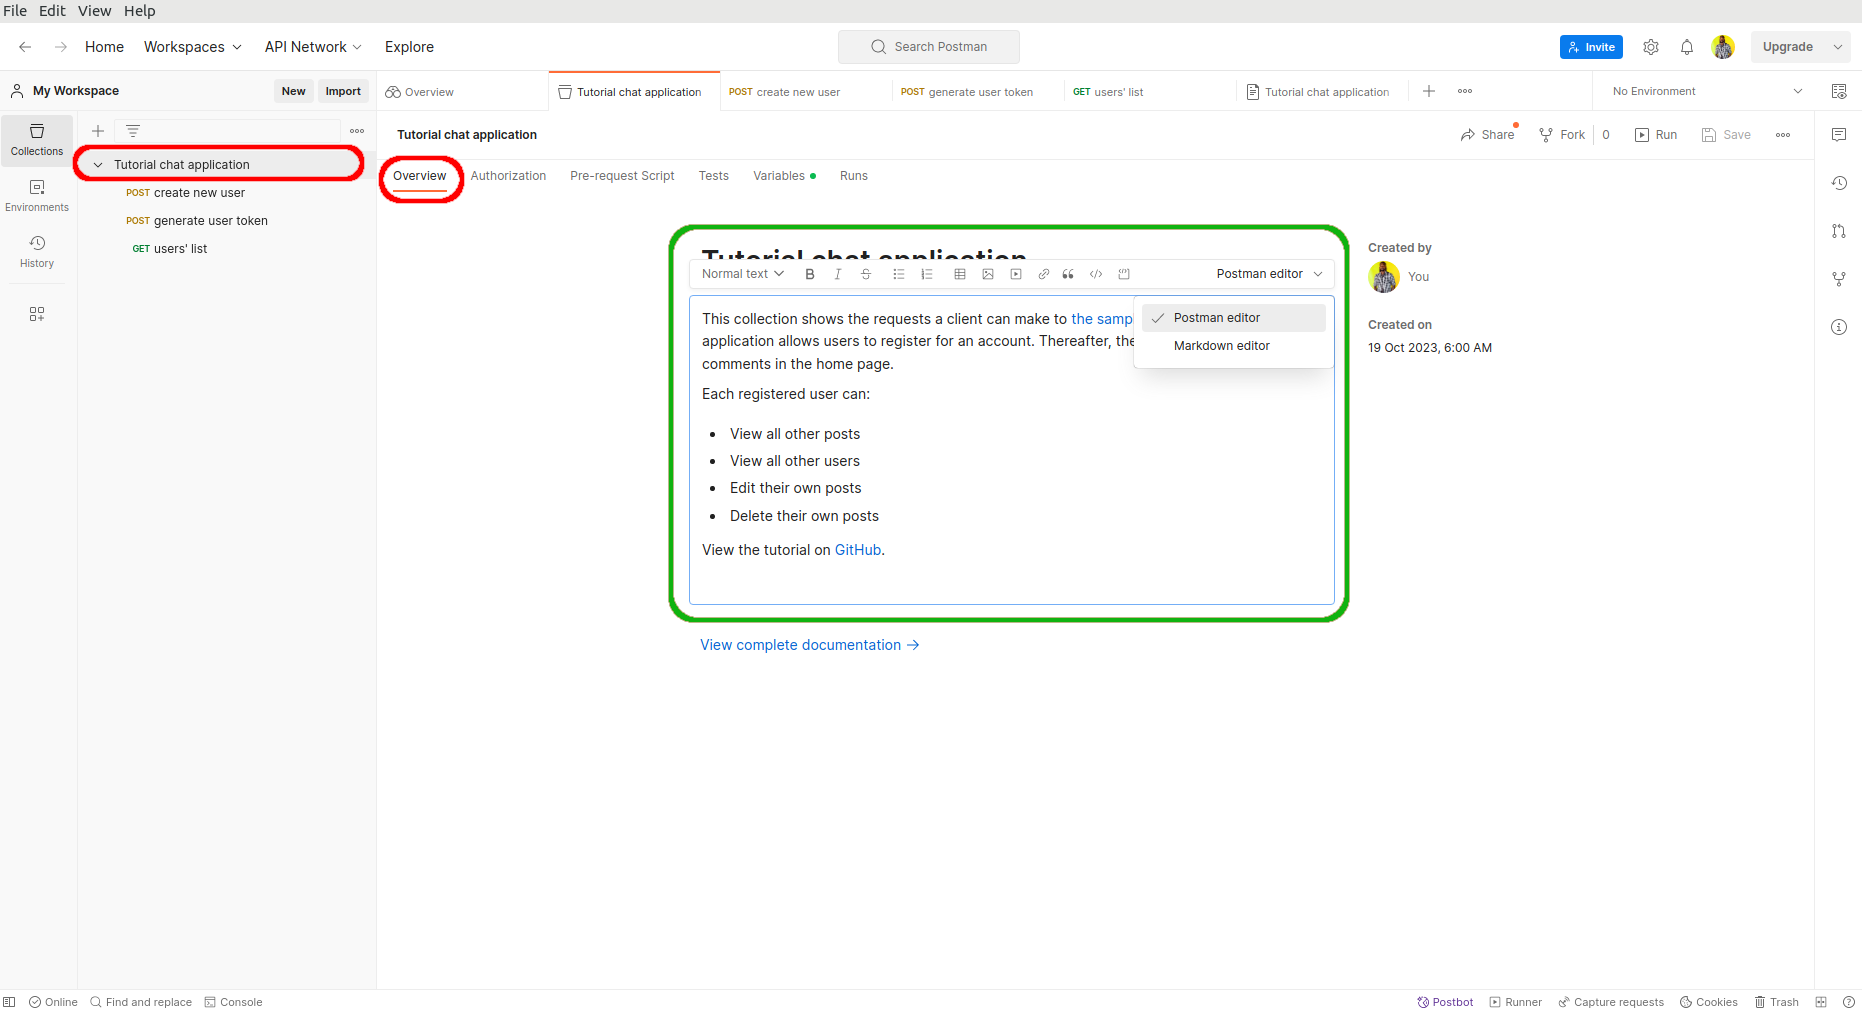
There is a link to view the complete collection's documentation right below the description. When we click on it, it will redirect us to the full collection documentation including all endpoints we have used.
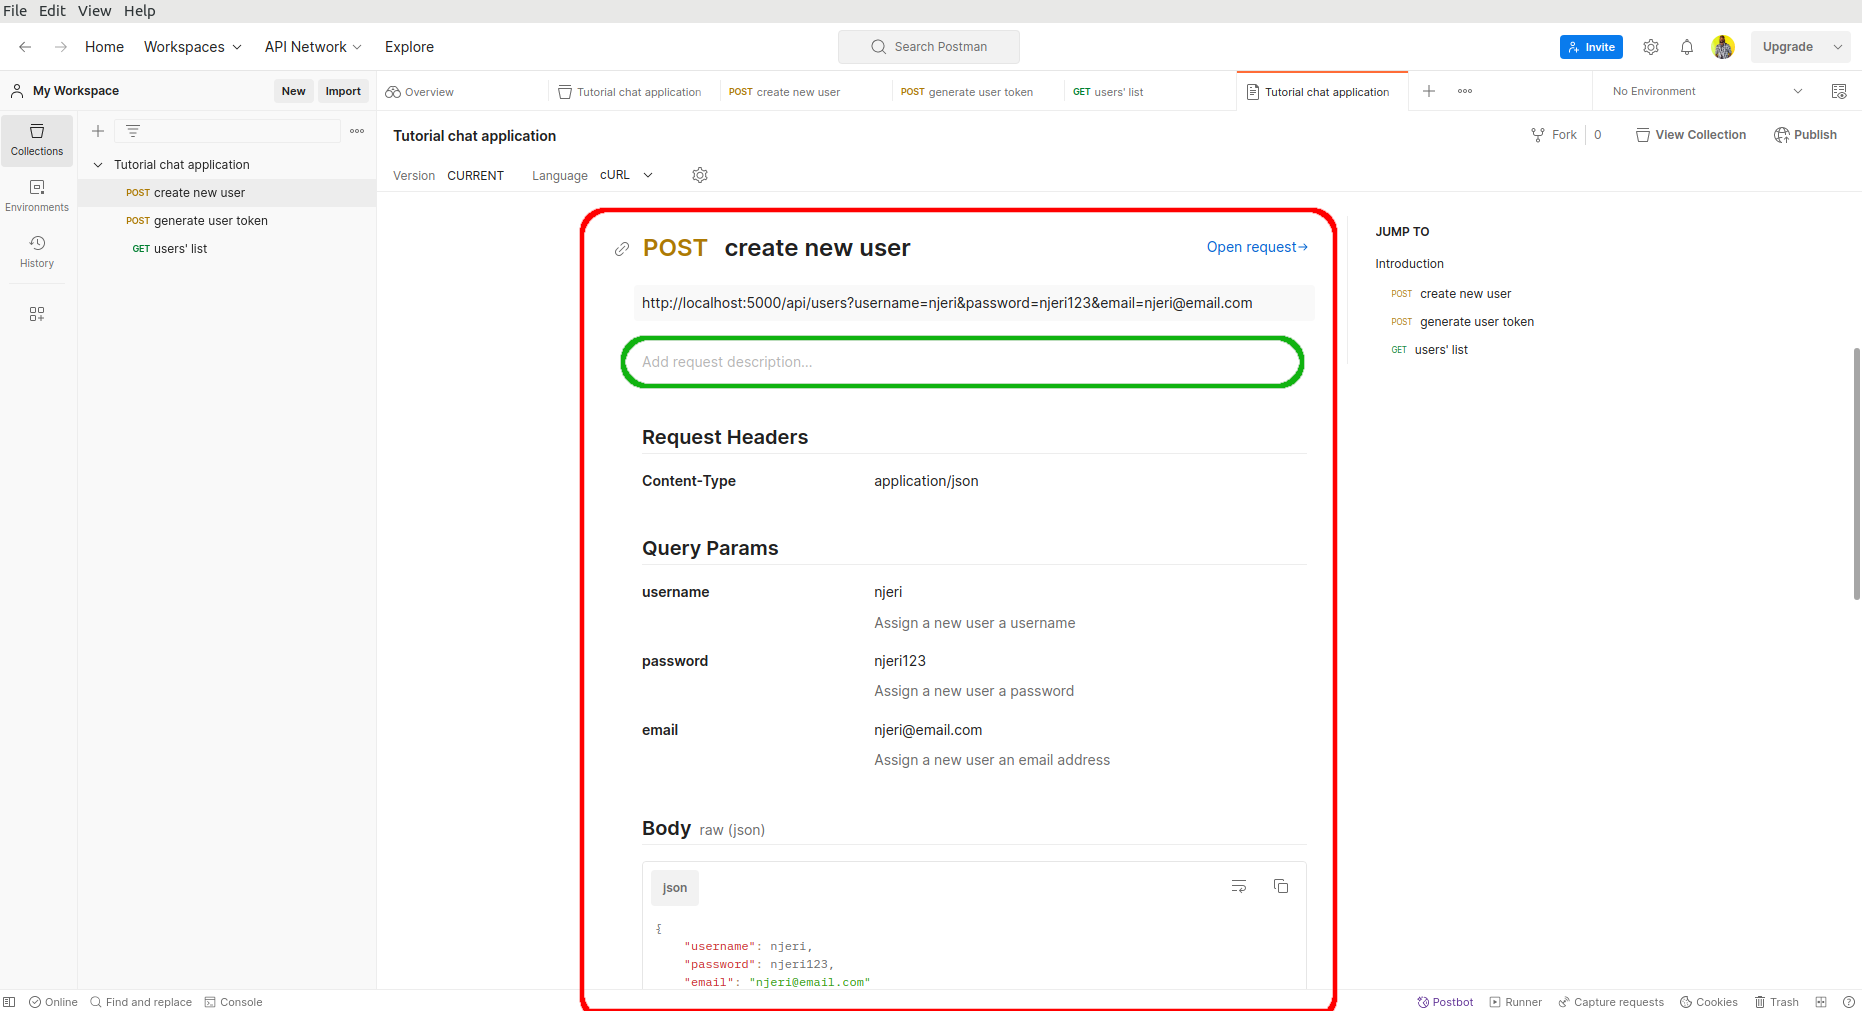
You will notice, though, that the documentation of each endpoint is not so descriptive. What we can do is edit each endpoint's documentation and provide more exhaustive information.
Share
If you enjoyed this article, you can share it with another person.
TweetNewsletter Subcription
Level up your skills.
We take your privacy seriously. Read our privacy policy. Unsubscribe | Resubscribe.