


Buy A Domain Name For Your Deployed Flask Application
During this tutorial, I will show you how you can purchase a domain name for your deployed application. A domain name makes it easy for users to remember your site rather than an IP (Internet Protocol) address. For your reference, these are the topics in our discussion:
- Welcome to Linode
- Deploy your flask app on Linode
- Buy a domain name for your deployed application (this article)
- Secure your domain with SSL
- How to monitor your server
The flask application demonstrated in the tutorials uses the file-based SQLite database. However, if you would like to know how to use PostgreSQL on a live Linux server, you can learn more by visiting Configure PostgreSQL in a Live Linux Server.
Table of Contents
If you would like to skip to a particular section within this tutorial, you can click on any of these links below:
Register a Domain Name
The very first thing I will need to do is to register a domain name from a domain registrar. This will cost me a small amount of money, usually about $12 per year. There are several domain registrars, for example, Google Domains and Godaddy. The registrar that I will use is Namecheap.
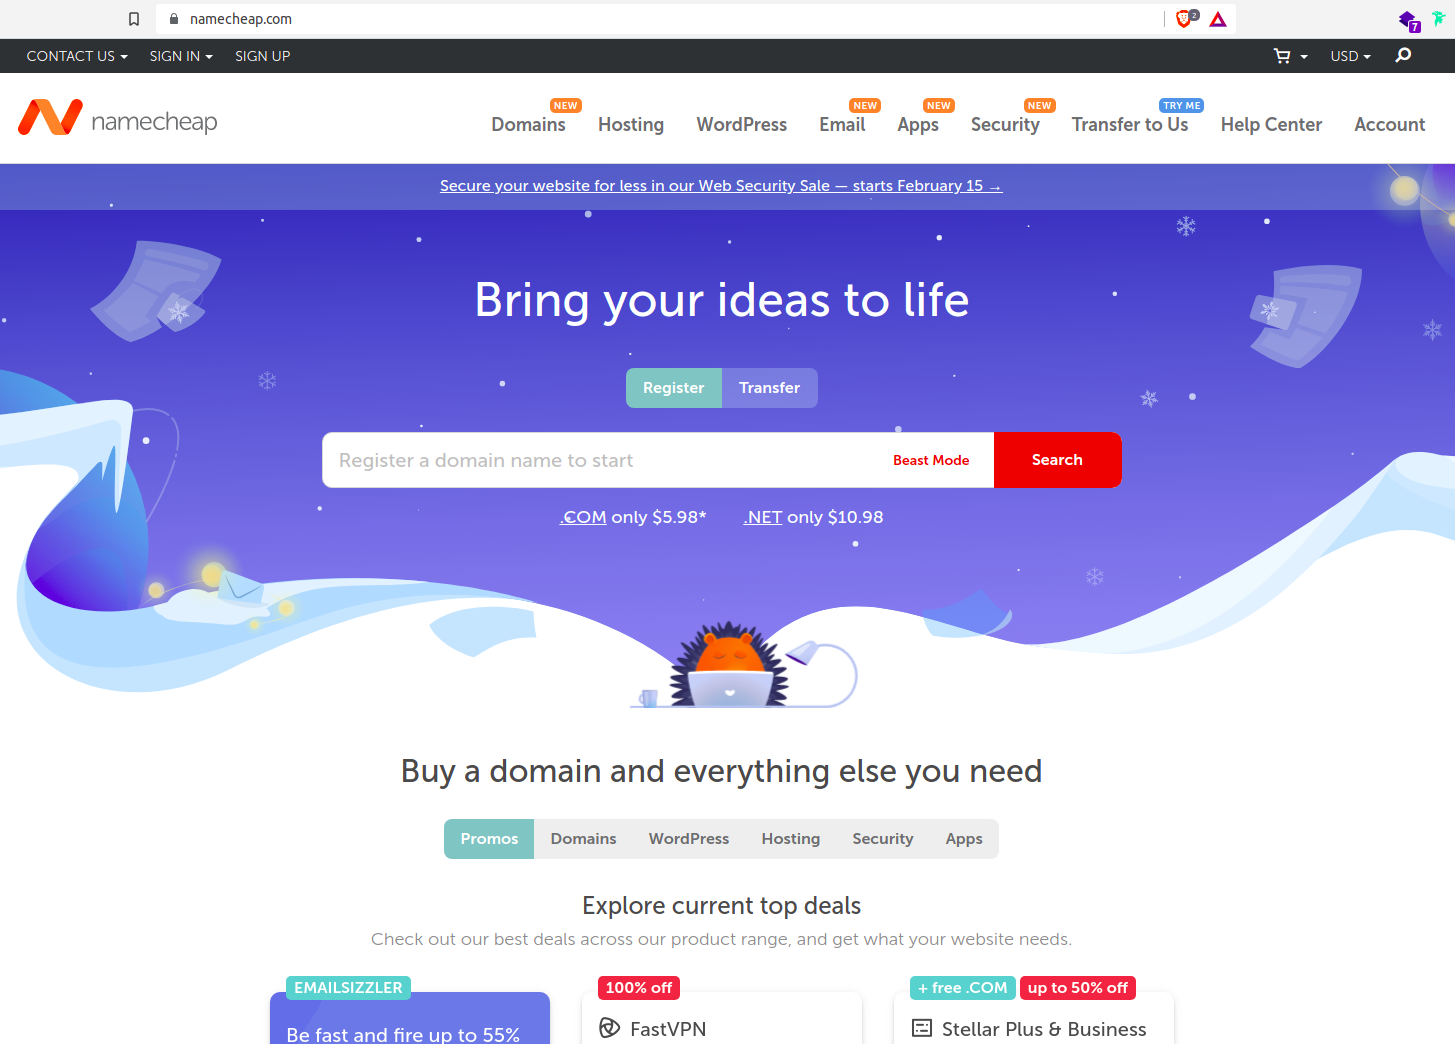
In the search bar, find yourself a domain name that you want to register. You may find some domain names already taken, so be sure to check the availability before you buy. It is easier to simply get a new domain name rather than bid for one that is already taken.
I will search for bolderlearner.com. If it is available, I will add it to my cart. You will find the name with possible other extensions such as .net or .academy. Pick the one that is most appropriate for your application. Namecheap normally offers monthly discounts when you register a domain name. Be sure to check that out and take advantage of the discount.
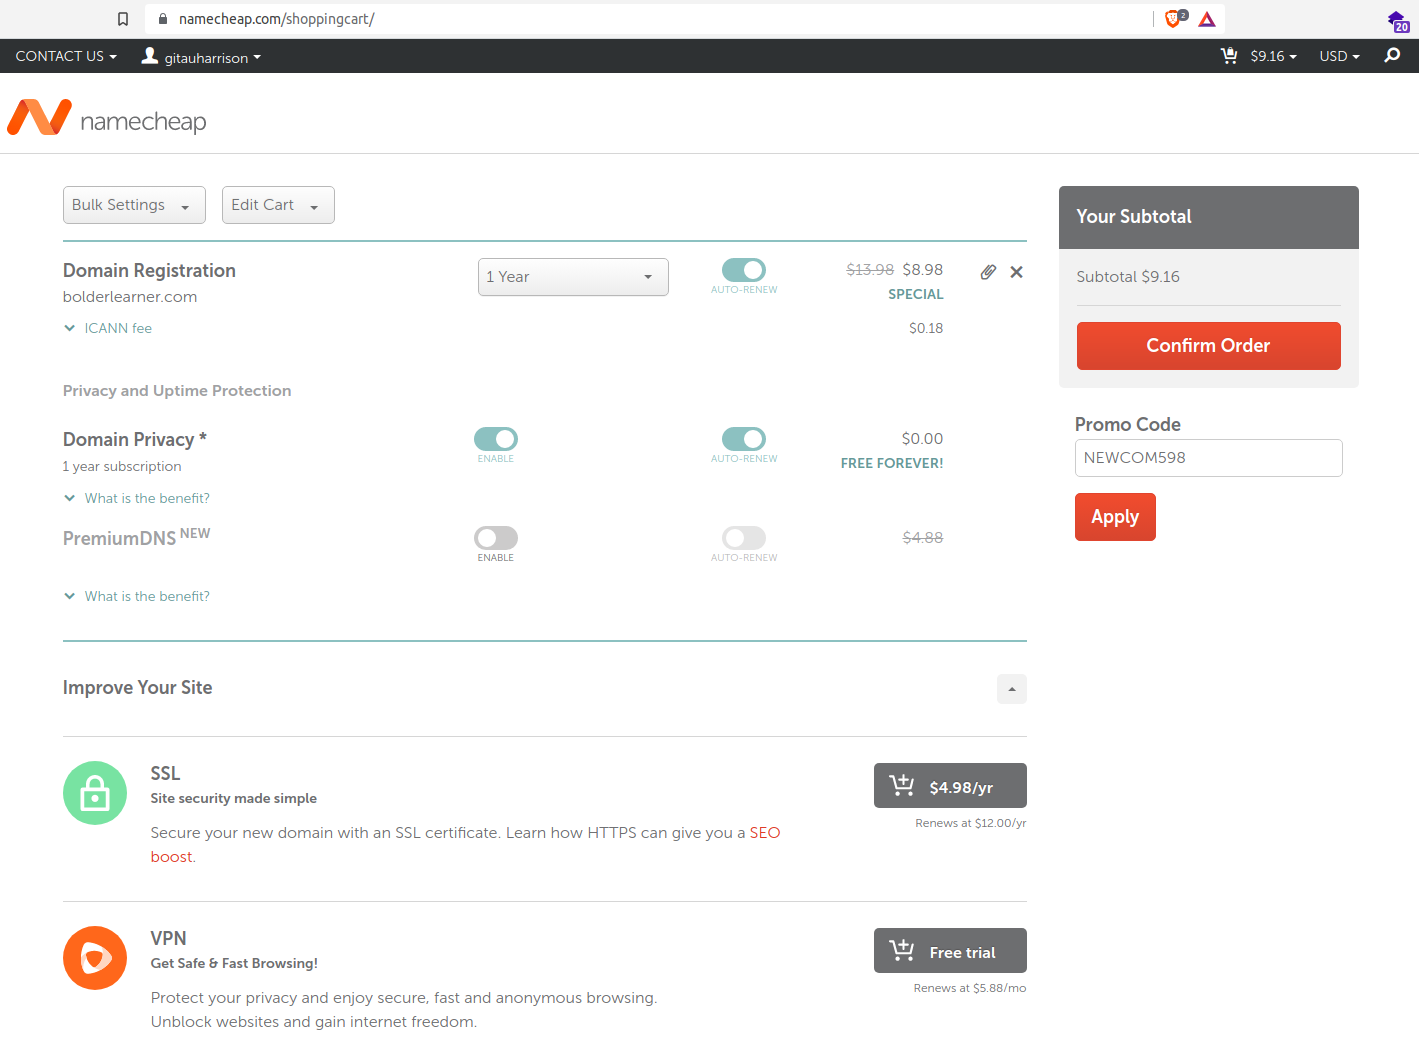
Once the name is in my cart, I will click on the checkout button to begin the process of confirming my order. I will register this domain for one year. You can choose to register it for longer periods of time by clicking the dropdown menu and selecting the number of years you would like to register the domain for.
By default, domain privacy is enabled just to protect you and your information when you register a domain. You can disable this by clicking the privacy buttons, but I don't know why you'd want to do that. There is a linux terminal command that you can use to find out more information about a domain name. So, for example, if I want to find out more information about bolderlearner.com, I can run the command whois bolderlearner.com. This simple command will reveal all the information about the domain name. If your domain privacy is disabled, all your personal details will be visible to anyone who runs this command. However, since the domain privacy is enabled by default, I am not be concerned about this because everything about me is blocked.
Namecheap also offers other addons such as SSL, VPN, Professional Email, and more. I will not be using any of these addons because I can do them myself. That is all I need to register my domain name. I will proceed to confirm my order. If you are interested in discounts, you will see a Promo Code field. Enter the promo code on offer during the month of your purchase, click "Apply" before clicking "Confirm Order". Since I am not a first time registrant, the coupon shown above will be invalid.
I will be redirected to the billing page where I can enter my credit card information. I have left out an image illustration of the billing page for privacy of my details. For this domain, I will disable autorenewal for my purchase. Once that is done, I will click "Continue". Namecheap will then redirect me to a confirmation page just to make sure that the details I have entered are correct. If everything looks good, I will confirm this purchase.
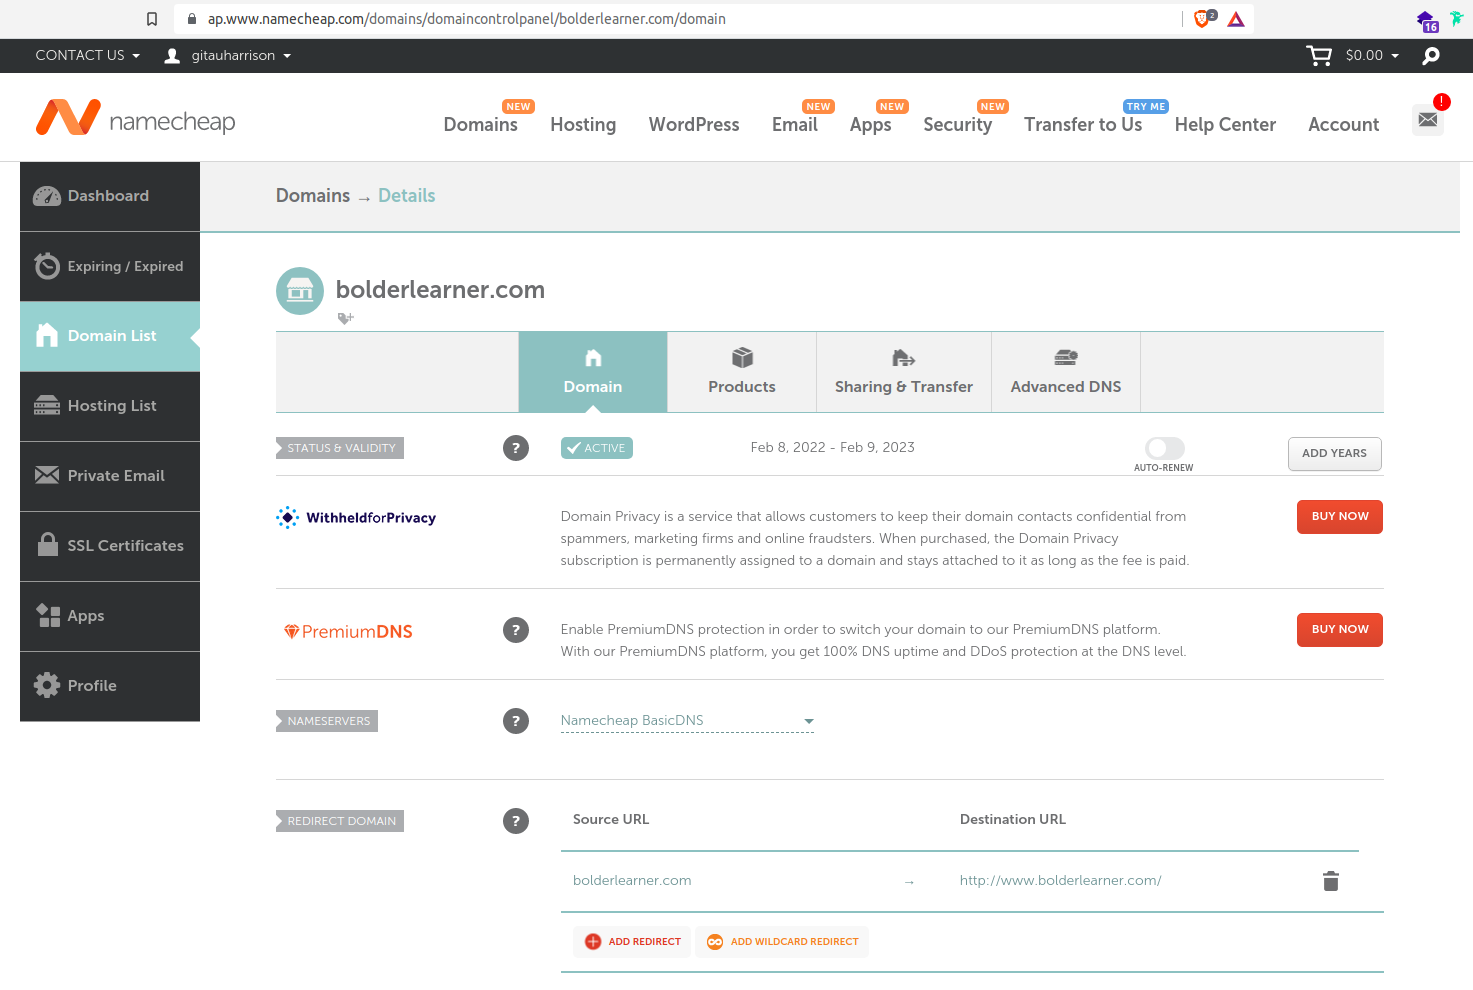
Back to my namecheap dashboard, I can click the Domain List link in the sidebar navigational menu to see the domain I just purchased. There is a "Manage" button next to the listed domain. Clicking this button will redirect me to the domain management page as seen below.
Connect Domain Name to Your Application
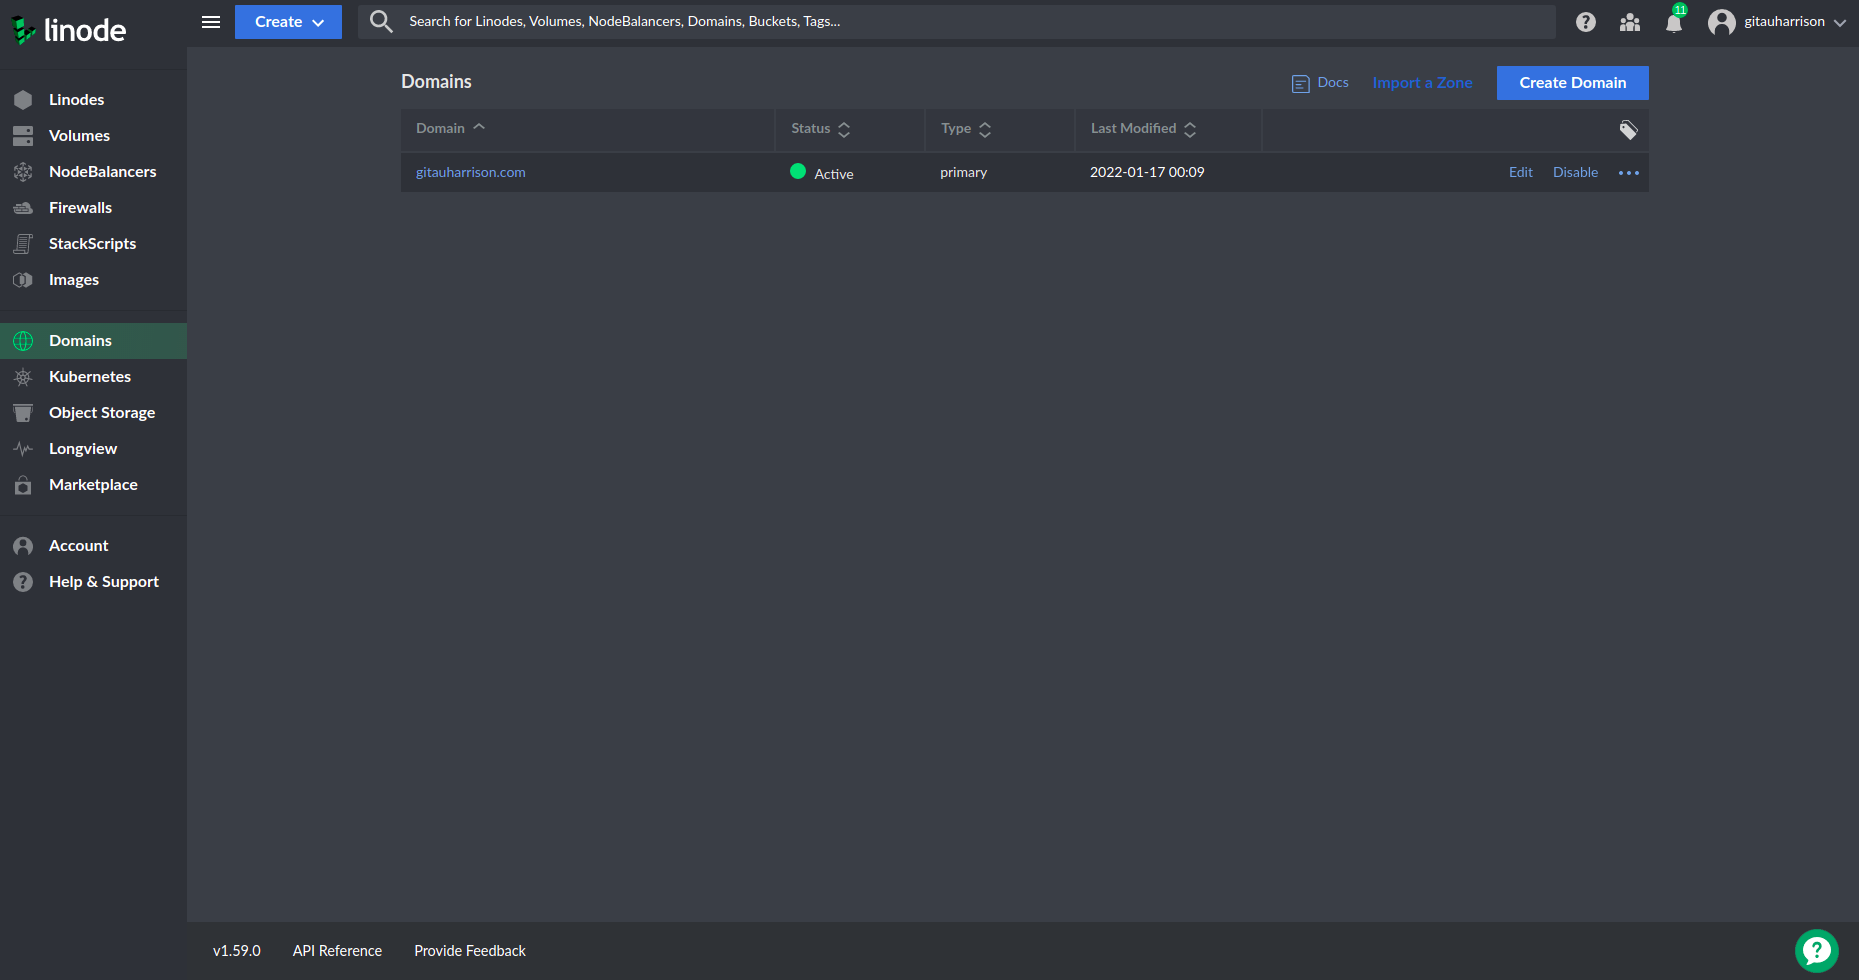
On my Linode dashboard, there is a "Domains" link in the sidebar navigational menu. Clicking this link will show me a list of all the domains I have registered. You can see that I currently have one domain registered.
To add a new domain, I will make use of the DNS Manager Documentation. This documenation can be found on top of your domains list, clearly labeled as Docs. Clicking this link should take you to the DNS Manager documentation.
DNS Set-Up Checklist
- Register a domain name (completed above)
- Set your domain name to use Linode's nameservers
- Use the DNS Manager to add a new record to your domain
- Set up revers DNS
- Add additional DNS records
Set Your Domain Name to Use Linode's Nameservers
The five entries below are the nameservers that Linode uses. I will need to add these to my domain name in Namecheap.
ns1.linode.comns2.linode.comns3.linode.comns4.linode.comns5.linode.com
On my domain management page in Namecheap, there is a section called "NAMESERVERS". By default, the nameservers are set to use Namecheap BasicDNS. I will click on the dropdown menu and select "Custom DNS". This will allow me to enter Linode's nameservers.
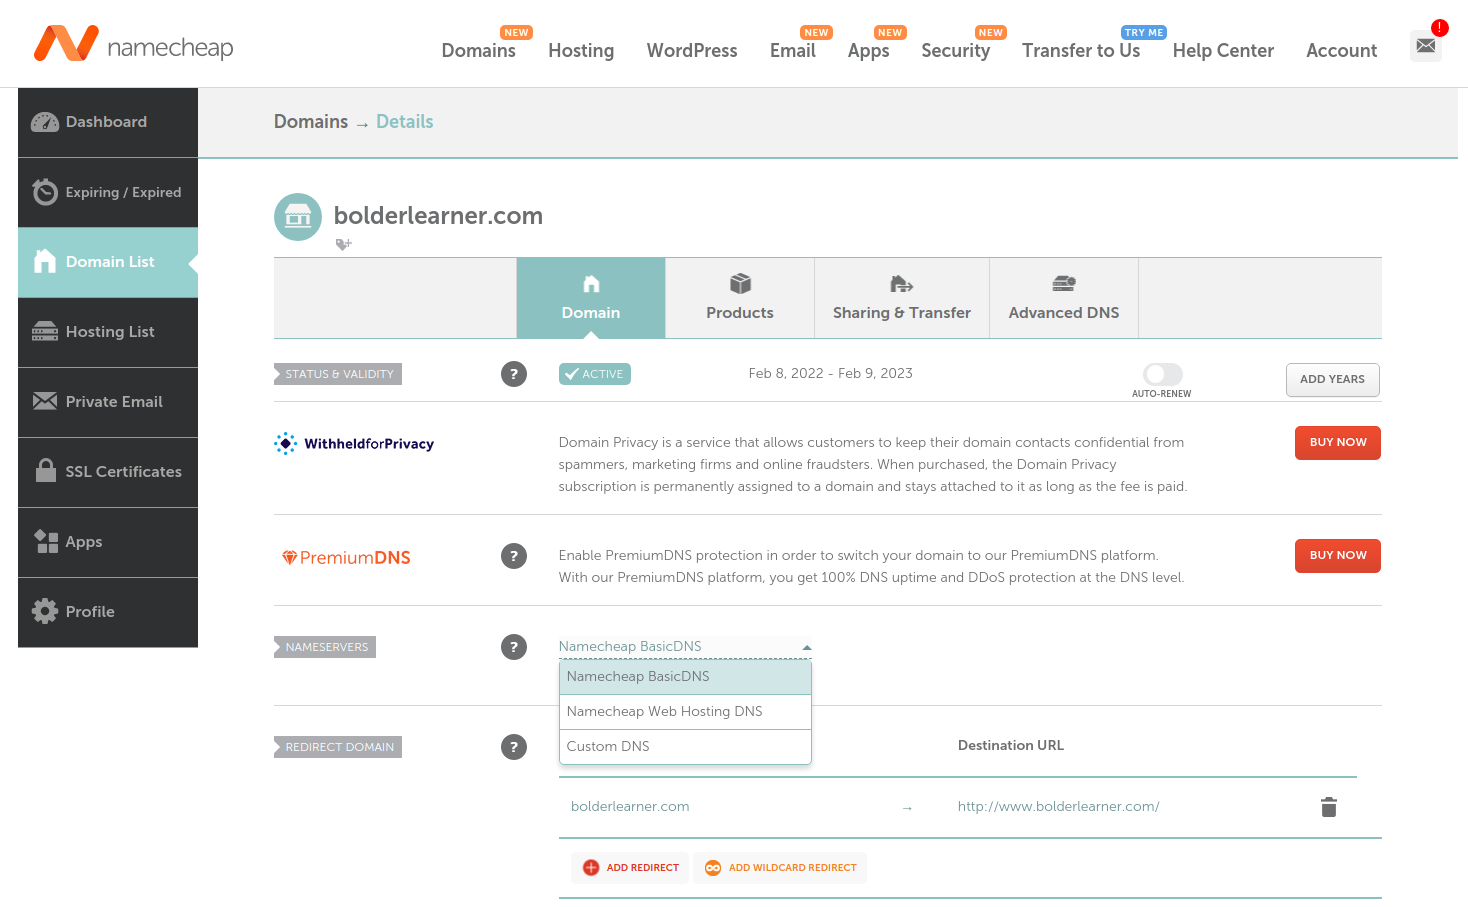
I will paste the nameservers into the text boxes then click on the :heavy_check_mark: to save the changes.

Both Linode and Namecheap say that the changes I have made will take some time, usually 24 - 48 hours, for the changes to apply. In computer jargon, this is known as a "DNS propagation delay".
Use the DNS Manager to Add a New Record to Your Domain
Within my domain list in Linode's dashboard, there is a button called "Create Domain".

To add my new domain name, I will click on this button. I will see this page:
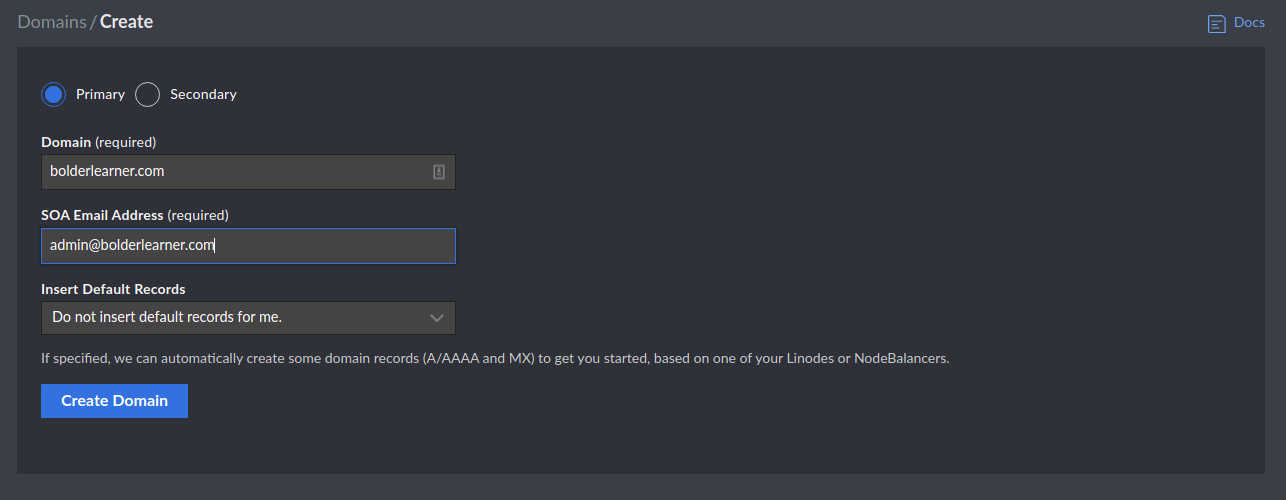
I have added my domain and a temporary email admin@bolderlearner.com which does not exist yet. "Create Domain" button will create this new domain and redirect me to Linode's domain management page.
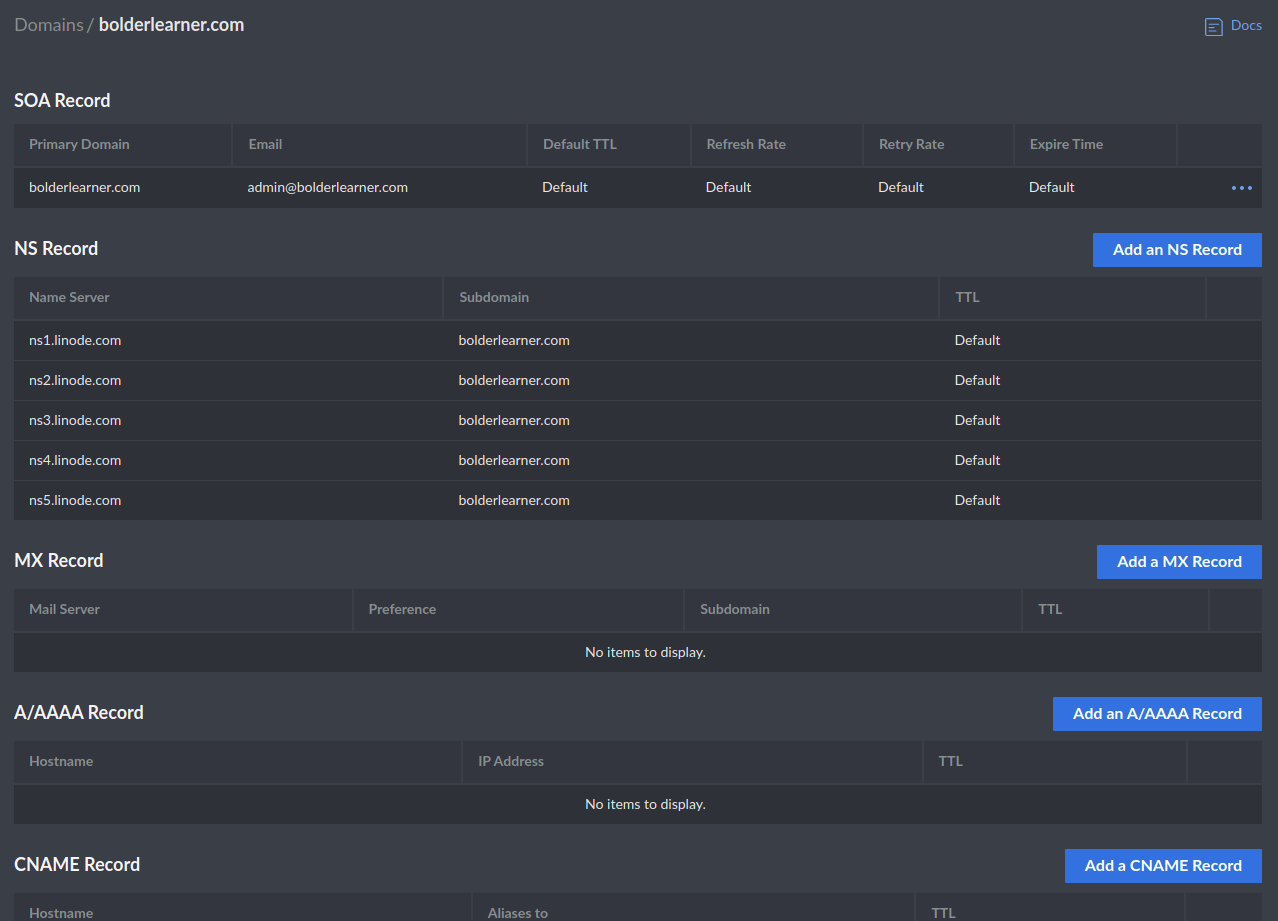
At first, this might look very intimidating, but it is actually very simple. What I am interested in here is to add some DNS records to my domain. Example of DNS records are A records, CNAME records, MX records, and TXT records.
The first record that I am going to add is an A record. This record is used to point my domain name to a specific IP address. The IP address in context is the IP address of my Linode. This record requires the following fields:
Hostname: This is the domain name that I want to point to my IP address.IP Address: This is the IP address that I want to point to my domain name.TTL: This is the time to live of the record. It sets the lifespan of the cache for the DNS record
I will click on "Add an A/AAAA Record" button (seen above) to update my hostname, IP address, and TTL.
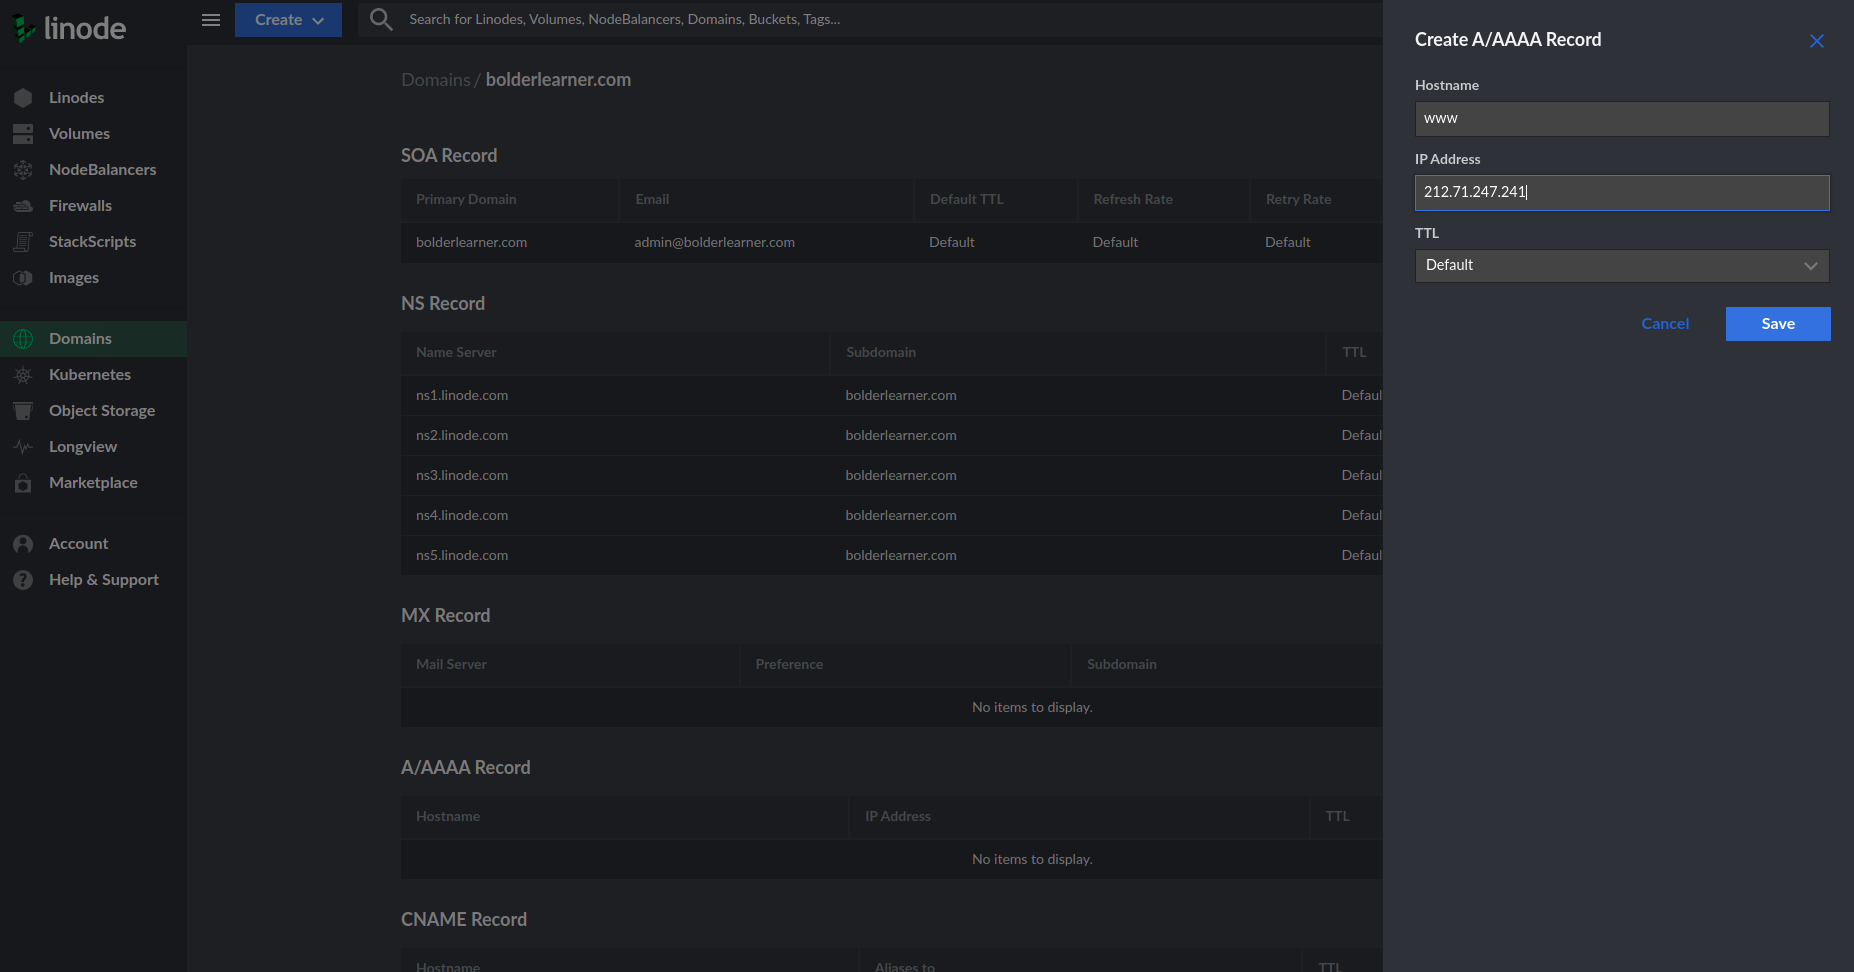
I have added my host name as www, my IP address as 212.71.247.241 and I left TTL as it was, that is "Default". The IP address that I am using currently is different from the one you saw in the previous tutorial. This is because I recreated the entire project and obtained a new IP address. Moving forward, I will be using this new IP address.
I can add more A records to my domain. Currently, I have only www record.
Hostname: in case a user forgets thewww.prefix.blog: this will be something like blog.bolderlearner.com.*(asterisk) - this is an example of a wildcard record. It will match any request for domains that do not exist. Wildcards are often used to point all non-existing domains to a specific IP address or top-level domain. If the querried first-level domain does not exist, the IP address specified in the wildcard DNS record will respond. For example, if I search for a non-existent app.bolderlearner.com, I will be re-directed to www.bolderlearner.com.
Set Up Reverse DNS
Computers usually use DNS to determine the IP address that is associated with a domain name. Reverse DNS is the opposite of this. Reverse DNS is used to determine the domain name that is associated with a specific IP address. Reverse DNS uses a pointer record (PTR) to match an IP address with a domain or subdomain. PTR records are generally set with a hosting provider, so reverse DNS is set in the Linode Cloud Manager.
I will click on my bolderlearner linode, then navigate to the Network tab. Scrolling down the Network tab page, I will see a section called IP Addresses.

What I am interested in here is the IPv4 address. The first row is the IP address of my linode. It has an "Edit RDNS" button. I will click on this button to edit the reverse DNS.
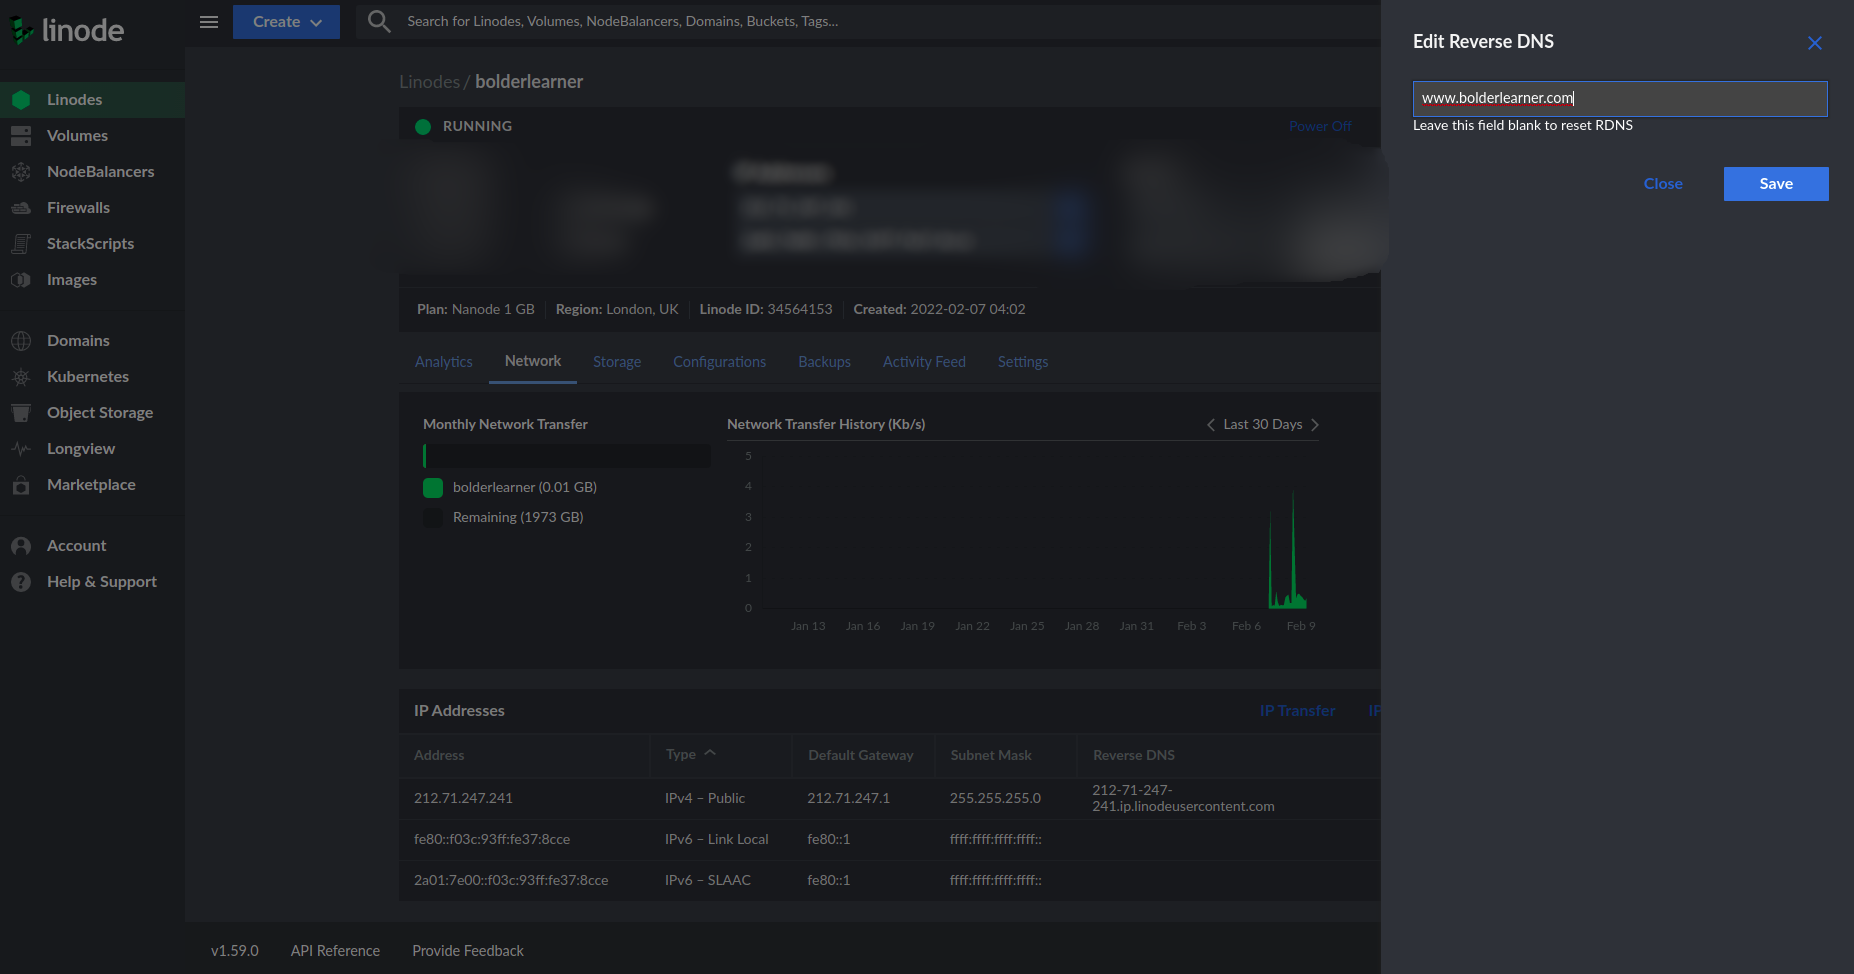
Only one form field is provided. In my case, I have added my domain name as www.bolderlearner.com. Sometimes it may take a few minutes for the DNS to propagate and it might look like you have an error. Give it a few minutes if that is the case for you. My edit was instant. As soon as you save, you will see that Reverse DNS column has been updated.
I will open my browser and paste my domain name into the search bar to test if the application is accessible.
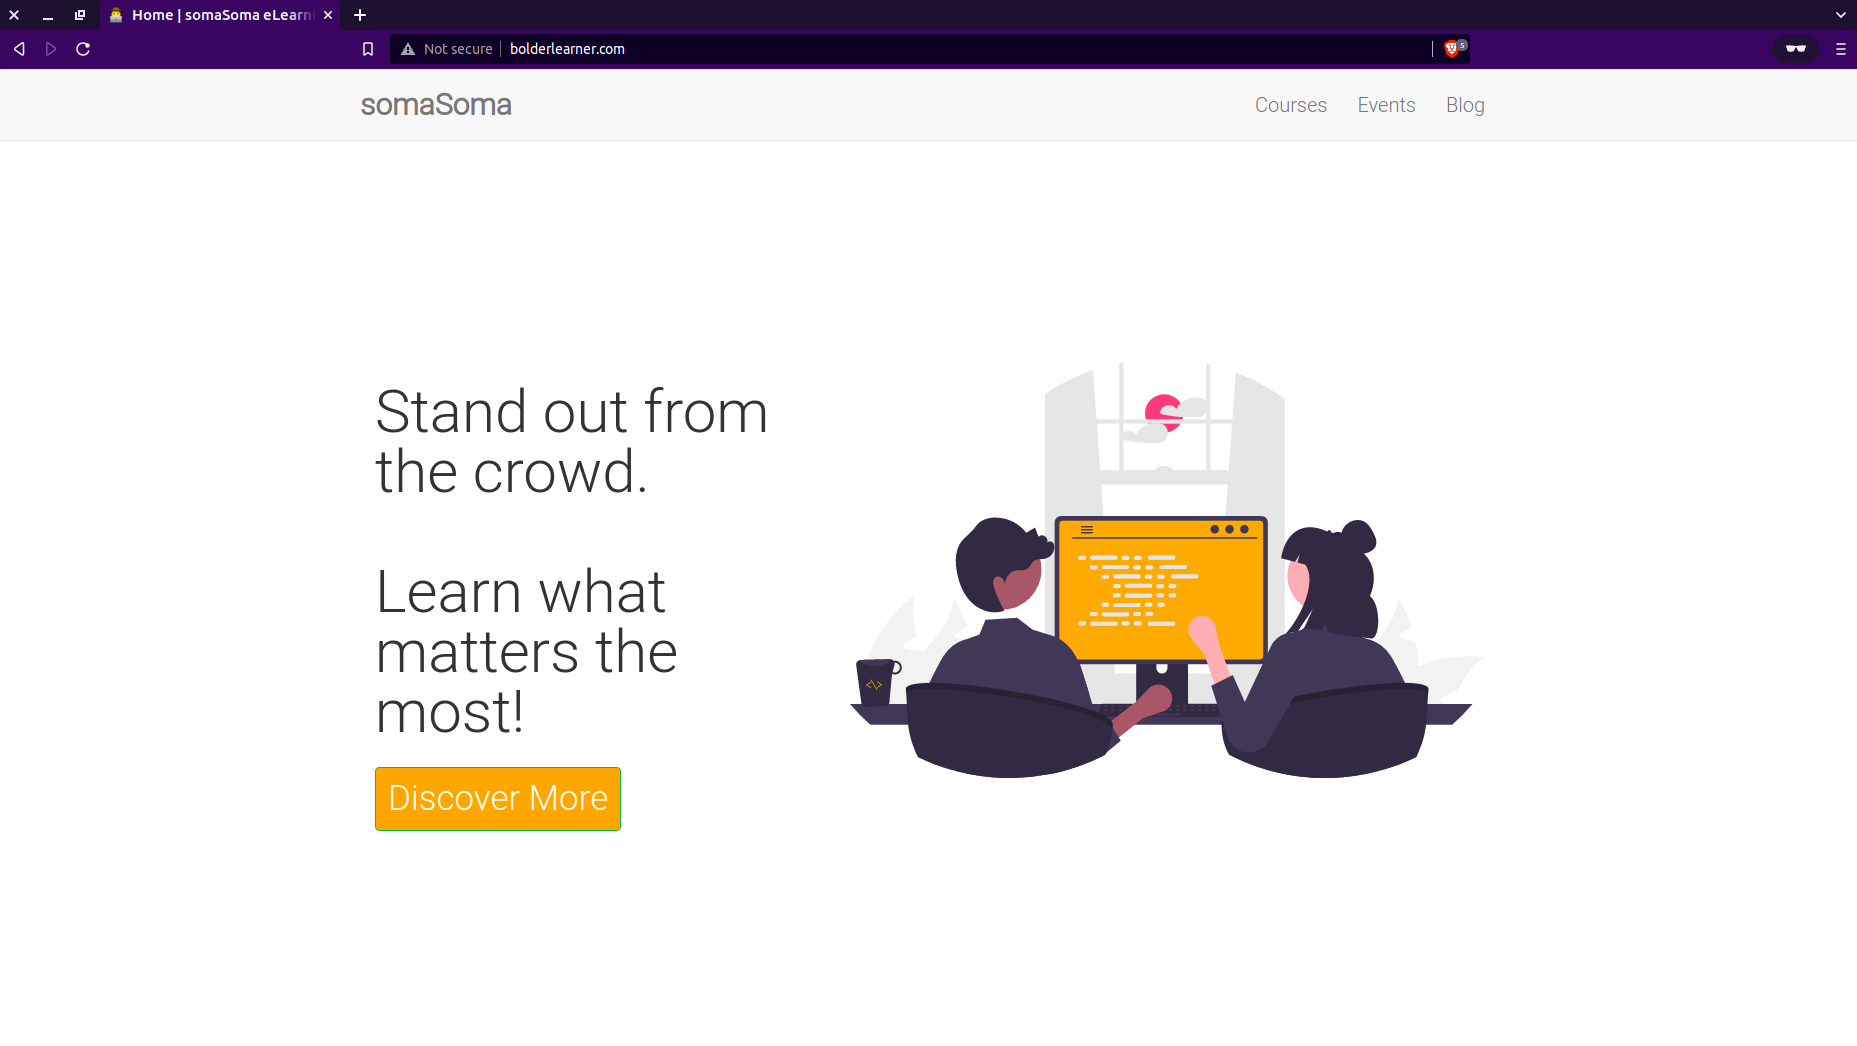
As you can see, I can access my application on www.bolderlearner.com. I have tested all aspects of my application such as user authentication and authorization and everything is working as expected.
Add Additional DNS Records
If you are familiar with Twilio Sendgrid, you probably know that it is a cloud-based email service. There is a good chance that using the Flask-mail package may give you authentication and email credibility issues. This package works exceptionally well during testing, but on a live production server, receiving emails may fail. Thankfully, our current setup works fine and you do not have to worry about this. I want to show you how you can configure an email service such as SendGrid to work with your new domain name.
This section will show you how to receive emails within a Flask application. If you want to learn how you can send emails from a Python Flask application, you can check this other comprehensive tutorial to learn more. I recommend that you begin with this tutorial before you can continue.
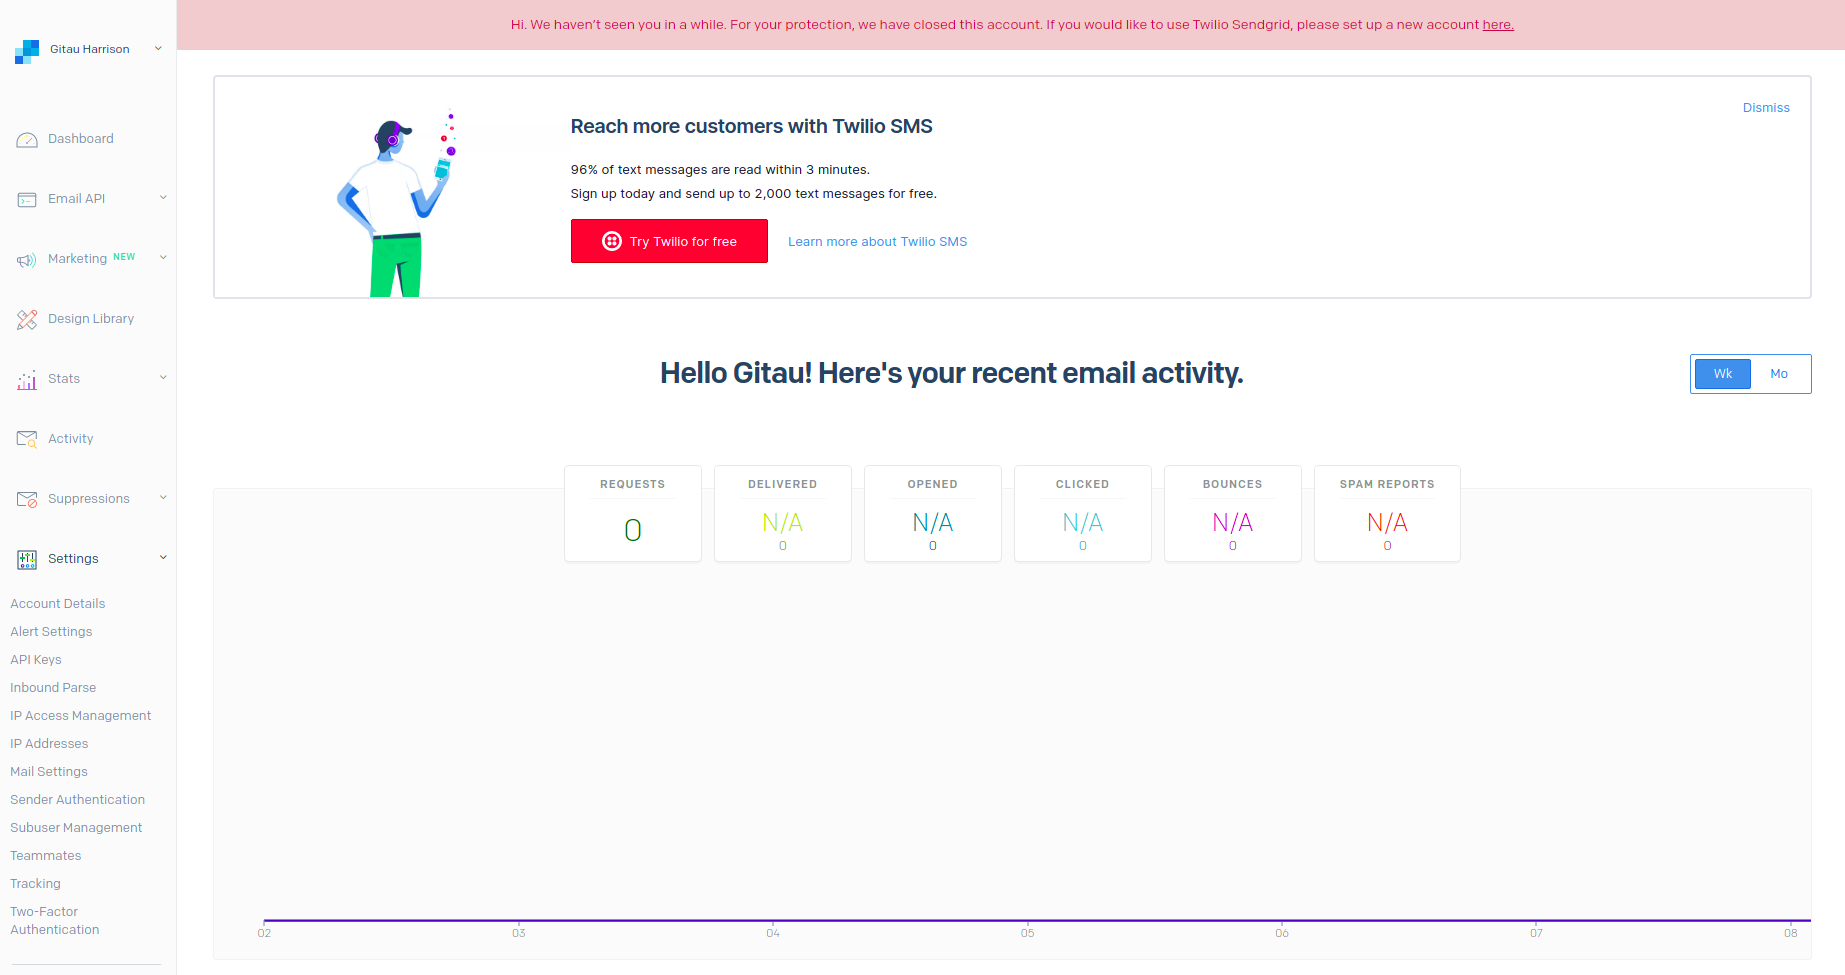
I need to authenticate my domain name with Twilio SendGrid so that the service can send and receive emails on my behalf. First, I need to login to my SendGrid account. Once authenticated, check the sidebar on the left of the dashboard and click on "Settings". You will see a link called "Sender Authentication".
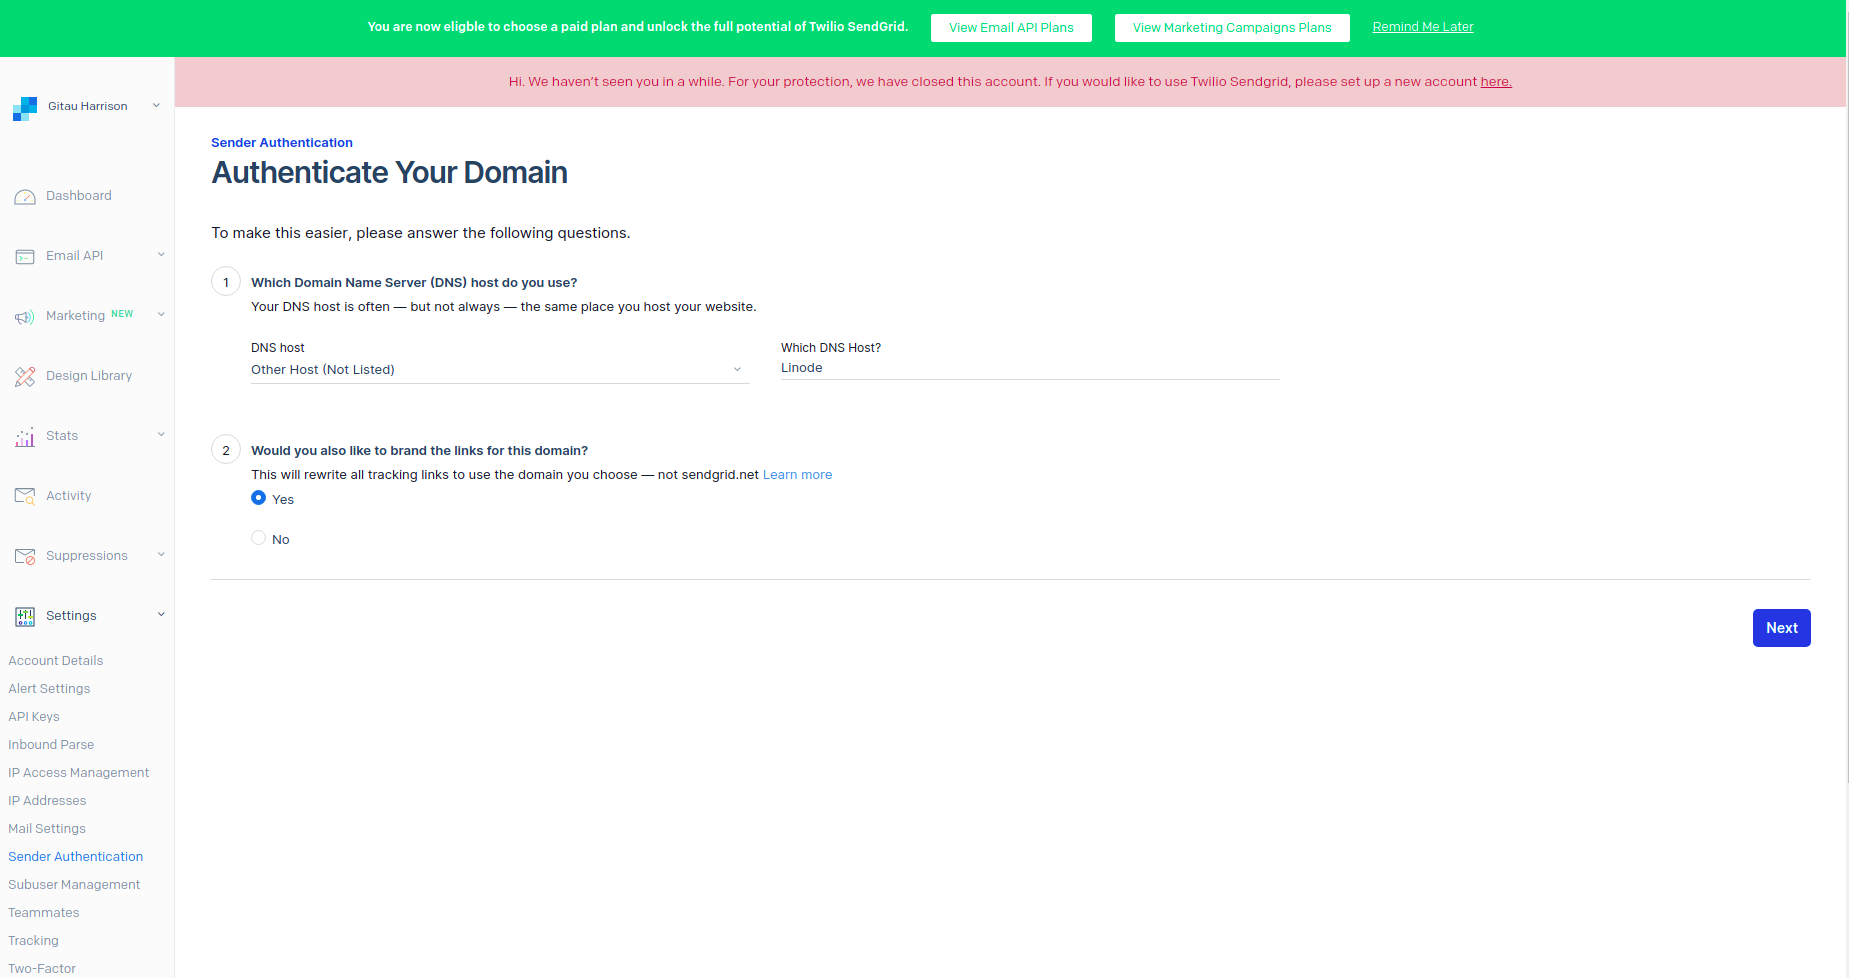
Click on this link to access the Sender Authentication page. There is a button called "Authenticate Your Domain".
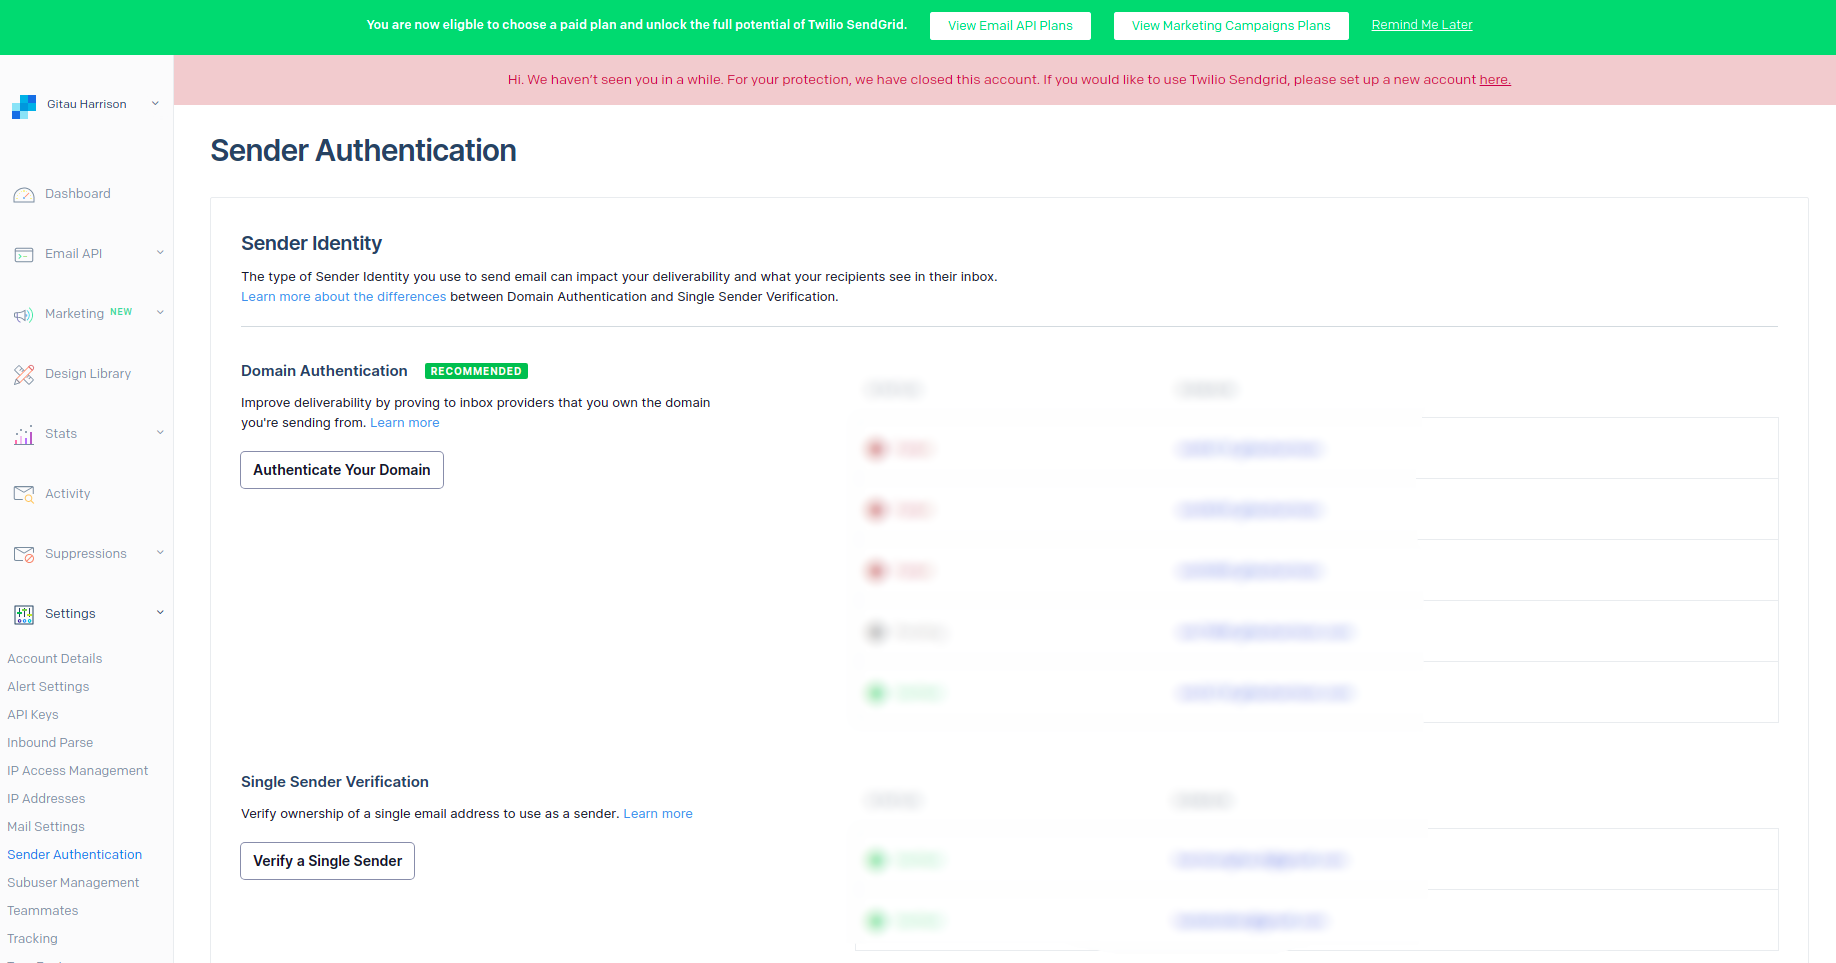
Once I have clicked on this button, there are several questions that I will be asked. The first page has two questions. Unfortunately, Linode, my DNS provider, is not listed in the dropdown menu. I needed to click on "Other Host (Not Listed)" to provide the host name. I also allowed for link branding in this domain.
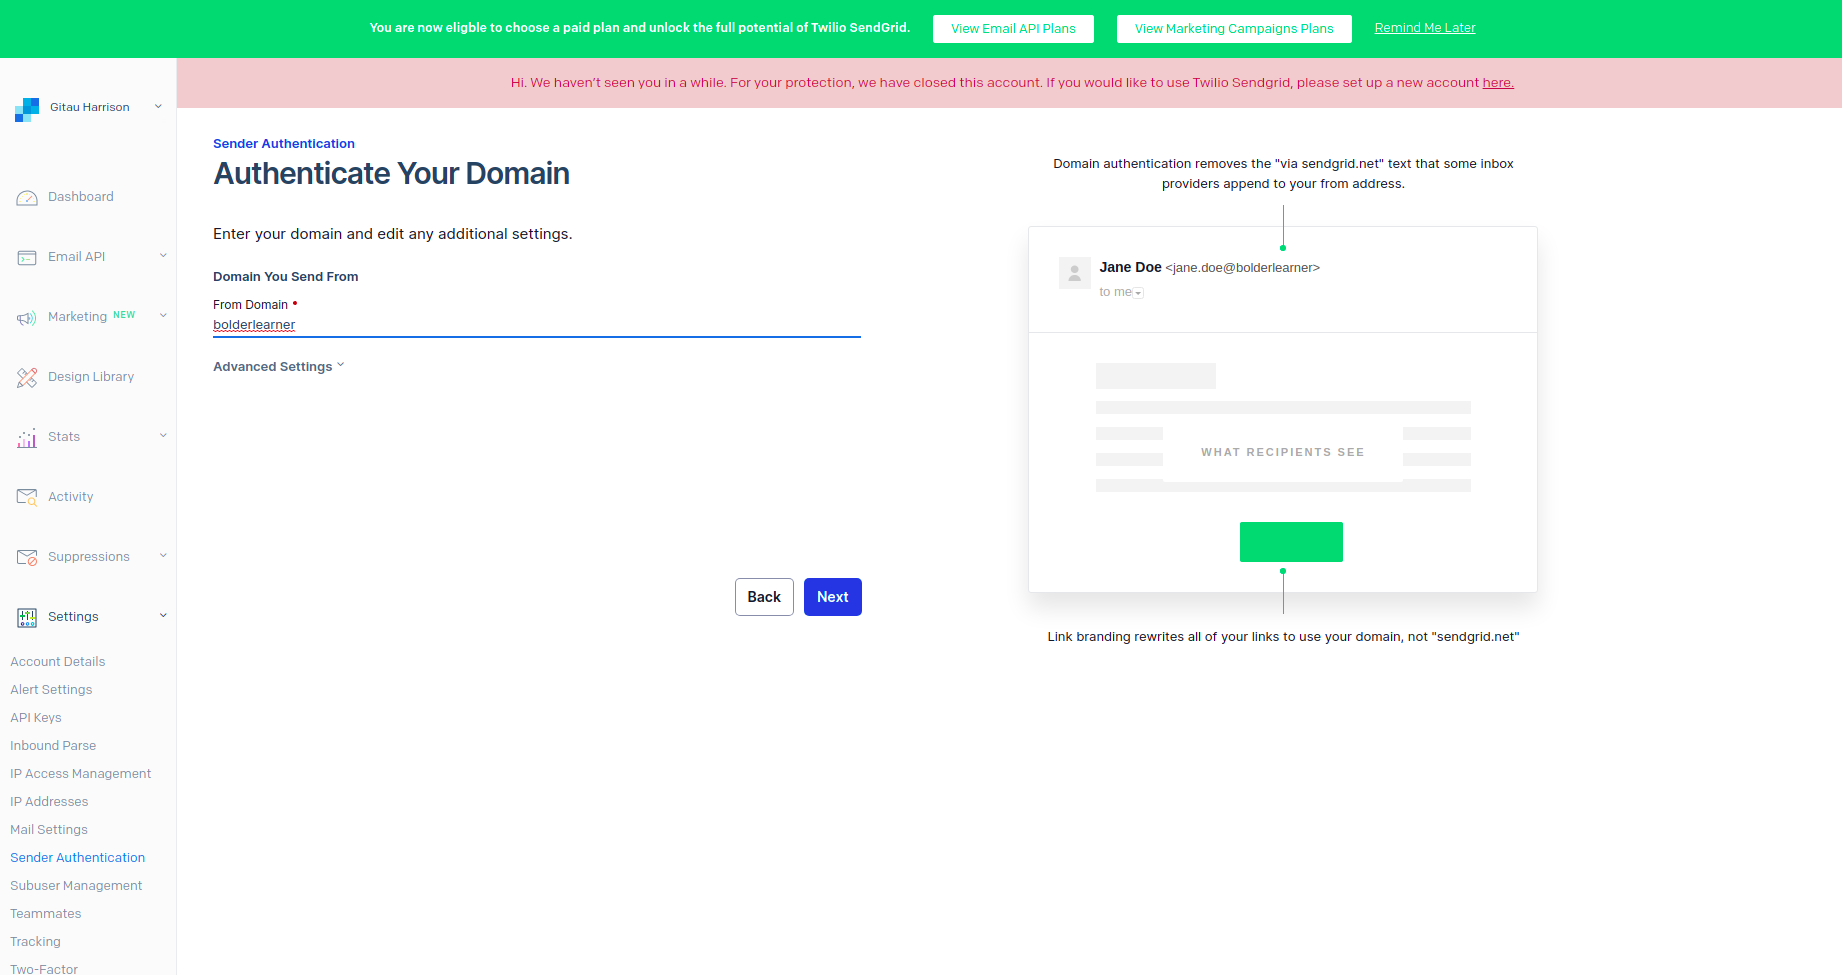
The "Next" button, blue in color, will redirect me to the next page in this process. I am required to update the domain name from which an email can be sent. A nice little preview of the email is shown as I key in my domain name (remember to add a .com).
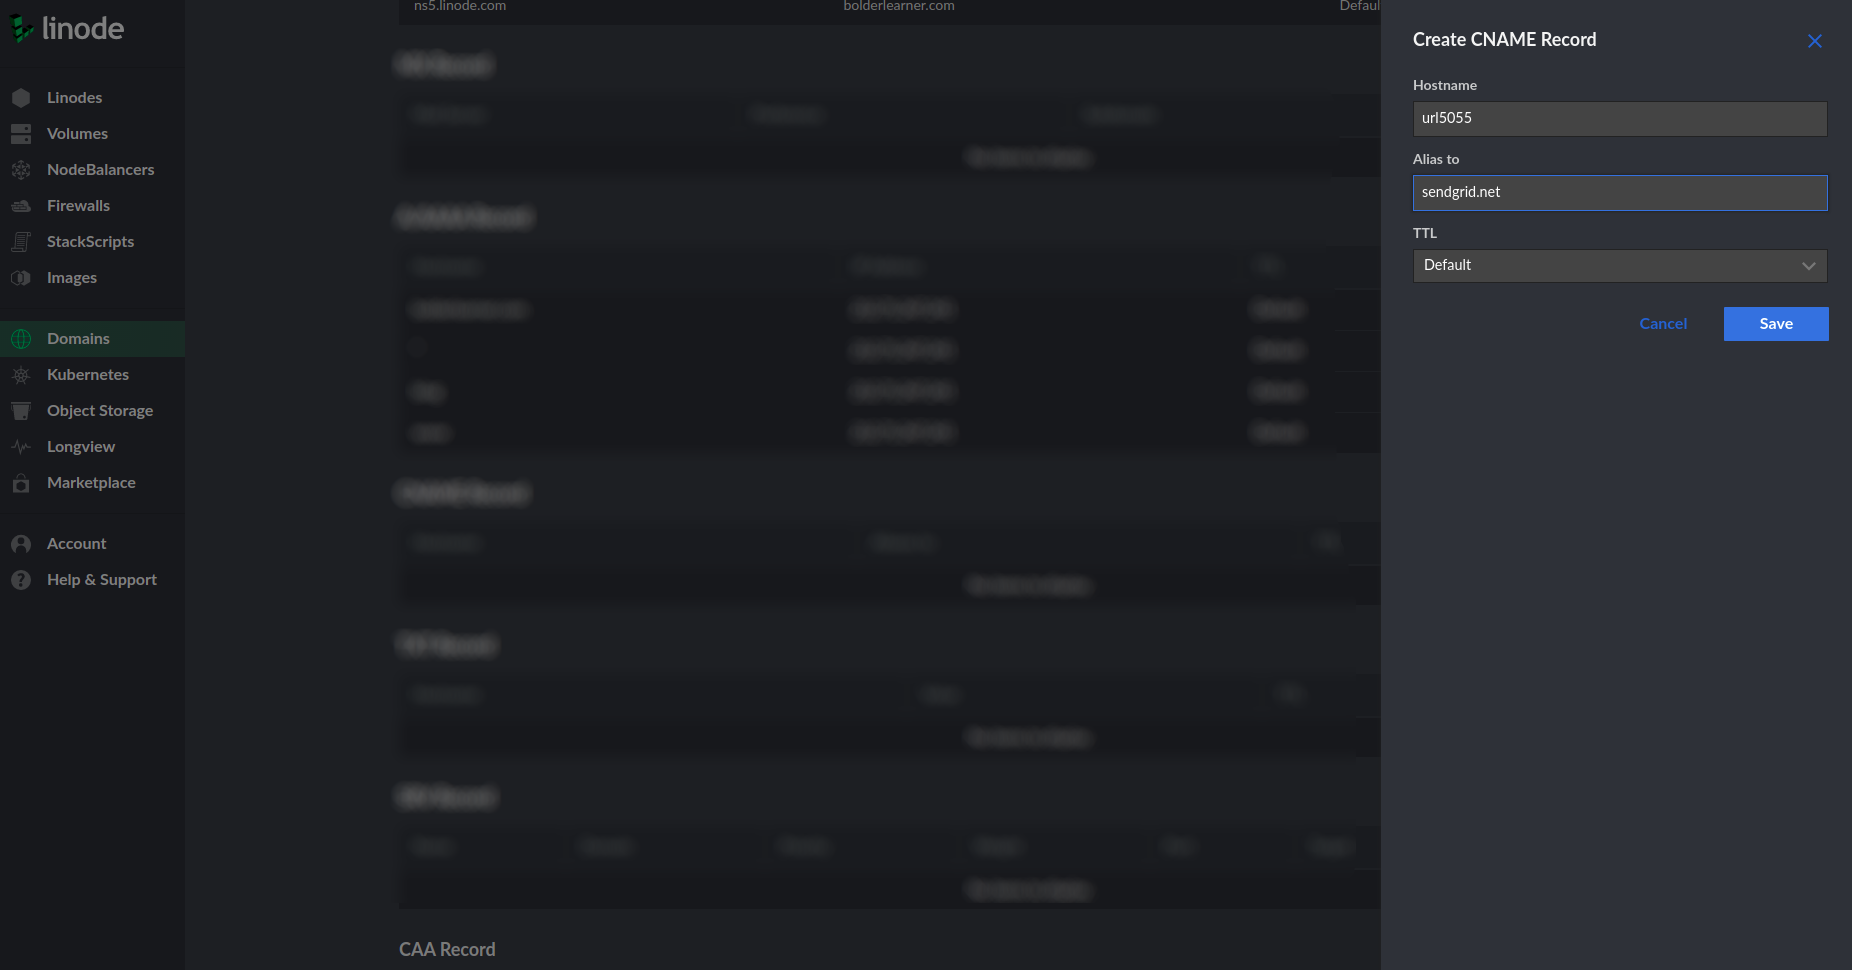
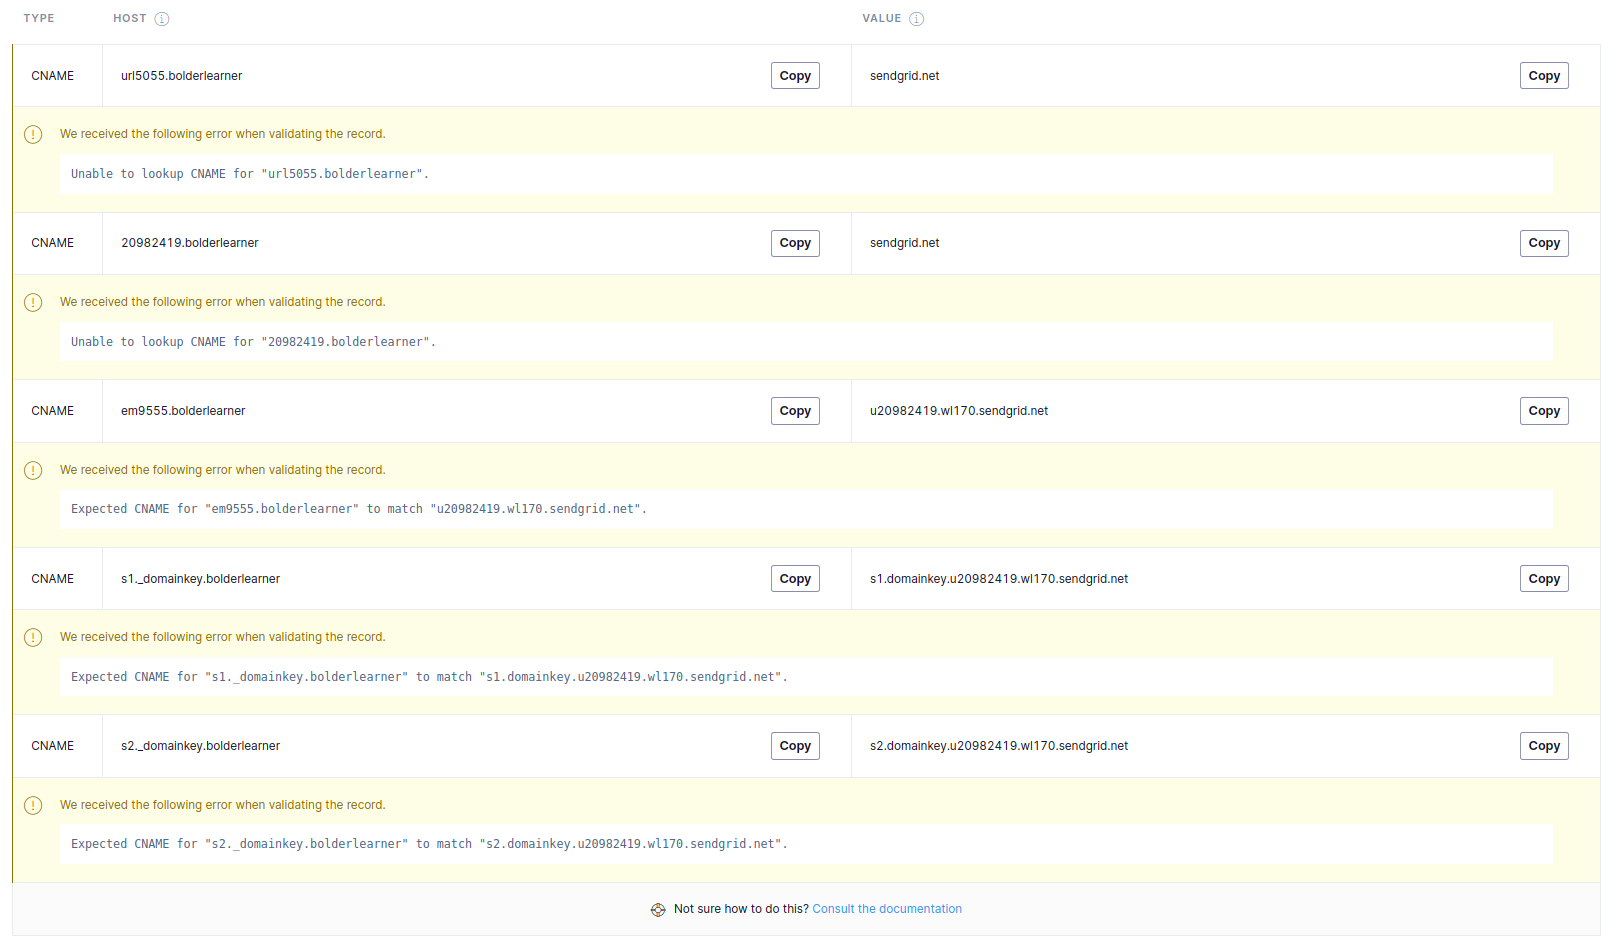
Finally, I will need to manually add the records seen in page 3 to my domain in Linode. There are five records that I need to add. These records need to be added to the CNAME section within Linode.
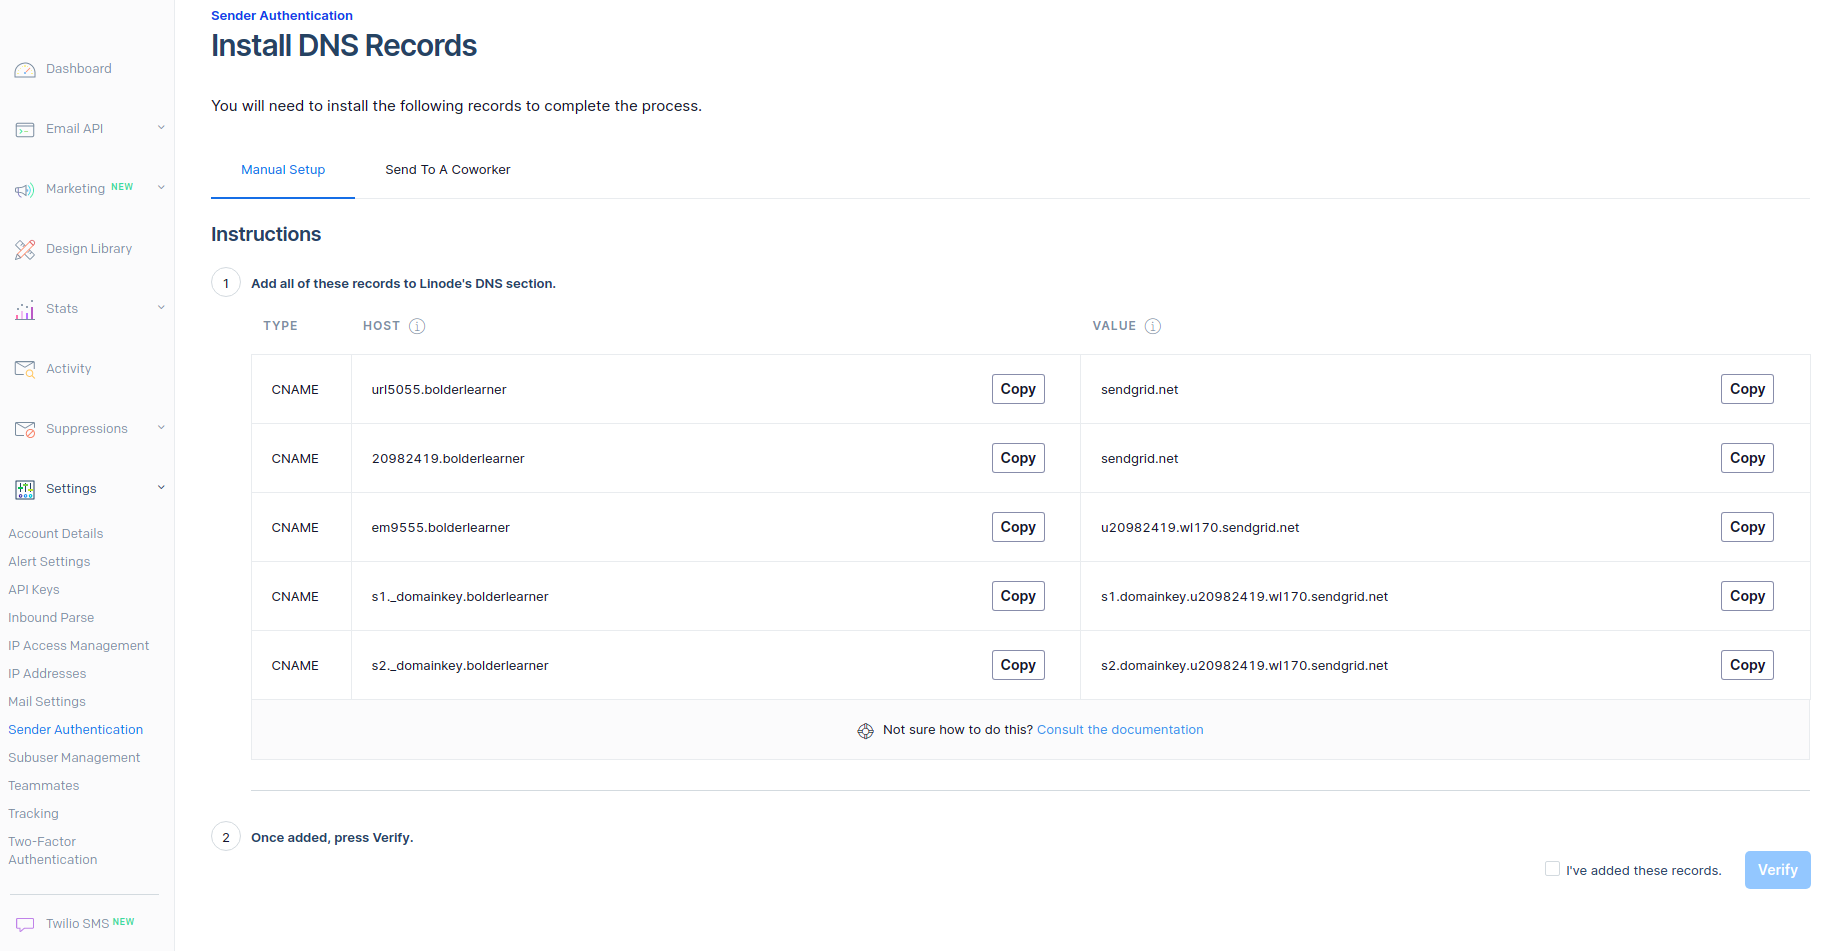
On my Linode Dashboard manager domain link, I will scroll down to the CNAME section, click on the "Add a CNAME Record" button, and add the above records.

Below is an example of the CNAME values under the HOST column as they are displayed and how you will need to enter them into your DNS management with one of your providers:
- HOST/NAME
em123.yourdomain.com. ENTER CNAME RECORD HOST/NAME AS:em123 - HOST/NAME
s1._domainkey.yourdomain.comENTER CNAME RECORD HOST/NAME AS:s1._domainkey - HOST/NAME
s2._domainkey.yourdomain.comENTER CNAME RECORD HOST/NAME AS:s2._domainkey
It can take up to 48 hours for the records to verify after you upload them into your DNS host, so you will likely have to come back later to verify by clicking the "Verify" button. If you click verify, and only half of your CNAME records verify, this usually means that you need to wait a bit longer. It's also possible that you entered one of your records incorrectly.
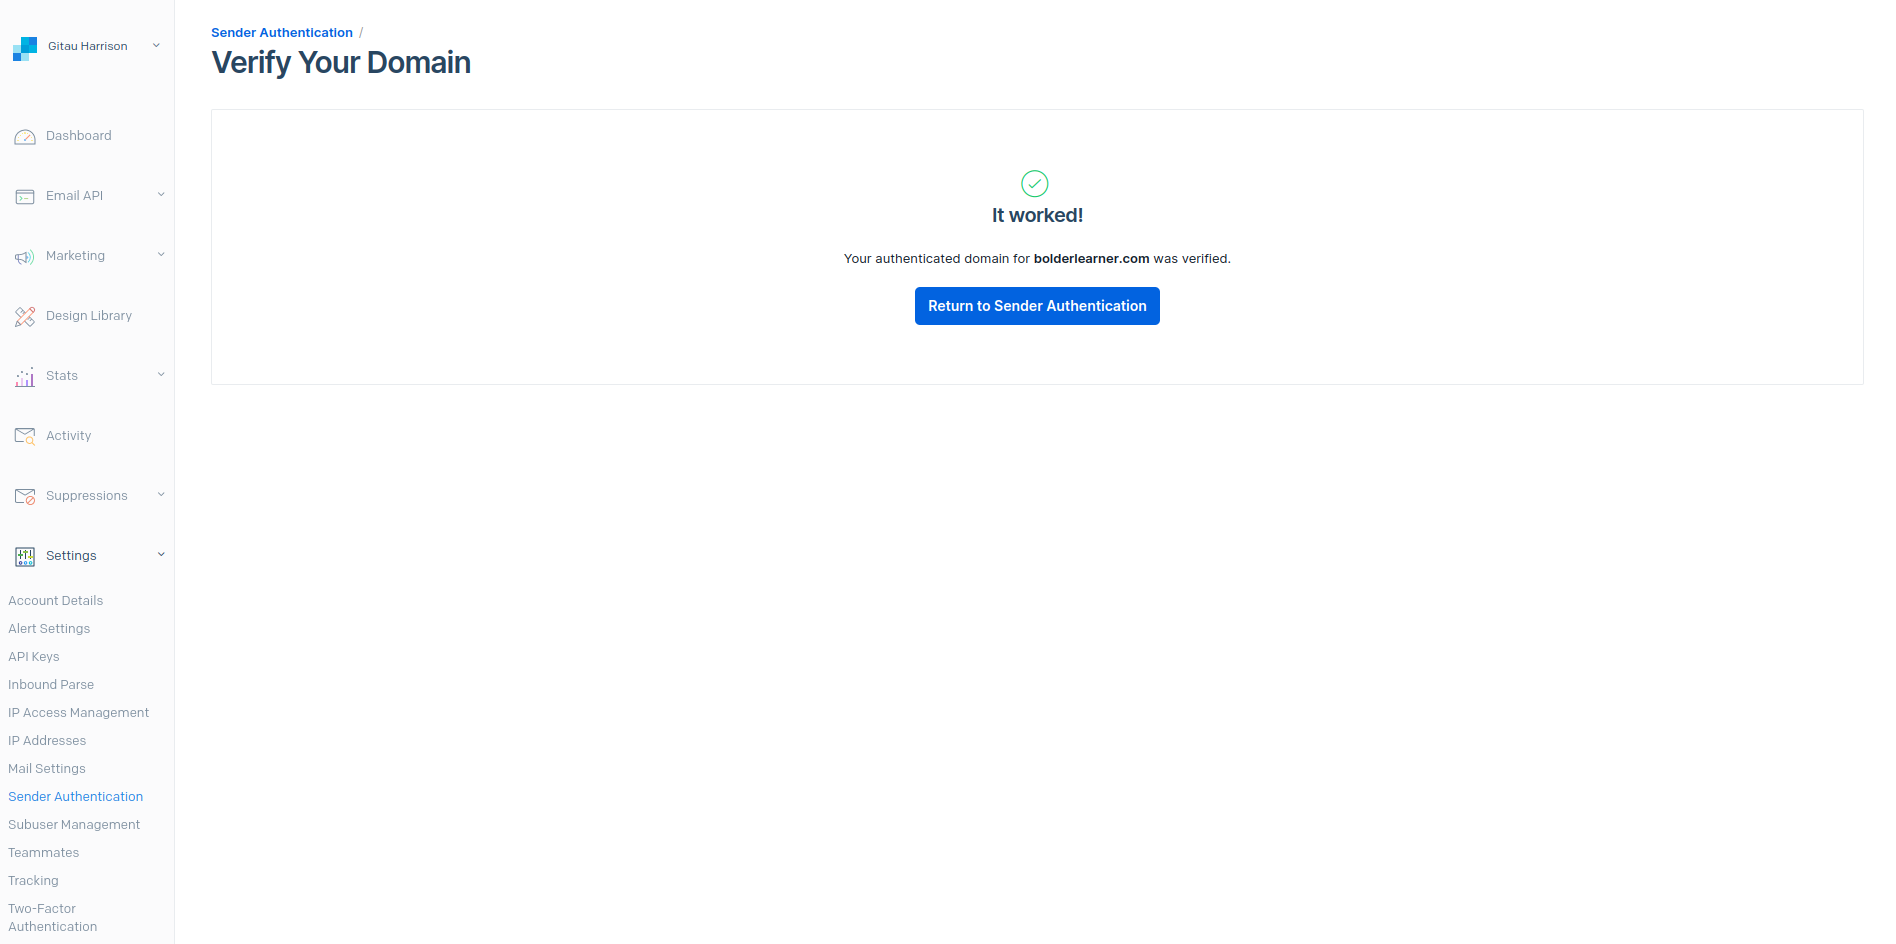
If all the records are properly done, and the verification is confirmed, you will get this output.
Any time that you send an email with a FROM address whose domain matches the domain set in the domain authentication, SendGrid applies that domain to your email. You only need to update your domain authentication if you want to update the domain you are emailing from. With the edits done in my evironment variables as seen on the earlier mentioned tutorial, everything should work just fine. You can check the Twilio SendGrid documentation to learn more.
Share
If you enjoyed this article, you can share it with another person.
TweetNewsletter Subcription
Level up your skills.
We take your privacy seriously. Read our privacy policy. Unsubscribe | Resubscribe.