


Secure Your Domain Name With SSL
With my application up and running on my server, and with a domain name, I will now secure my domain with SSL. For your reference, these are the topics in our discussion throughout this series:
- Welcome to Linode
- Deploy your flask app on Linode
- Buy a domain name for your deployed application
- Secure your domain with SSL (this article)
- How to monitor your server
The flask application demonstrated in the tutorials uses the file-based SQLite database. However, if you would like to know how to use PostgreSQL on a live Linux server, you can learn more by visiting Configure PostgreSQL in a Live Linux Server.
Table of Contents
This tutorial is divided into the following sections:
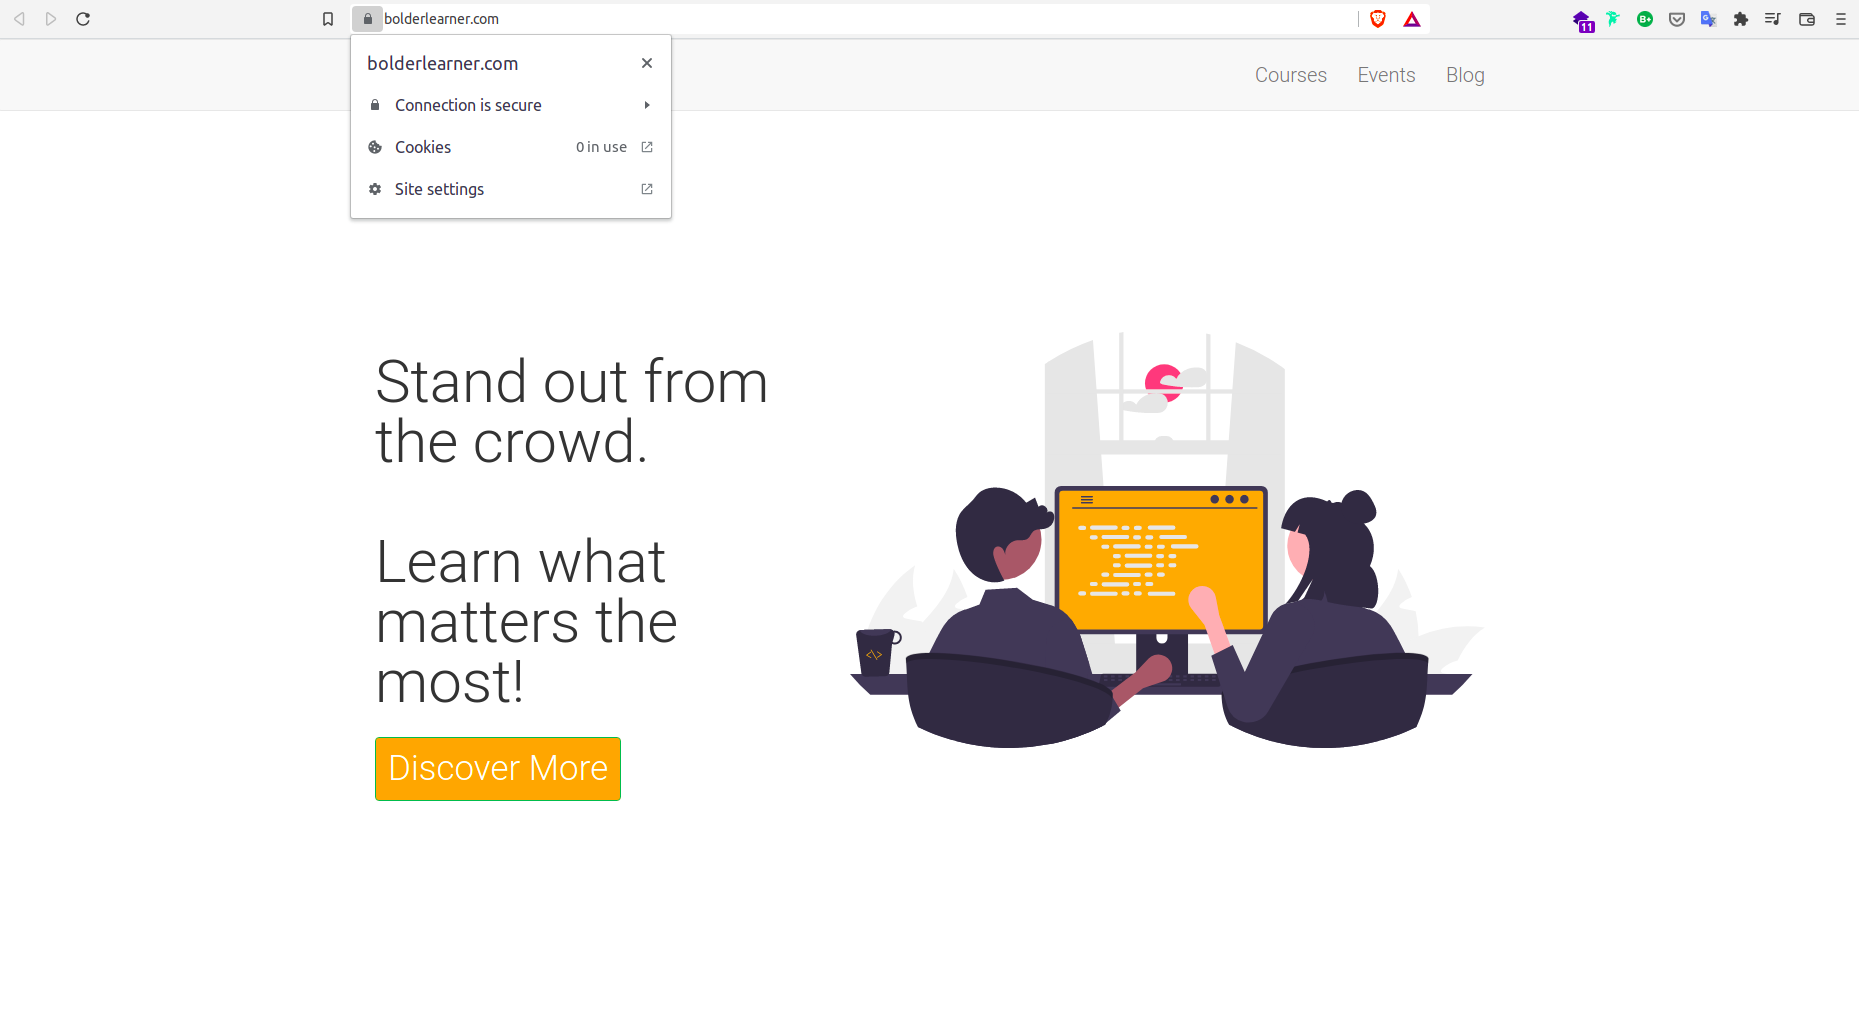
I have noted that next to my domain name on a browser, there is "Not Secure" badge. Clicking on this badge reveals a message that says "Your connection to this site is not secure."
![]()
The URL of my application currently is http://www.bolderlearner.com. What I would like to do is to make my site secure by enabling HTTPS with a free certificate using a service called Let's Encrypt. To understand the difference between HTTP and HTTPS, let us go over some basics.
SSL Overview
In full, SSL stands for Secure Sockets Layer. It is a standard technology used to keep an internet connection secure by safeguarding any sensitive data that is being sent between two systems, such as a server (Linode) and a client (Brave browser). It uses encryption algorithms to scramble data in transit. An updated version of the SSL is called the TLS (Transport Layer Security).
HTTPS (Hypertext Transfer Protocol Secure) is a protocol that uses SSL to encrypt the data sent between the client and the server. It is a standard protocol that is used to securely transfer data between a client and a server. The principal motivations for using HTTPS are to protect the privacy of the data and to prevent eavesdropping. It protects against man-in-the-middle-attacks.
The authentication aspect of HTTPS typically requires a trusted third party to sign server-side digital certificates. We still refer to HTTPS using SSL rather than TLS because the term is more commonly used. The details of the certificate, including the issuing authority and the corporate name of the website owner, can be viewed by clicking on the lock symbol on the browser bar. Learn the full HTTP life cycle here.
Working With Let's Encrypt
Let's Encrypt is a non-profit organization that is authorized to issue digital certificates. To get started, paste the following URL into your browser to access their page: https://letsencrypt.org/.
Click the "Get Started" button to learn how you can get a free SSL certificate. Typically, you will need to SSH into your server to run the commands needed to get a certificate. Since I have shell access, I will use the Certbot ACME command line tool to get a free SSL certificate.
Once on https://certbot.eff.org/, I will identify that my HTTP website is running Nginx on Ubuntu 20. Filling this will provide me with several commands that I need to run to get a free SSL certificate. To use certbot, I will need these things:
- Comfort with the command line interface
- A HTTP website what is already online with an open port (80)
- Application hosted on a server that can be accessed via SSH with the ability to run sudo commands
Certbot Commands
These are the commands I need to get a free SSL certificate:
sudo snap install core; sudo snap refresh coresudo apt-get remove certbotsudo snap install --classic certbotsudo ln -s /snap/bin/certbot /usr/bin/certbotsudo certbot --nginxsudo certbot renew --dry-run
To understand what each command does, I have provided brief descriptions below.
To run the Certbot commands, I will need to SSH into my server:
$ ssh gitauharrison@212.71.247.241
Ubuntu 20.04 comes with
snapdpre-installed, so I do not have to worry about this. If your machine does not have it, make sure you install it. You can check Conanical documentation to find out how you can work withsnapd.Once I am in the server, I will need to update my version of
snapdto the latest version:gitauharrison@bolderlearner:~$ sudo snap install core; sudo snap refresh core
Next, I need to remove any OS package manager like
aptbefore installingcertbot. This is to ensure that when I run the commandcertbot, the snap is used and not the OS package manager.gitauharrison@bolderlearner:~$ sudo apt-get remove certbot
Now, I can install Certbot in my server:
gitauharrison@bolderlearner:~$ sudo snap install --classic certbot
- To ensure that Certbot can be run, I need to prepare my server to run the command
certbot: -
Now my server is ready to run the command
certbot:gitauharrison@bolderlearner:~$ sudo certbot --nginx
You will be prompted to respond to a few questions in the terminal. Please do so.
This is how auto-renewal looks like.
gitauharrison@bolderlearner:~$ sudo certbot renew --dry-run # Output Saving debug log to /var/log/letsencrypt/letsencrypt.log - - - - - - - - - - - - - - - - - - - - - - - - - - - - - - - - - - - - - - - - Processing /etc/letsencrypt/renewal/www.bolderlearner.com.conf - - - - - - - - - - - - - - - - - - - - - - - - - - - - - - - - - - - - - - - - Account registered. Simulating renewal of an existing certificate for www.bolderlearner.com - - - - - - - - - - - - - - - - - - - - - - - - - - - - - - - - - - - - - - - - Congratulations, all simulated renewals succeeded: /etc/letsencrypt/live/www.bolderlearner.com/fullchain.pem (success) - - - - - - - - - - - - - - - - - - - - - - - - - - - - - - - - - - - - - - - -
gitauharrison@bolderlearner:~$ sudo ln -s /snap/bin/certbot /usr/bin/certbot
Editing Nginx Configuration File
Now, I am ready to run the command certbot. But before I do that, I need to make some changes to my Nginx configuration. I will open the Nginx configuration file in the nano editor:
gitauharrison@bolderlearner:~$ sudo nano /etc/nginx/sites-enabled/somasoma_elearning
Currently, I have the server name set to 212.71.247.241. What I am interested in doing is to change this to my domain name.
/etc/nginx/sites-enabled/somasoma_elearning: Update server_name to domain name
{
    server_name www.bolderlearner.com;
}
To save this change, I will press ctrl + X, type "y" for "yes", and hit enter.
I will open this file in nano to see these changes:
gitauharrison@bolderlearner:~$sudo nano /etc/nginx/sites-enabled/somasoma_elearning
True to their word, my Nginx configuratin file has been automatically updated.
/etc/nginx/sites-enabled/somasoma_elearning: Changes made by certbot
server {
    server_name www.bolderlearner.com;
    location /static {
            alias /home/gitauharrison/somasoma_elearning_app/app/static;
    }
    location / {
            proxy_pass http://localhost:8000;
            include /etc/nginx/proxy_params;
            proxy_redirect off;
    }


listen 443 ssl; # managed by Certbot
ssl_certificate /etc/letsencrypt/live/www.bolderlearner.com/fullchain.pem; # managed by Certbot
ssl_certificate_key /etc/letsencrypt/live/www.bolderlearner.com/privkey.pem; # managed by Certbot
include /etc/letsencrypt/options-ssl-nginx.conf; # managed by Certbot
ssl_dhparam /etc/letsencrypt/ssl-dhparams.pem; # managed by Certbot

}
server {
if ($host = www.bolderlearner.com) {
    return 301 https://$host$request_uri;
} # managed by Certbot


    listen 80;
    server_name www.bolderlearner.com;
return 404; # managed by Certbot


}
I said that I wanted the HTTP traffic to be redirected to HTTPS. The second server block captures this directive. If the host is www.bolderlearner.com, then all redirects (denoted by 301) will be through HTTPS.
Testing NGinx Configuration
To test my Nginx configuration, I will run the command nginx -t in the terminal. Ensure you have exited the file opened above by pressing Ctrl + X.
gitauharrison@bolderlearner:~$ nginx -t


# Output

nginx: [alert] could not open error log file: open() "/var/log/nginx/error.log" failed (13: Permission denied)
2022/02/10 05:36:26 [warn] 105538#105538: the "user" directive makes sense only if the master process runs with super-user privileges, ignored in /etc/nginx/nginx.conf:1
2022/02/10 05:36:26 [emerg] 105538#105538: cannot load certificate "/etc/letsencrypt/live/www.bolderlearner.com/fullchain.pem": BIO_new_file() failed (SSL: error:0200100D:system library:fopen:Permission denied:fopen('/etc/letsencrypt/live/www.bolderlearner.com/fullchain.pem','r') error:2006D002:BIO routines:BIO_new_file:system lib)
nginx: configuration file /etc/nginx/nginx.conf test failed
It seems like I have an error, but the "error" in question is actually a permission issue. To fix this, I need to prefix the command above with sudo.
gitauharrison@bolderlearner:~$ sudo nginx -t


# Output

nginx: the configuration file /etc/nginx/nginx.conf syntax is ok
nginx: configuration file /etc/nginx/nginx.conf test is successful
Originally, when setting up my firewall, I allowed HTTP traffic. I need to update this to allow HTTPS traffic. On the terminal, I will run:
gitauharrison@bolderlearner:~$ sudo ufw allow https
I can optionally disallow HTTP traffic, but I will not do that because my configuration is already set to redirect all HTTP traffic to HTTPS. Before I can test my website to see if all these changes have taken effect, I will restart my Nginx server:
gitauharrison@bolderlearner:~$ sudo systemctl restart nginx
If I go back to my browser, and reload my site, I should be able to see that HTTPS has taken effect.
Certificate Auto-renewal
This certificate typically lasts for around 90 days and after that I need to renew it. This can be really cumbersome, and I might even forget about it. I would want that just before the expiration date, the application is able to auto-renew this certificate for me.
This is a simulated renewal. To automate this renewal process, I will run a cronjob. I will open my crontab file using nano:
gitauharrison@bolderlearner:~$ sudo crontab -e


# Output

no crontab for root - using an empty one

Select an editor.  To change later, run 'select-editor'.
  1. /bin/nano        <---- easiest
  2. /usr/bin/vim.basic
  3. /usr/bin/vim.tiny
  4. /bin/ed

Choose 1-4 [1]: 1 # I have selected nano
Scroll to the bottom of the file and add the following line:
/tmp/crontab.SYULN5/crontab: Auto-renewal
30 4 1 * * sudo certbot renew --quiet
To save, I will press ctrl + X, type y and hit enter. This basically autorenews the certificate at 4.30 am on the 1st of every month. The --quiet option tells the program not print out any messages or feedback. If you would like to learn more about cronjobs, you can check out the cronjobs tutorial.
Share
If you enjoyed this article, you can share it with another person.
TweetNewsletter Subcription
Level up your skills.
We take your privacy seriously. Read our privacy policy. Unsubscribe | Resubscribe.