


Deploy Your Flask App on Linode Server
In this tutorial, I will walk you through the steps you can follow to deploy your flask application on Linode servers. For your reference, these are the topics I am going to discuss:
- Welcome to Linode
- Deploy your flask app on Linode (this article)
- Buy a domain name for your deployed application
- Secure your domain with SSL
- How to monitor your server
The flask application demonstrated in the tutorials uses the file-based SQLite database. However, if you would like to know how to use PostgreSQL on a live Linux server, you can learn more by visiting Configure PostgreSQL in a Live Linux Server.
Table of Contents
If you would like to skip to a particular section within this tutorial, you can click on any of these links below:
- Overview
- Create a linode account
- Create a linode
- Log into your virtual machine
- Set up your linux server
- Add flask application to the linux server
- Using nginx and gunicorn
Overview
The assumption is that you have already built an application. You probably already know that a locally running app is only accessible to you and no one else. There is a tool such as ngrok that you can use to create a tunnel and provision a temporary publicly accessible URL. However, we would like to make our application accessible to anyone who has internet through a browser such as Brave or Google Chrome.
For the purposes of this tutorial, I will be hosting an elearning application built using Python and the Flask micro-framework on a Linode server. You can access the project on this GitHub repository and use it to follow along. Alternatively, if you have built one for yourself, ensure that you have it on GitHub, or an alterntive version control system.
Create Linode Account
When you deploy to a Linux server, you are are going to be using a virtual machine hosted by your provider, in this case it is Linode. To begin, ensure that you have created an account on Linode. If you haven't already, click here to sign up. Occassionally, Linode will offer you free hosting credits as soon as you sign up. So, be sure to check that out and take advantage of it.
Create a Linode
Deploying to a Linux server takes a lot of effort to set up, but this method offers you a lot of flexibility on the kind of control you will have over your application and web server. Free tier hosting options normally offer only basic functionalities, but should you desire to have more control, say you want to use a custom domain name like my-app.com rather than something such as my-app.herokuapp.com, you will be required to upgrade to a paid version. Even so, you may not have all the control you might want.
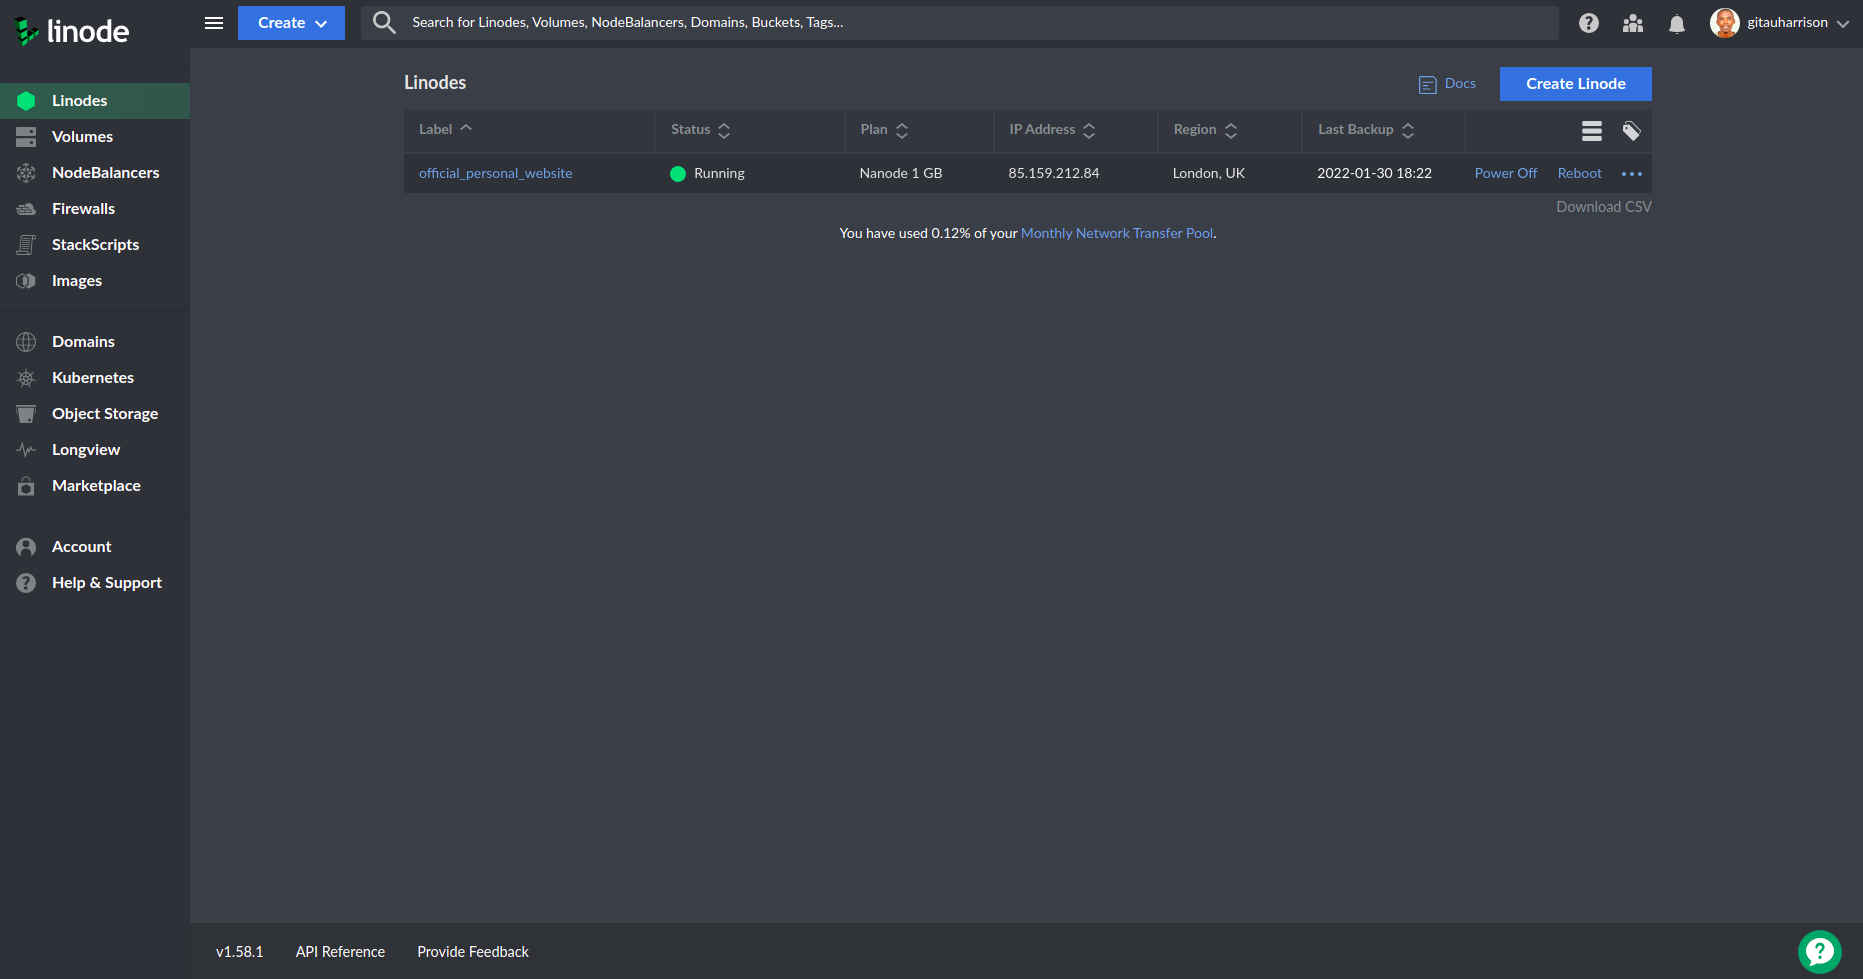
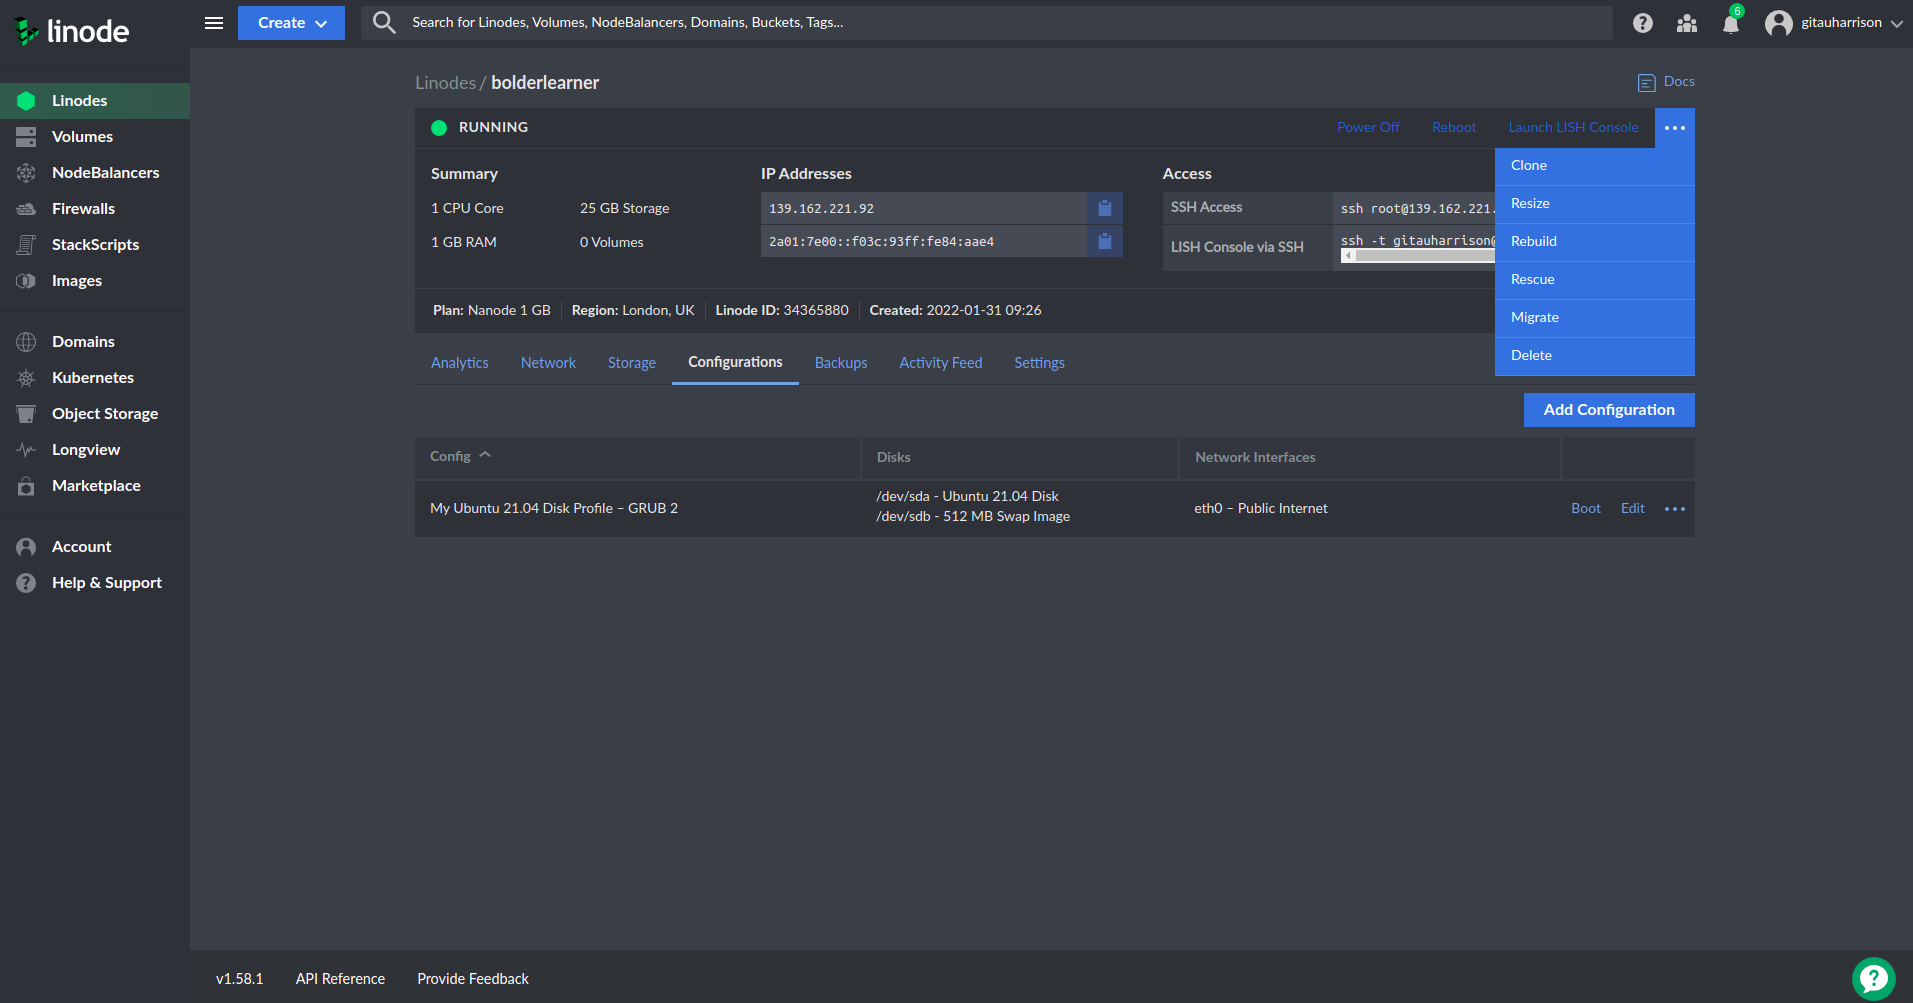
I already have an account with Linode, but I will still show you how you can get started from scratch. Below, I have logged into my account and you can see that I already have one server called official_personal_website.
To create you own server, do the following:
- Click on the Create button on the top-left or the top-right of your dashboard.
- Select "Linode", which is the name of their Linux server
- Choose the "Ubuntu" image (your Operating System)
- Select your region (it is best to choose one that is closest to you)
- Decide on what plan you'd prefer. For the purposes of this tutorial, I will choose Nanode 1 GB, a low performance machine and the cheapest since I do not anticipate so much traffic and activity to go on in the application.
- Give a descriptive label for your linode, say bolderlearner since this is going to be an elearning application.
- Provide a stronger root password for your own server. You need to remember this as you will need it to log into the system.
- Optionally, you can choose to back up your server if it is for production
- Finally, click the "Create Linode" button on the far right to create your server
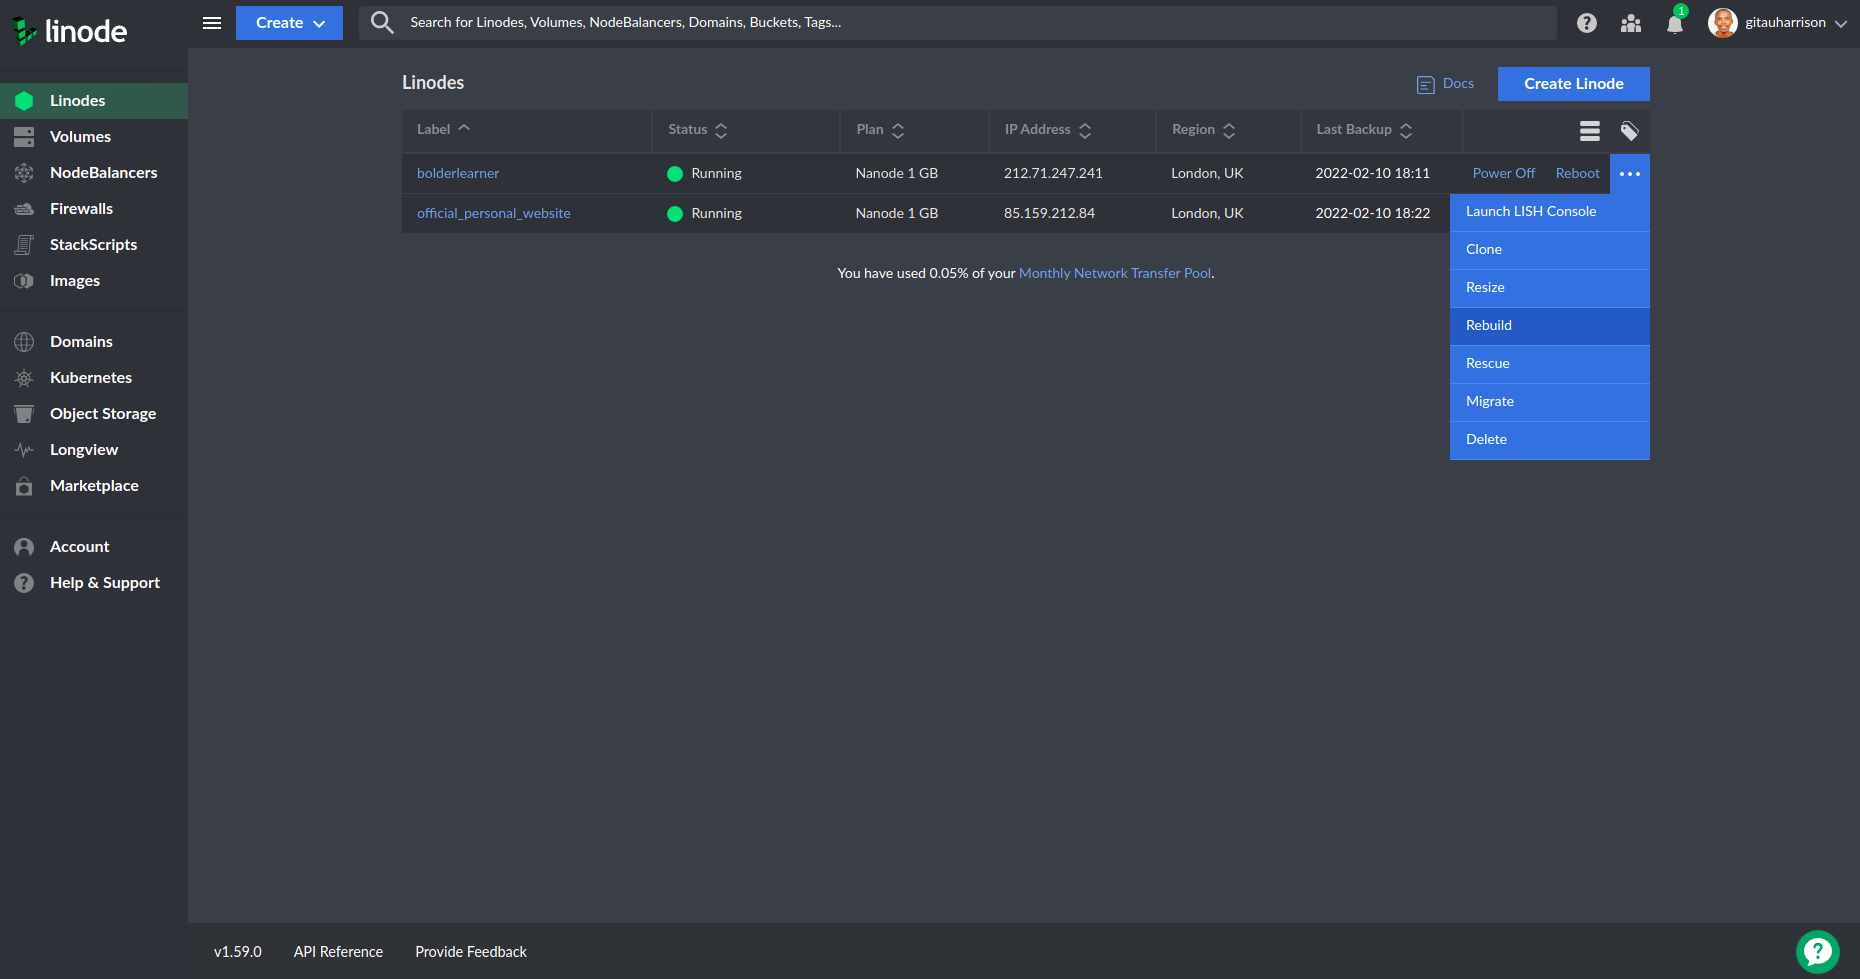
Once the new linode has finished provisioning, click on it. You will see how you can access your machine using the SSH command. In the case of bolderlearner linode, the SSH Access command is ssh root@139.162.221.92.
Log Into Your Virtual Machine
You will see me use different terminal windows moving forward. If you are a bit curious as to how I am able to do this, then I recommend that you look at byobu, a text-based window manager and terminal multiplexer. Alternatively, if you are using VS Code, you can simply do the following:
- Press ctrl + shift + ` to open a new terminal window
- Press ctrl + shift + 5 to split the terminal window
The reason for having the split terminal windows is to allow me to run commands on my local machine and commands on linode server separately. It is just so much easier working like this rather than having to go back and forth between my local machine and my linode server.

The window on the left will be my linode server while the one on the right will be my local machine's. I have copied and pasted my linode's root SSH command in the left terminal window to hightlight this.
Copy and paste your SSH Access code in one of the terminal windows to access your linode server. I will paste mine as follows:
$ ssh root@139.162.221.92

# Output

The authenticity of host '139.162.221.92 (139.162.221.92)' can't be established.
ECDSA key fingerprint is SHA256:bBMaK2zHPang8gz2GC/cI/F/Jlo/h6iumhBWYILtcKk.
Are you sure you want to continue connecting (yes/no/[fingerprint])?
Type "yes" to continue your connection. When prompted, key in your linode's root password which you had created in your dashboard. If successful, you will be connected to your linode's server. Your terminal will change from harry@harry:~$ to root@localhost:~#. You are now working with a barebones Ubuntu server.
Set Up Your Linux Server
As is normally the case with any local machine's server, we need to set up a few things in our new linode server:
Update and Upgrade Server
Upgrade the software the first time you log into any linux system
root@localhost:~# apt update && apt upgrade

# Patiently wait for the update and upgrade to complete since it may take several minutes to finish
Root User
Create a host name in this machine:
root@localhost:~# hostnamectl set-hostname bolderlearner
To test that the host name has actually been set, run:
root@localhost:~# hostname

# Output
bolderlearner
Set your hostname in a host file:
root@localhost:~# nano /etc/host
This will open the file
hostin thenanoeditor. If you are not familiar with this editor, consider searching it online to learn more. However, for this tutorial, there are only a few commands that we shall be using while working with thenanoeditor.You can use the arrow keys to move around. Begin by adding these lines in the
/etc/hostfile which is currently opened in yournanoeditor:127.0.0.1 localhost 139.162.221.92 bolderlearner
The first is the IP address of the localhost whereas the second is the IP address of my linode server as seen in the dashboard.
To save this file, hit
ctrl + x. It will ask if you want to save this file. Type in "y" and pressEnter. You will have saved this file upon exiting.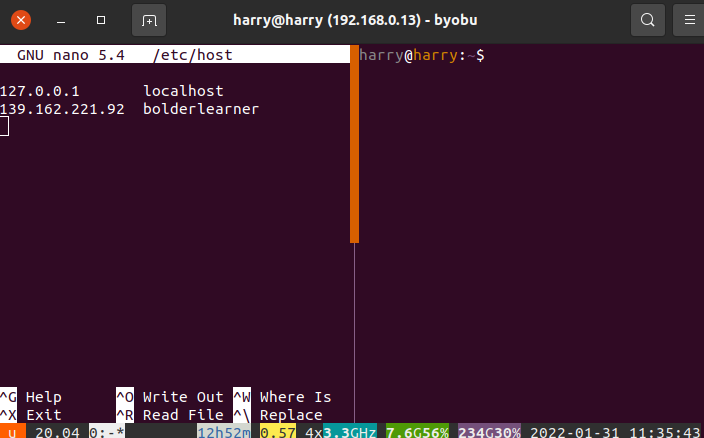
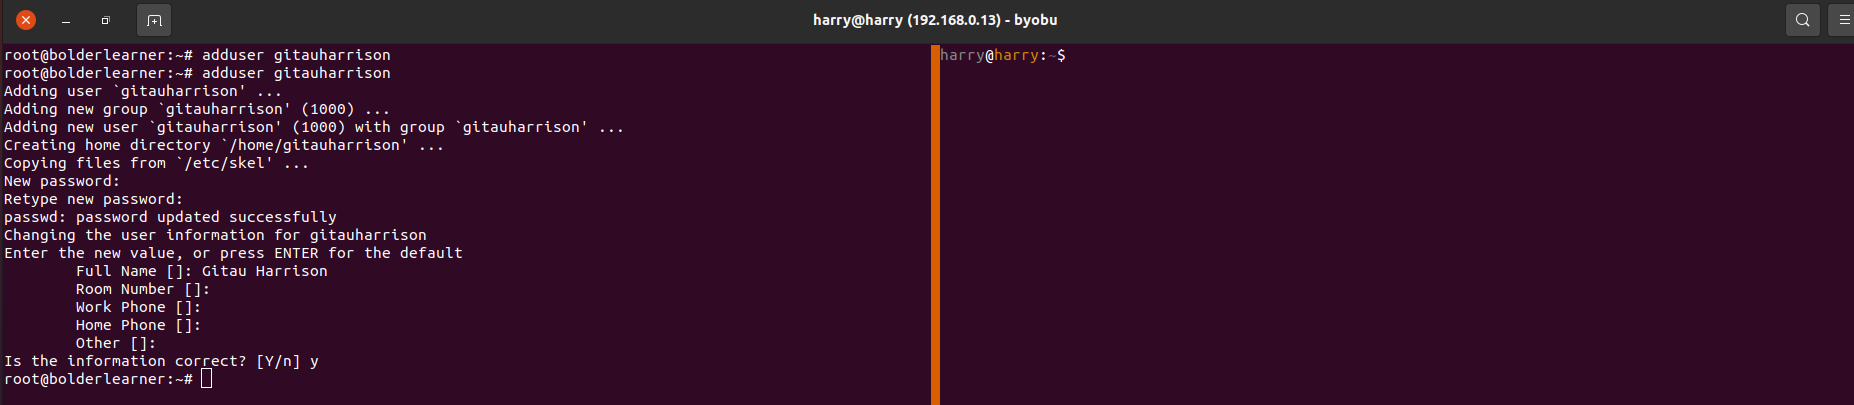
Create a limited user. At the moment, I am logged in as the
rootuser, who has unlimited priviledges and can execute any command. However, it is best practice to add a user who has limited priviledges. This user will still be able to run admin commands usingsudo, which is much safer than running everything asroot. Run this command to add a new user:root@localhost:~# adduser gitauharrison
You will be prompted to create a new password for this user. Please do so. Ensure that you can remember that password. You will be asked a few more questions such as "Full Name" etc. You can fill that up or leave them blank. This step is optional.
Add the user to a
sudogroup so that they can run admin commandsroot@localhost:~# adduser gitauharrison sudo # Output Adding user `gitauharrison' to group `sudo' ... Adding user gitauharrison to group sudo Done.
Logout of root user and log in as
gitauharrisonuser. It is just best practice to work as a limited user. Run:root@localhost:~# exit # Output logout Connection to 139.162.221.92 closed.
This will log you out as a
rootuser. Notice that I am taken back to my local machine.
Log back in as user
gitauharrison. To do this, simply press the up arrow key on your keyboard to access your linode's SSH Access command. Mine wasssh root@139.162.221.92. Instead of hittingEnterjust yet, I will replacerootin the SSH Access command withgitauharrison. Now, the new command that I need to run to start my bolderlearner linode server will be:$ ssh gitauharrison@139.162.221.92
- Hit
Enter. I will be required to key in mygitauharrisonpassword that I had set earlier. Doing so will log me in as the new user, that isgitauharrison@bolderlearner:~$.
SSH Authentication
Set up SSH Authentication. This will allow me to log into my server without having to supply my password every time. This is quite convinient.
Make a
.sshdirectory from the home directorygitauharrison@bolderlearner:~$ mkdir .ssh
- If you are not sure if you are in your home directory or not, simply run the command
pwdin the terminal.pwdstands forprint working directory. Another way to find out if you are in your home directory is to look at your terminal. If you can see a tilde character (~), then you are in your home directory.
- If you are not sure if you are in your home directory or not, simply run the command
Moving to my other terminal window running on my local machine, I will run the following command:
$ ssh-keygen -b 4096
I will be asked to create a password. You can add one if you want more security, but again, you can still leave it blank. This is okay. I will also be asked to overwrite an existing
id_rsafile. Type "y" for yes to continue.Notice that I have two files created, id_rsa and id_rsa.pub which is my public key. I will need to move my public key to my linode server. To do this, I will run the
scp(secure copy) command in my terminal:$ scp ~/.ssh/id_rsa.pub gitauharrison@139.162.221.92:~/.ssh/authorized_keys
- Here, I am securely copying the id_rsa.pub file to our new linode user. I am using the colon punctuation mark to specify what location I want the file to be copied to. I will save the contents of id_rsa.pub in a file called authorized_keys found in the hidden
.sshfolder. -
Kindly note that the step above only allows me to log in to my linode server without having to supply my password. In case I want to connect my project folder to a version control system such as GitHub, I will need to generate a new SSH key pair. This is done in my other terminal window where I have my linode server running:
gitauharrison@bolderlearner:~$ ssh-keygen -t rsa -b 4096 -C "my email"
-
This will generate a new SSH for my linode. When asked for a passphrase,
I can optionally choose to provide one.
ls ~/.ssh/reveals the new SSH key pair.
-
This will generate a new SSH for my linode. When asked for a passphrase,
I can optionally choose to provide one.
-
Display the contents of the id_rsa.pub file on the terminal window:
gitauharrison@bolderlearner:~$ cat ~/.ssh/id_rsa.pub
-
I will need to copy the content of the id_rsa.pub file to the clipboard then paste it into the GitHub settings page. My project folder is now connected to GitHub and I can run terminal commands such as
git pull origin masterto update my project.There are two ways you can copy this content if you are wondering how:
-
Run
cat ~/.ssh/id_rsa.pubto display the content on your terminal. Then, using your mouse, simply hightlight the content by dragging around and press Ctrl + shift +C to copy the content to your clipboard. Be careful not to include empty spaces. -
Use the
xclipcommand to copy the content to your clipboard.xclip -sel c < ~/.ssh/id_rsa.pub
selstands for "selection" andcstands for "clipboard". This will copy the content of the id_rsa.pub file to the clipboard without any further input from you.
-
Connecting to GitHub
- Here, I am securely copying the id_rsa.pub file to our new linode user. I am using the colon punctuation mark to specify what location I want the file to be copied to. I will save the contents of id_rsa.pub in a file called authorized_keys found in the hidden
Moving back to the new linode user terminal window, let us test to see if the new id_rsa.pub key has been copied. Run the
lscommand to list all the files found in.sshfolder:gitauharrison@bolderlearner:~$ ls .ssh/ # Output authorized_keys
Update SSH permissions where the owner of the directory has (1) read, write and execute permissions on the directory and (2) read and write permissions on the files.
gitauharrison@bolderlearner:~$ sudo chmod 700 ~/.ssh/
You will be required to provide your user password. Here, I am updating the permissions on the
sshfolder.
gitauharrison@bolderlearner:~$ sudo chmod 600 ~/.ssh/*
Here, I am updating the permissions on all files found inside .ssh folder.
In Linux, the chmod command is used to change permissions of files and directories. The first digit in the command chmod 700, that is number 7, defines the permissions for the owner/user of that file or folder. It means that the user has read, write and execute rights. The second digit, 0, means no permissions, and it applies to the group of that directory. The last digit, 0, applies to everyone else. The second command chmod 600 applies the 6 hundred permissions to the owner, the group and everyone else on the files found in the .ssh folder.
Understanding CHMOD command
-
chmodis used to change the mode of a file system object. Files have read (r), write (w), and execute (x) permissions. The chmod command is run as follows:chmod [permissions] [file]. For example,
gitauharrison@bolderlearner:~$ chmod 700 ~/.ssh/
-
This will change the permissions of the
.sshfolder to 700. The first number stands for the user associated with the file. The second number stands for the group associated with the file. The third number stands for everyone else, who is not the user or part of the group.
| Octal Notation | Permission | Symbolic Representation |
|---|---|---|
| 0 | No permission | --- |
| 1 | Execute Permission Only | --x |
| 2 | Write Permission Only | -w- |
| 3 | Write and Execute Permission Only (1+2)=3 | -wx |
| 4 | Read Permission Only | r-- |
| 5 | Read and Execute Permission Only (4+1)=5 | r-x |
| 6 | Read and Write Permission Only (4+2)=6 | rw- |
| 7 | Read, Write and Execute Permission Only (4+3)=7 | rwx |
Now, if I exit the server by running exit in the terminal, and hit Enter again after pasting ssh gitauharrison@139.162.221.92, I should be able to SSH into the virtual machine without a password.
Disallow root logins over SSH.
As the new user, update the SSH Config file.
gitauharrison@bolderlearner:~$ sudo nano /etc/ssh/sshd_config
This will open the SSH configuration file in the
nanoeditor. There are two values that I need to change in this configuration file. Using the down arrow key on your keyboard, scroll down until you can see:PermitRootLogin. Currently, it is set to "yes". Change it to "no" by deleting the existing value and writing "no". We have a limited user who now hassudoaccess and, therefore, there is no need to log into my machine asroot.PasswordAuthentication. It is most likely commented out so make sure you uncomment it. If it is not commented out, then simply change its value from "yes" to "no". With SSH setup, there is really no need to log in using a password.
Press
ctrl + xto exit. On your way out, type "y" to save the file using its current name.
Now, what I need to do is to restart the SSH service. Run the command below:
gitauharrison@bolderlearner:~$ sudo systemctl restart sshd
If you would like to learn more about SSH Key-based authentication, click here to check out the SSH Authentication guide.
Firewall
- I need to set up a firewall to monitor and control incoming and outgoing network traffic based on predetermined security rules. For your information, a firewall creates a barrier between a trusted network and an untrusted network. An example of an untrusted network can be the internet.
Install
ufwalso known as "uncomplicated firewall":gitauharrison@bolderlearner:~$ sudo apt install ufw
-
Add rules while working with
ufw:# 1 gitauharrison@bolderlearner:~$ sudo ufw default allow outgoing # Output Default outgoing policy changed to 'allow' (be sure to update your rules accordingly) # 2 gitauharrison@bolderlearner:~$ sudo ufw default deny incoming # Output Default incoming policy changed to 'deny' (be sure to update your rules accordingly)
-
We want to configure these allow rules to allow for SSH, HTTP and any other port that we may want to access from the outside of our server. Begin by running the commands below. I have provided a brief explanation of what each command does.
gitauharrison@bolderlearner:~$ sudo ufw allow ssh


# Output
Rules updated
Rules updated (v6)
-
This will allow me to SSH into my server, without which my firewall will prevent its use.
gitauharrison@bolderlearner:~$ sudo ufw allow 5000


# Output

Rules updated
Rules updated (v6)
-
This will allow me to access port 5000 which will be used by my flask development server. Using this port will enable me to test my application before going live on a production server.
gitauharrison@bolderlearner:~$ sudo ufw enable


# Output

Command may disrupt existing ssh connections. Proceed with operation (y|n)? # type "y" for "yes"
Firewall is active and enabled on system startup
-
The command above basically enables all that I have set for my SSH and port 5000. When prompted, type "y" to activate and enable firewall on system startup.
-
To see the status of the things I have allowed, I can run the command below:
gitauharrison@bolderlearner:~$ sudo ufw status

# Output
Status: active

To                         Action      From
--                         ------      ----
22/tcp                     ALLOW       Anywhere
5000                       ALLOW       Anywhere
22/tcp (v6)                ALLOW       Anywhere (v6)
5000 (v6)                  ALLOW       Anywhere (v6)

# Port 22 is SSH; there is port 5000 as well
-
Add Flask Application to the Linux Server
There are two ways that I can get my flask application onto my linux server. The first method would simply be to clone my GitHub repository onto my server. The other method would be to copy the files of my local application onto my server.
I will use the second method to show you how you can transfer your application files to your server. Kindly note that the project on GitHub does not show the .env file which contains all the secret keys needed by our project. For this reason, make sure that you create that file in your root directory and add your keys following the .env-template file as a guide. However, since the project is on my local machine, I don't have to worry about "missing" files. I can proceed to copy my entire project folder onto my server.
Copy Project Folder to New Linode Server
I will run the command below on the terminal window of my local machine:
(venv)$ scp -r home/Desktop/somasoma-elearning gitauharrison@139.162.221.92:~/
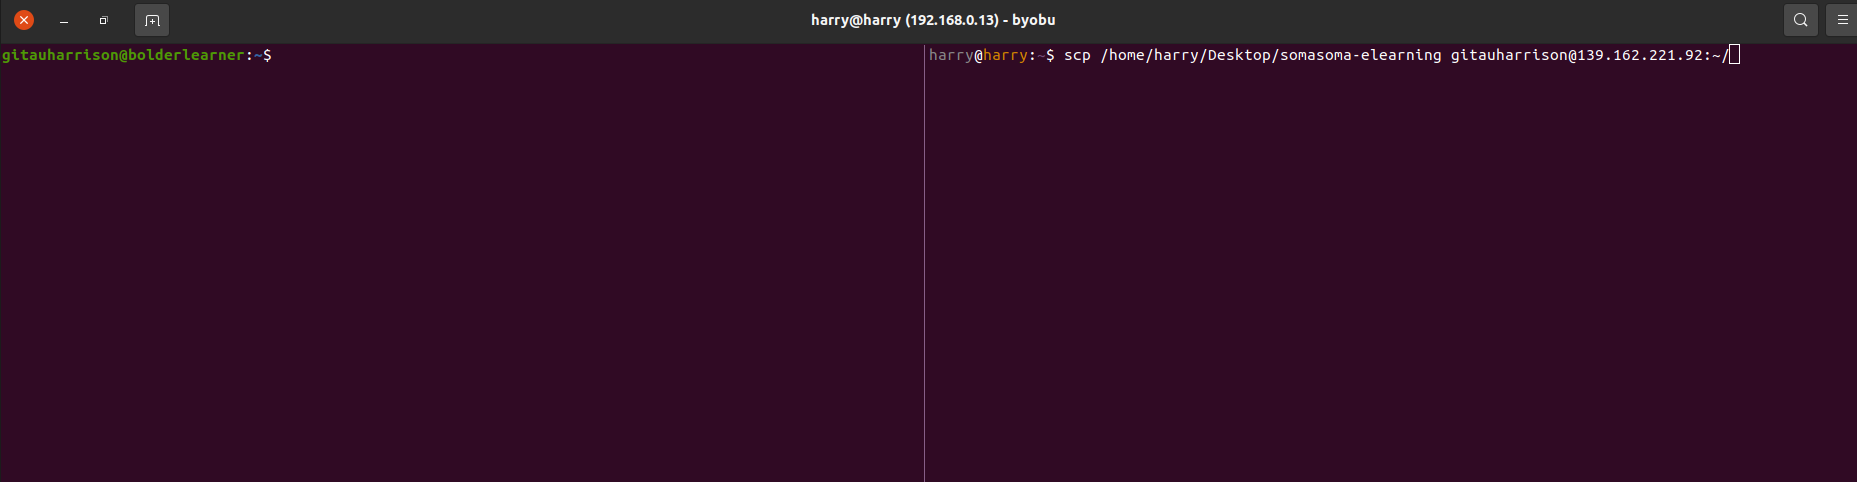
You have seen me use the command scp before. Basically, I am securly copying my entire somasoma-elearning folder from my local machine's Desktop folder to my user's home folder. The ~/ denote that the location I am interested in is the home folder of the user in the linux server. Note that since I am copying a non-empty folder, I have used the -r flag. This flag tells the command to copy the entire folder and its contents. Depending on the size of your project, it can take a few seconds to several minutes to finish the process.
I can now check that the project folder was copied entirely by navigating to my linux server and listing everything in the home folder. The linux server is on the other terminal window.
gitauharrison@bolderlearner$ ls

# Output

somasoma-elearning-app
# I can check this folder's contents by running the commands cd and ls
Create and Activate a Virtual Environment
Virtual environments help isolate the needs of our application from that of our server. This has the benefit of ensuring that our server remains clean. Also, should we want to add another project in this server, a virtual environment will help isolate the needs of one project from that of another. This will help us to avoid any conflicts that may arise due to dependancy-related issues.
I will install pip:
gitauharrison@bolderlearner$ sudo apt install python3-pip
The command python3-venv will help me install my virtual environment.
gitauharrison@bolderlearner$ sudo apt install python3-venv
With the two packages installed, now I can create a virtual environment. I will change directory to somasoma-elearning-app and run the command below:
gitauharrison@bolderlearner$ cd somasoma-elearning-app

gitauharrison@bolderlearner$ python3 -m venv venv
I have created a virtual environment called venv. The first venv is the folder that holds our virtual environemnt. To activate it, I will run this command:
gitauharrison@bolderlearner:~/somasoma-elearning-app$ source venv/bin/activate

# You will notice a prompt at the beginning of your terminal
Install Project Dependancies
My project has a requirements.txt file in the root directory. This file lists all the packages used to build the elearning app. The packages even define what version they are. To install them in venv, I run this command in the linux server:
(venv)gitauharrison@bolderlearner:~/somasoma-elearning-app$ pip3 install -r requirements.txt
You may encounter an issue installing psycopg2. This is because psycopg2 is not a standard package. It is built as a wrapper around libpq. It requires some PostgreSQL binaries and headers requried for building 3rd-party applications for PostgreSQL. To install psycopg2, I will run the command below:
(venv)gitauharrison@bolderlearner:~/somasoma-elearning-app$ sudo apt install python3-dev libpq-dev
Then you can re-install the packages in requirements.txt.
Set Environment Variables
All our evironment variables are located in the hidden file .env. Sometimes, it is a little tricky to work with environment variables in web servers. So, what I am going to do is to create a configuration file for my application. I will load this file in my application instead of environment variables.
To begin, I create a new file for my configurations:
(venv)somasoma-elearning-app$ sudo touch /etc/somasoma_elearning_config.json
Then, to update it with the contents of the .env file, I need to open it in nano:
(venv)somasoma-elearning-app$ sudo nano /etc/somasoma_elearning_config.json
I can now populate it with environment variables in JSON format:
/etc/somasoma_elearning_config.json: Environment Variables
{
    "SECRET_KEY": "put-here-your-secret-key",
    "SQLALCHEMY_DATABASE_URI": "sqlite:///path-to-database-file-as-seen-in-linux-server",
    "MAIL_USERNAME": "put-your-email-here",
    "MAIL_PASSWORD": "put-your-email-password-here"
}
If you are not so sure how you can get the path to your database file, you can refer to my method below:
(venv)somasoma-elearning-app$ pwd

# Output
/home/gitauharrison/somasoma-elearning-app

# My app.db file is found in the folder above
# I can add the path to the database file to the folder above
# sqlite:////home/gitauharrison/somasoma-elearning-app/app.db
I will save this file and close it by hitting Ctrl + X and typing Y to confirm the changes. The next thing is to edit the config.py file in our project. Open it in nano once again:
(venv)somasoma-elearning-app$ sudo nano config.py
Update the file with these information:
config.py: Environment Variables
# ...
import json


with open('/etc/somasoma_elearning_config.json') as config_file:
    config = json.load(config_file)


class Config(object):
    SECRET_KEY = config.get('SECRET_KEY')
    SQLALCHEMY_DATABASE_URI = config.get('SQLALCHEMY_DATABASE_URI')
    MAIL_USERNAME = config.get('MAIL_USERNAME')
    MAIL_PASSWORD = config.get('MAIL_PASSWORD')
    # ...
Everthing else remains the same. Using json.loads() makes the config variable a Python dictionary. Everywhere we are using os.environ.get() to get the environment variable can now be replaced with config.get(). Save the file and close it.
Test the Application
To start a flask server, typically, we would run flask run command. However, this method only works for development. We can expose this application to the outside world by using flask run --host=:
(venv)somasoma-elearning-app$ flask run --host=0.0.0.0


# Output

 * Serving Flask app 'elearning.py' (lazy loading)
 * Environment: development
 * Debug mode: on
 * Running on all addresses.
 WARNING: This is a development server. Do not use it in a production deployment.
 * Running on http://139.162.221.92:5000/ (Press CTRL+C to quit)
 * Restarting with stat
 * Debugger is active!
 * Debugger PIN: 387-730-869
You can see that the application is running on http://139.162.221.92:5000/. I will paste this link in my browser to test the application.
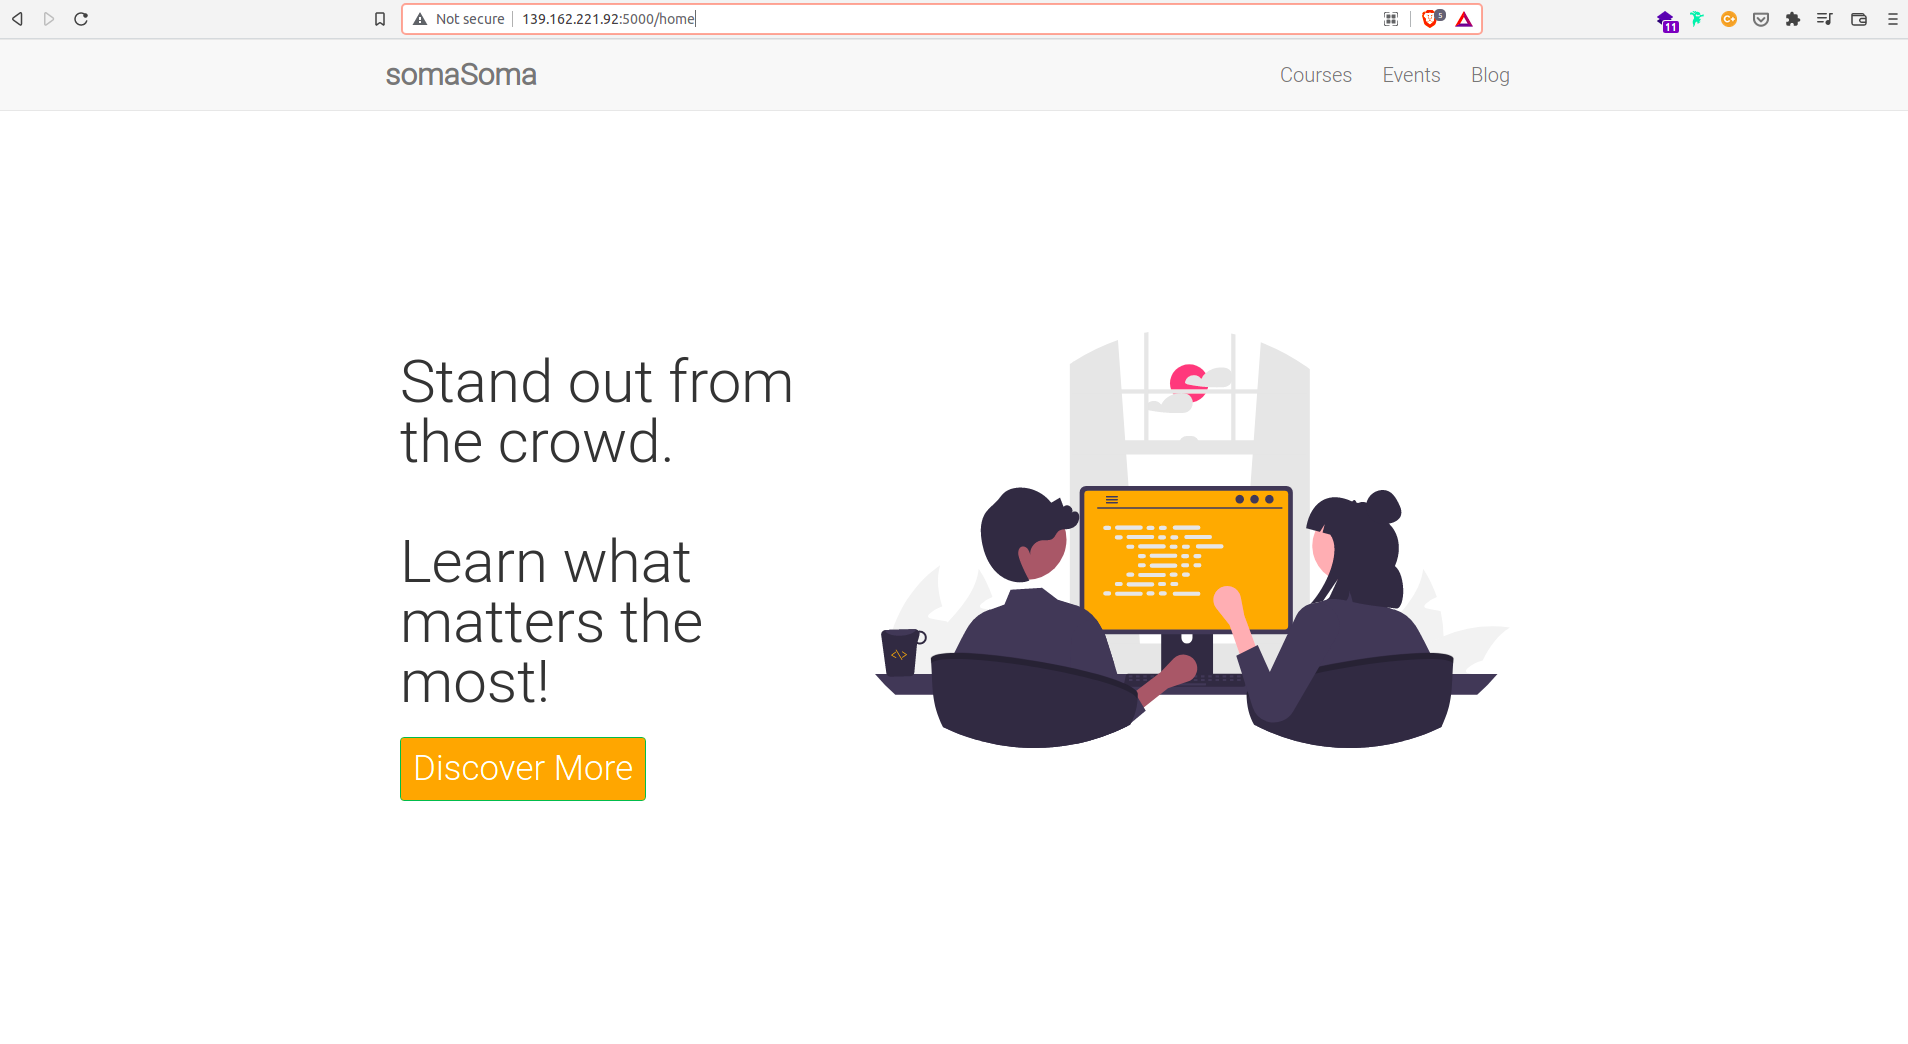
The application is running on my server at port 5000. If I try to access the application without the port number, I mean http://139.162.221.92, I won't get anything. This is because port 80 is not open yet on my firewall. Thankfully, several parts of the application are working.
So far, everything seems to be working. There is one big issue though. I am running a development server on a live production server. This is okay for testing, but it is not recommended. Development servers are inefficient, unstable, and insecure. What I would want to do is to switch to Nginx and Gunicorn because such applications can handle traffic and are good on performance.
I will kill this server by pressing Ctrl + C. The application will stop running.
Using Nginx and Gunicorn
Back to my user's home directory, I will install nginx and gunicorn:
(venv)gitauharrison@bolderlearner$ sudo apt install nginx
Next, I will install gunicorn within my user's virtual environment:
(venv)gitauharrison@bolderlearner$ pip3 install gunicorn
Typically, Nginx is a web server that we want to handle requests for static files (CSS, JS, images). The Python files will be handled by Gunicorn. I will begin my removing the default Nginx configuration file:
(venv)gitauharrison@bolderlearner$ sudo rm /etc/nginx/sites-enabled/default
Then I will create a new file for my Nginx configuration:
(venv)gitauharrison@bolderlearner$ sudo nano /etc/nginx/sites-enabled/somasoma_elearning
This will create a completely blank file using nano. I will add the following lines:
/etc/nginx/sites-enabled/somasoma_elearning: Nginx Configuration
server {
    listen 80;
    server_name 139.162.221.92;
    location /static {
        alias /home/gitauharrison/somasoma-eLearning-app/app/static;

    }
    location / {
        proxy_pass http://localhost:8000;
        include /etc/nginx/proxy_params;
        proxy_redirect off;
    }

}
I have began by adding the location of my static files. This will be handled by Nginx. The / is the root directory as seen in the second location. The proxy_pass will forward all the traffic to Gunicorn and it will handle all the Python code. I have added a few more variables to that proxy. If you would like to learn more about these variables you can check the Nginx documentation. Save the file and close it by hitting ctrl + X, type "y" for "yes" and then hit Enter.
I have set my server to listen to port 80, which is the default port for HTTP, but if you remember from a section above, I have not opened this port yet. The next step is to open the port.
(venv)gitauharrison@bolderlearner$ sudo ufw allow http/tcp


# Output
Rule added
Rule added (v6)
At this point, I am done with the testing port 5000. So, I will disallow this port from being used by Nginx.
(venv)gitauharrison@bolderlearner$ sudo ufw delete allow 5000


# Output
Rule deleted
Rule deleted (v6)
To make sure that the new rules are enabled, I will run the command below:
(venv)gitauharrison@bolderlearner$ sudo ufw enable


# Output
Command may disrupt existing ssh connections. Proceed with operation (y|n)?
# Hit 'y' for 'yes'

Firewall is active and enabled on system startup
Start Nginx
Finally, I will restart my Nginx server:
(venv)gitauharrison@bolderlearner$ sudo systemctl restart nginx
Should nginx refuse to start for any reason, you can check the logs by typing:
# 1
(venv)gitauharrison@bolderlearner$ sudo systemctl status nginx.service


# Output
 nginx.service - A high performance web server and a reverse proxy server
     Loaded: loaded (/lib/systemd/system/nginx.service; enabled; vendor preset: enabled)
     Active: failed (Result: exit-code) since Tue 2022-02-08 11:47:45 UTC; 3min 31s ago
       Docs: man:nginx(8)
    Process: 53244 ExecStartPre=/usr/sbin/nginx -t -q -g daemon on; master_process on; (code=exited, status=1/FAILURE)

Feb 08 11:47:45 bolderlearner systemd[1]: Starting A high performance web server and a reverse proxy server...
Feb 08 11:47:45 bolderlearner nginx[53244]: nginx: [emerg] directive "server_name" is not terminated by ";" in /etc/nginx/sites-enabled/somasoma_elearning:5
Feb 08 11:47:45 bolderlearner nginx[53244]: nginx: configuration file /etc/nginx/nginx.conf test failed
Feb 08 11:47:45 bolderlearner systemd[1]: nginx.service: Control process exited, code=exited, status=1/FAILURE
Feb 08 11:47:45 bolderlearner systemd[1]: nginx.service: Failed with result 'exit-code'.
Feb 08 11:47:45 bolderlearner systemd[1]: Failed to start A high performance web server and a reverse proxy server.


OR

# 2
(venv)gitauharrison@bolderlearner$ sudo journalctl -u nginx
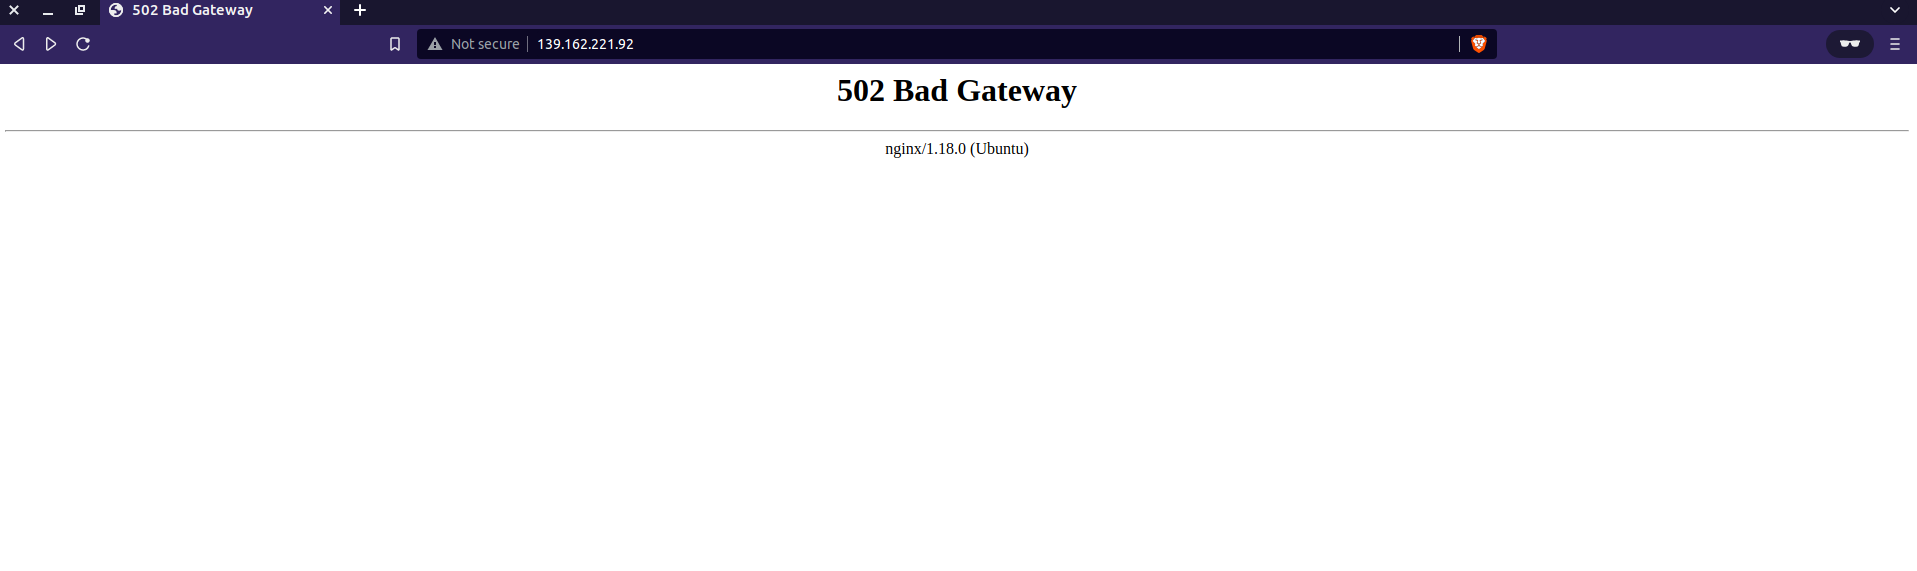
Nginx status will tell you exactly where the error is coming from. If I navigate to http://139.162.221.92/ on my browser, I will get an Nginx 502 Bad Gateway error.
The server is currently listening to port 80, and therefore it has gotten into contact with Nginx, but it does not know how to forward Python code. This is because Gunicorn is not running. I will need to run Gunicorn so that Nginx can forward the requests for Python files to it.
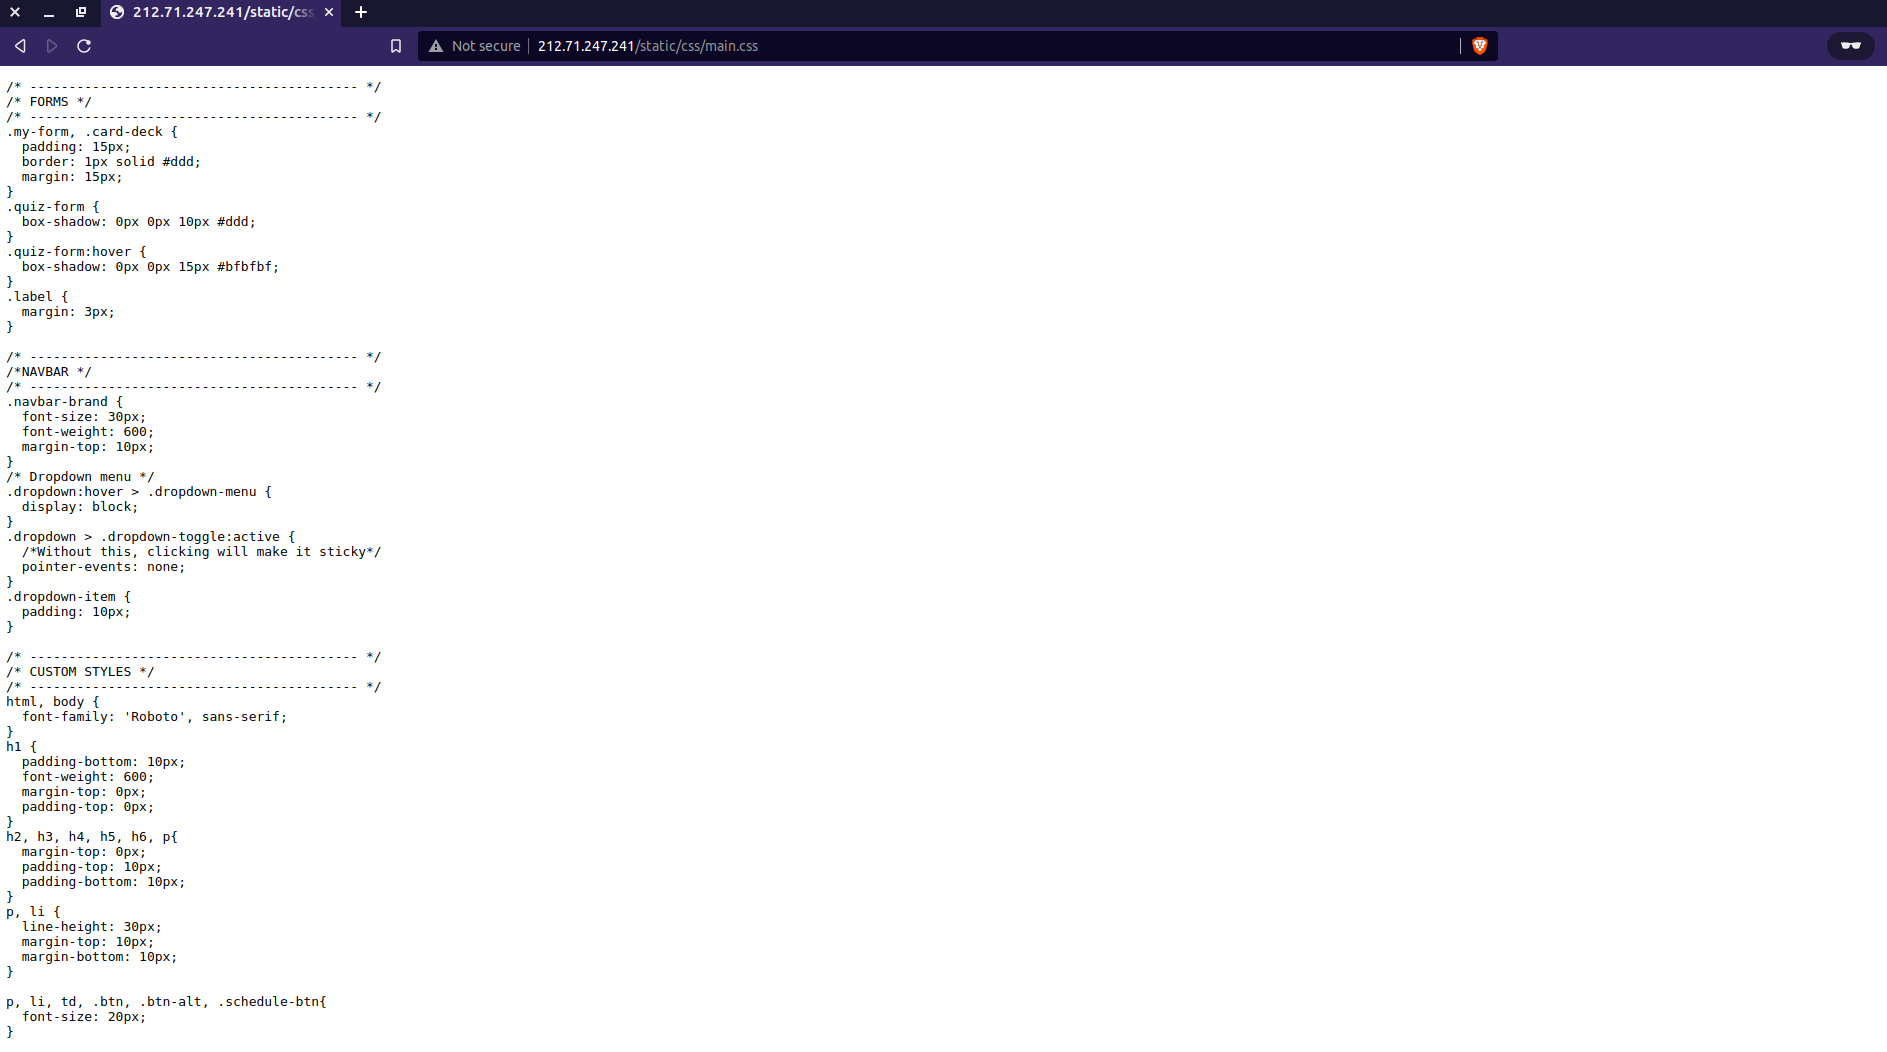
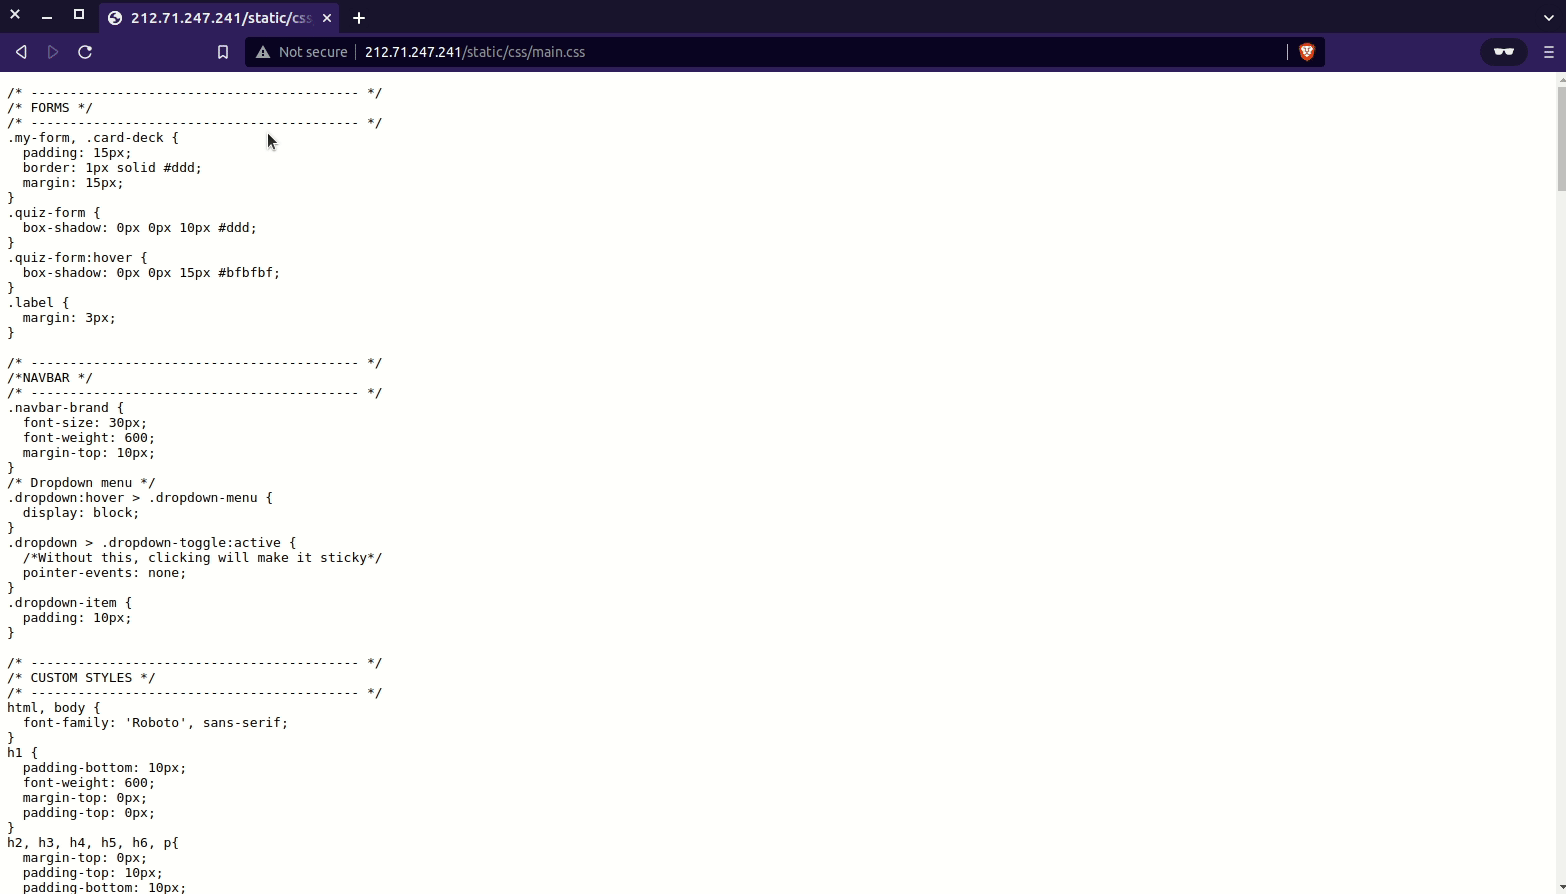
However, before running Gunicorn, I should be able to access my CSS files. So, navigating to http://139.162.221.92/static/css/main.css will allow me to see the CSS file. This means that Nginx is working.
Start Gunicorn
Back to serving my python code, I will run the following command:
(venv)gitauharrison@bolderlearner:~/somasoma-eLearning-app$ gunicorn -w 3 elearning:app


# Output

[2022-02-06 04:55:03 +0000] [88381] [INFO] Starting gunicorn 20.1.0
[2022-02-06 04:55:03 +0000] [88381] [INFO] Listening at: http://127.0.0.1:8000 (88381)
[2022-02-06 04:55:03 +0000] [88381] [INFO] Using worker: sync
[2022-02-06 04:55:03 +0000] [88382] [INFO] Booting worker with pid: 88382
[2022-02-06 04:55:03 +0000] [88383] [INFO] Booting worker with pid: 88383
[2022-02-06 04:55:03 +0000] [88384] [INFO] Booting worker with pid: 88384
First ensure that you are in the project folder, in my case, I have navigated into the somasoma-eLearning-app. The reason for this is to ensure that you have access to the application's entry point file, that is elearning. Alternatively, you can supply th path to the entry point file if you are in the home directory.
Breaking down the command above:
gunicornis the command to run Gunicorn.-w 3: This will tell Gunicorn to run 3 worker processes.elearning:app: This is the entry point file (the module containing my application's variable name).
How do you know how many workers you need to run?
(venv)gitauharrison@bolderlearner:~/somasoma-eLearning-app$ (2 * num_of_cores_in_your_machine) + 1
To see the number of cores in my machine in Linux, I will run the following command:
(venv)gitauharrison@bolderlearner:~/somasoma-eLearning-app$ nproc --all


# Output
1
Doing the calculation as seen above will give me the number of workers I need to run. Now, If I navigate to http://139.162.221.92/ on my browser, I will get a 200 OK response for all my files.
Handling Gunicorn Error
As interesting as it is to see Nginx and Gunicorn running, our server is still not ready for production yet. All the processes are running in the foreground. If I close my server before killing the Gunicorn process (by typing exit or ctrl + Z), my application will still be running in the background and I can access it on http://139.162.221.92/. Any further attempts to restart Gunicorn will fail with a Connection in use: ... error.
(venv)gitauharrison@bolderlearner:~/somasoma-eLearning-app$ gunicorn -w 3 elearning:app

# Output

[2022-02-06 05:46:04 +0000] [89201] [INFO] Starting gunicorn 20.1.0
[2022-02-06 05:46:04 +0000] [89201] [ERROR] Connection in use: ('127.0.0.1', 8000)
[2022-02-06 05:46:04 +0000] [89201] [ERROR] Retrying in 1 second.
[2022-02-06 05:46:05 +0000] [89201] [ERROR] Connection in use: ('127.0.0.1', 8000)
[2022-02-06 05:46:05 +0000] [89201] [ERROR] Retrying in 1 second.
[2022-02-06 05:46:06 +0000] [89201] [ERROR] Connection in use: ('127.0.0.1', 8000)
[2022-02-06 05:46:06 +0000] [89201] [ERROR] Retrying in 1 second.
[2022-02-06 05:46:07 +0000] [89201] [ERROR] Connection in use: ('127.0.0.1', 8000)
[2022-02-06 05:46:07 +0000] [89201] [ERROR] Retrying in 1 second.
[2022-02-06 05:46:08 +0000] [89201] [ERROR] Connection in use: ('127.0.0.1', 8000)
[2022-02-06 05:46:08 +0000] [89201] [ERROR] Retrying in 1 second.
[2022-02-06 05:46:09 +0000] [89201] [ERROR] Can't connect to ('127.0.0.1', 8000)
Technically, what should happen is that my request for the resource found at http://139.162.221.92/, for example, should serve me with a 502 Bad Gateway error from NGinx. No request should go through. To fix this, I will need to first kill the Gunicorn process that is currently running. This can be achieved by executing this command:
(venv)gitauharrison@bolderlearner:~/somasoma-eLearning-app$ sudo fuser -k 8000/tcp

# Output

8000/tcp:            89314 89392 89393 89394
The fuser command will list all the processes that are using the port 8000. The -k flag will kill all the processes listed above. I can now restart gunicorn by running gunicorn -w 3 elearning:app.
Auto-restart Gunicorn with Supervisor
It would be such a life-saver if there is a way that Gunicorn can be constantly monitored, such that it can auto-restart if it crashes. There is the software supervisor which can be installed on Ubuntu to help with this.
(venv)gitauharrison@bolderlearner:~/somasoma-eLearning-app$ sudo apt install supervisor
Once that is installed, I need to set up a supervisor configuration file.
(venv)gitauharrison@bolderlearner:~/somasoma-eLearning-app$ sudo nano /etc/supervisor/conf.d/somasoma_elearning.conf
This will open somasoma_elearning.conf in the nano editor. Update the file with this information:
/etc/supervisor/conf.d/somasoma_elearning.conf: Supervisor configuration
[program:somasoma_elearning]
directory=/home/gitauharrison/somasoma-eLearning-app
command=/home/gitauharrison/somasoma-eLearning-app/venv/bin/gunicorn -w 3 elearning:app
user=gitauharrison
autostart=true
autorestart=true
stopasgroup=true
killasgroup=true
stderr_logfile=var/log/somasoma_elearning/somasoma_elearning.err.log
stdout_logfile=var/log/somasoma_elearning/somasoma_elearning.out.log
I have began by giving my program a name, somasoma_elearning. Then I have set a directory from which I want to run the gunicorn command. I need to explicitly find the location of gunicorn within my application's folder. Line #3 will be responsible for running this gunicorn command.
I have added a few other configurations which are self-explanatory. The application will automatically start when the server is started, it will auto-restart in the event the application crashes. I have also provided a few log files for the application.
I need to save the file above before creating the log files below. This is achieved by pressing ctrl + X, type 'y' and hit enter on your keyboard.
(venv)gitauharrison@bolderlearner:~/somasoma-eLearning-app$ sudo mkdir -p var/log/somasoma_elearning
The -p flag will create any directory in the change if none exists. I will then create the log files.
(venv)gitauharrison@bolderlearner:~/somasoma-eLearning-app$ sudo touch var/log/somasoma_elearning/somasoma_elearning.err.log

(venv)gitauharrison@bolderlearner:~/somasoma-eLearning-app$ sudo touch var/log/somasoma_elearning/somasoma_elearning.out.log
I will then restart supervisor:
(venv)gitauharrison@bolderlearner:~/somasoma-eLearning-app$ sudo supervisorctl reload
Should you encounter an issue running the command above, such as error: <class 'FileNotFoundError'>, [Errno 2] No such file or directory: file: /usr/lib/python3/dist-packages/supervisor/xmlrpc.py line: 560, consider running the two commands below to fix it:
(venv)gitauharrison@bolderlearner:~/somasoma-eLearning-app$ sudo supervisord -c /etc/supervisor/supervisord.conf

(venv)gitauharrison@bolderlearner:~/somasoma-eLearning-app$ sudo supervisorctl -c /etc/supervisor/supervisord.conf

# Output
somasoma_elearning_app           RUNNING   pid 60456, uptime 0:00:13
supervisor> # Type "reload"
Really restart the remote supervisord process y/N? # Answer "y" for "yes"
# You should see "Restarted supervisord"
# Exit supervisor prompt using "ctrl + c"
If I exit my server (by pressing ctrl + Z or type "exit") on my terminal, I should still be able to access my application on http://139.162.221.92/. Sometimes it can take a while for the supervisor to start up that process.
And that is it! I have now completed manually setting up my application that can be accessed on http://139.162.221.92/ on any browser.
Delete Your Linode
If you want to delete your linode, for whatever reason, say it was just a test application, you can do so from your dashboard. Click the "Linode" tab, find the three dots next to your Linode, and click "Delete". It will ask you to confirm the deletion.
Being Logged Out of Your Server
For one reason or another, you may find yourself in a situation where you cannot log back in to your server. Given the fact that we have disabled root login and disallowed password authentication except through SSH, there is no way you will access your server. The reason for this situation may be that you recreated a new SSH key in your local machine and therefore the server does not have a copy of this. This will give you a ... permission denied (publickey) error. To fix this, you can use your Linode Shell terminal on the web to make these changes. In your linode (dashboard), just before the elipsis, there is "Launch Lish Console" aka "Weblish". You can use this to perform the necessary actions to restore access to your server.
Rebuild Your Linode
It is not uncommon that at one point we fry our servers. It may be during routine maintenance, or it may be due to a bug in our code. In either case, we need to rebuild our server. By rebuilding, we will end up with a fresh install of our application, and still maintain our current IP address. We will need to set up whatever configurations we'd like to have and any software we'd still need.
To begin the rebuild process, navigate back to your Linode Dashboard manager. Click on the "Linode" link in the sidebar to access a list of all your available linodes. At the end of each Linode's row, there is an ellipis for more options. Click on the ellipsis to access "Rebuild". Complete the registration form by providing needed information.
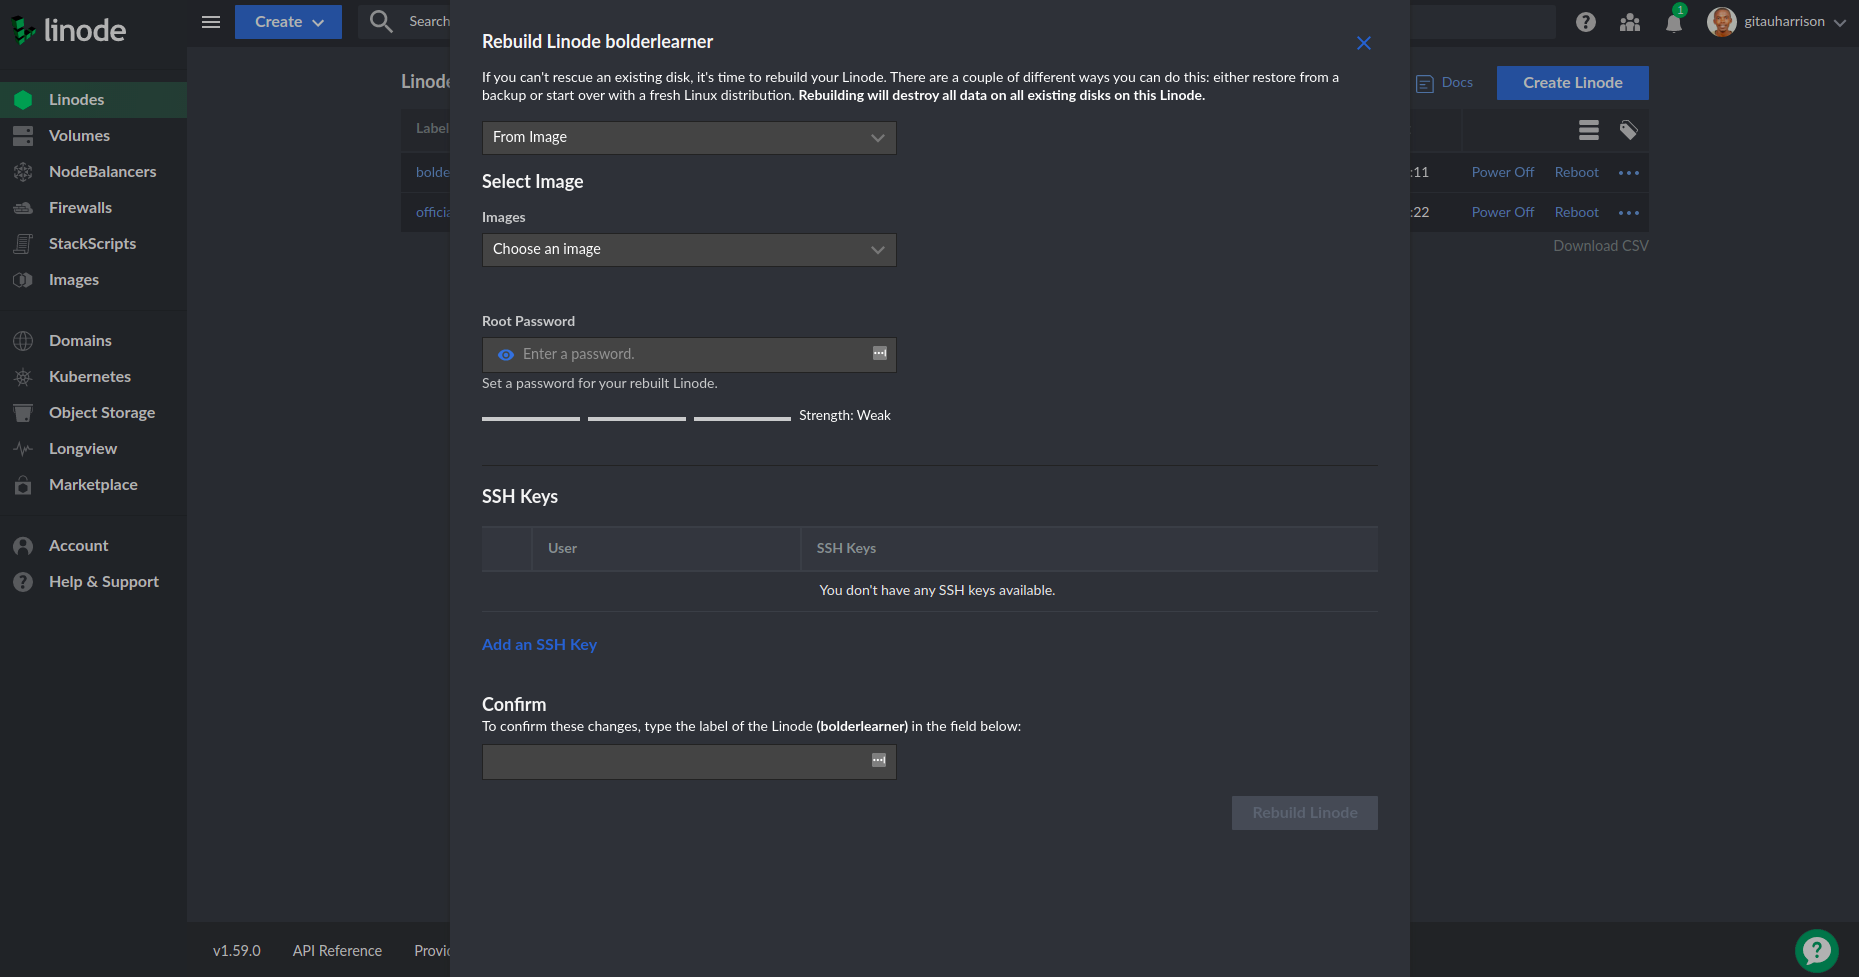
Click the "Rebuild Linode" button (after you have properly filled the form) and the rebuild process will begin almost immediately. If you were currently logged in to your server, you will notice that you will be automatically logged out.
It might takes several minutes for the rebuild to complete. You can check the status of the rebuild process in the "Activity Feed" tab to monitor and confirm that the rebuild has completed. Once the process is successfully completed, any attempt to login to your previously existing linode server will give you an error.
$ ssh gitauharrison@139.162.221.92

# or ssh root@ssh root@139.162.221.92


# Output

@@@@@@@@@@@@@@@@@@@@@@@@@@@@@@@@@@@@@@@@@@@@@@@@@@@@@@@@@@@
@    WARNING: REMOTE HOST IDENTIFICATION HAS CHANGED!     @
@@@@@@@@@@@@@@@@@@@@@@@@@@@@@@@@@@@@@@@@@@@@@@@@@@@@@@@@@@@
IT IS POSSIBLE THAT SOMEONE IS DOING SOMETHING NASTY!
Someone could be eavesdropping on you right now (man-in-the-middle attack)!
It is also possible that a host key has just been changed.
The fingerprint for the ECDSA key sent by the remote host is
SHA256:...............
Please contact your system administrator.
Add correct host key in /home/harry/.ssh/known_hosts to get rid of this message.
Offending ECDSA key in /home/harry/.ssh/known_hosts:10
    remove with:
    ssh-keygen -f "/home/harry/.ssh/known_hosts" -R "139.162.221.92"
ECDSA host key for 85.159.212.84 has changed and you have requested strict checking.
Host key verification failed.
Thankfully, there is useful feedback on what we can do to fix this issue. In my case, I need to remove the offending host key from my known_hosts file. This key can be found in /home/harry/.ssh/known_hosts. Of particular interest is line number 10. I will open this file in nano and remove the offending line. Press ctrl + x, type 'y' and hit enter to save the edits.
Now, if I SSH into my linode server using root, I should be able to access it.
$ ssh root@139.162.221.92


# Output

The authenticity of host '139.162.221.92 (139.162.221.92)' can't be established.
ECDSA key fingerprint is SHA256:..................
Are you sure you want to continue connecting (yes/no/[fingerprint])?
From here, I can begin to reinstall my flask application afresh.
Going Further
Congratualtions on coming this far. I hope you have been able to get your application up and running on your server. The next thing that I would like to share with you to complete this process would be how to get yourself a domain name. You can agree with me that 139.162.221.92/ is difficult to remember. Rather, I would like to rename that IP address to something anyone can quickly remember, such as bolderlearner.com. Check the reference section atop this tutorial to navigate to the next step.
Share
If you enjoyed this article, you can share it with another person.
TweetNewsletter Subcription
Level up your skills.
We take your privacy seriously. Read our privacy policy. Unsubscribe | Resubscribe.